|
This card was created with a few items that I have not played with in a while. Sometimes I like to dig into my supplies and revisit some of my old favorites to get my creative inspiration flowing again! I also try to play around with different looks and styles than my usual feminine, clean and simple style.
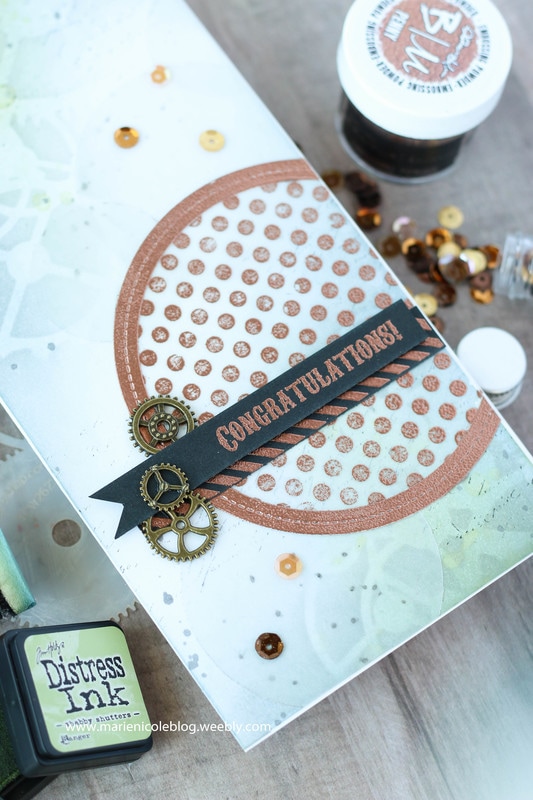
This card is still quite simple, as it doesn't have a ton of embellishments, but the background makes it stand out. 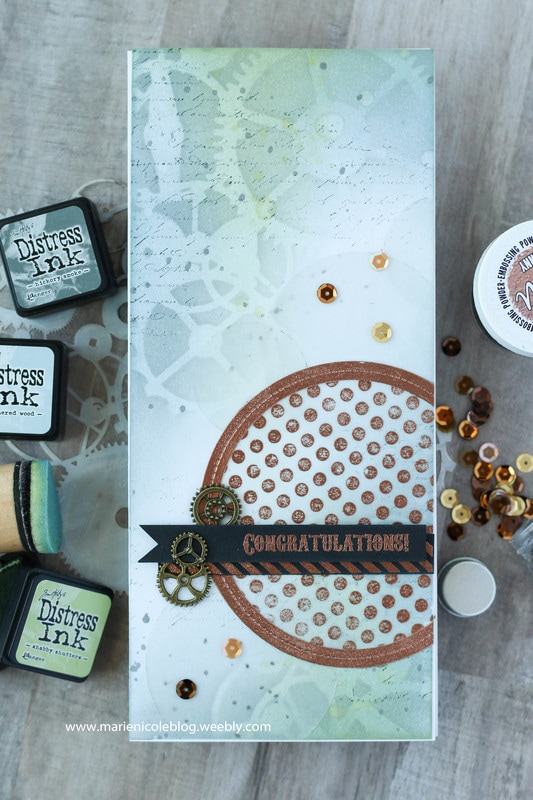
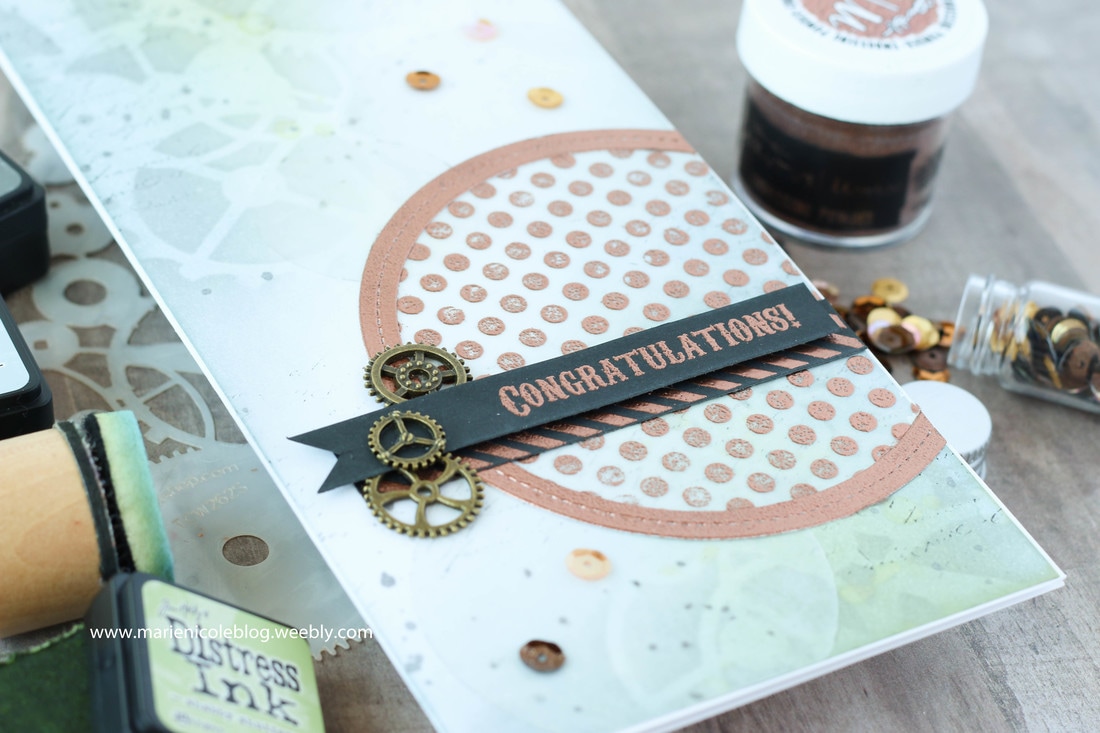
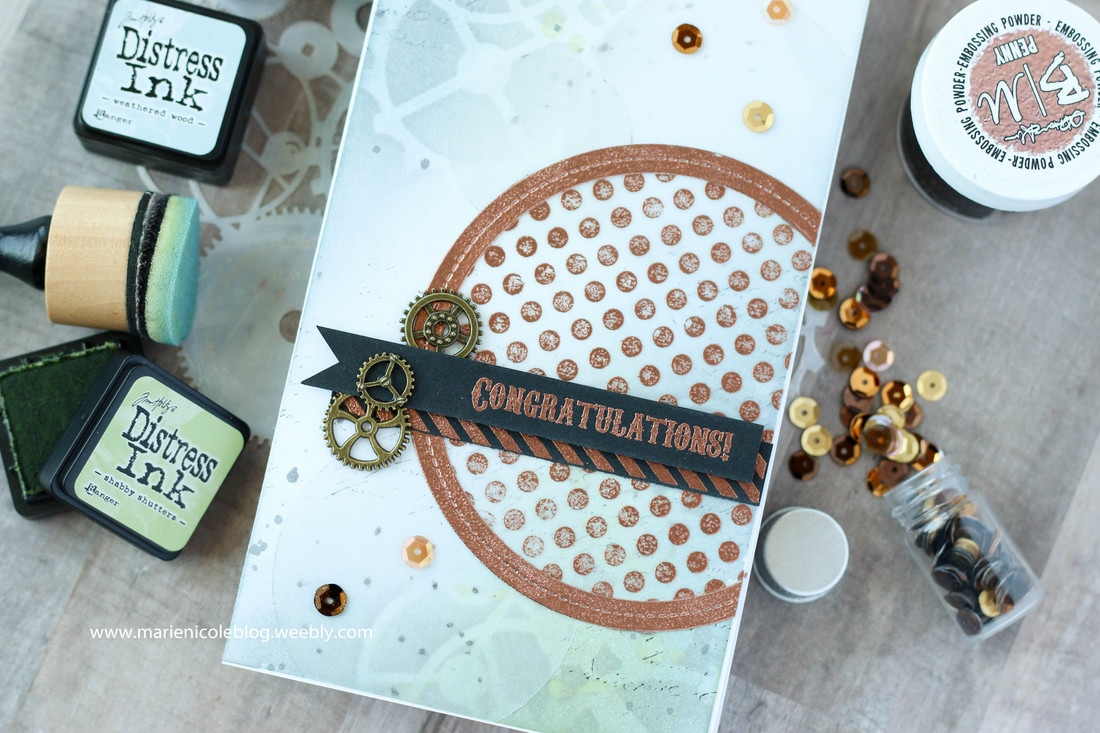
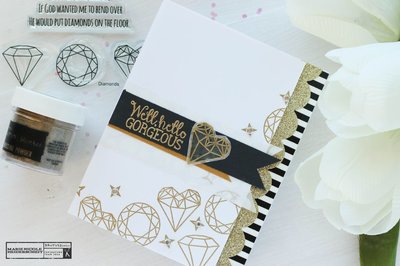
I began with a Long and Skinny card base from Canvas Corp Brands. Then, I stenciled some Hickory Smoke Distress Ink over my TCW Gears Stencil. After removing the stencil, I added some Weathered Wood over the Hickory Smoke. It gave a grey-blue color that reminded me of metal gears. Next, using my fingers and a paintbrush, I flicked on some water droplets to get the ink moving. After that was dry, Shabby Shutters Ink was blended over the top, highlighting where those droplets had been. Then, to add just a little more interest, I also stamped some faded text using Black Soot Distress Ink.
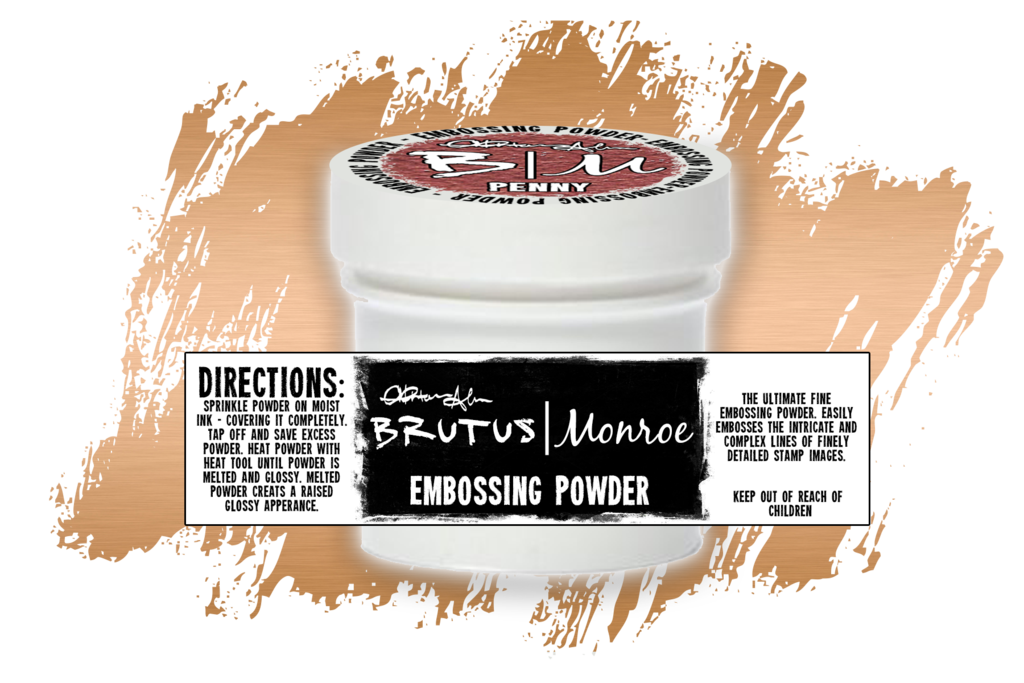
Next, using some Lawn Fawn Circle Frame Dies, I cut out several different sizes of circles from vellum. The big circle was stamped with a polka dot stamp and embossed with some Brutus Monroe Penny Embossing Powder. I love this copper powder- it shines just like the metal! I also embossed one of the frames to adhere around the circle so that it would make the big one stand out. The other circles where adhered in the background. They are very subtle, but the add some interest without taking away from the background. 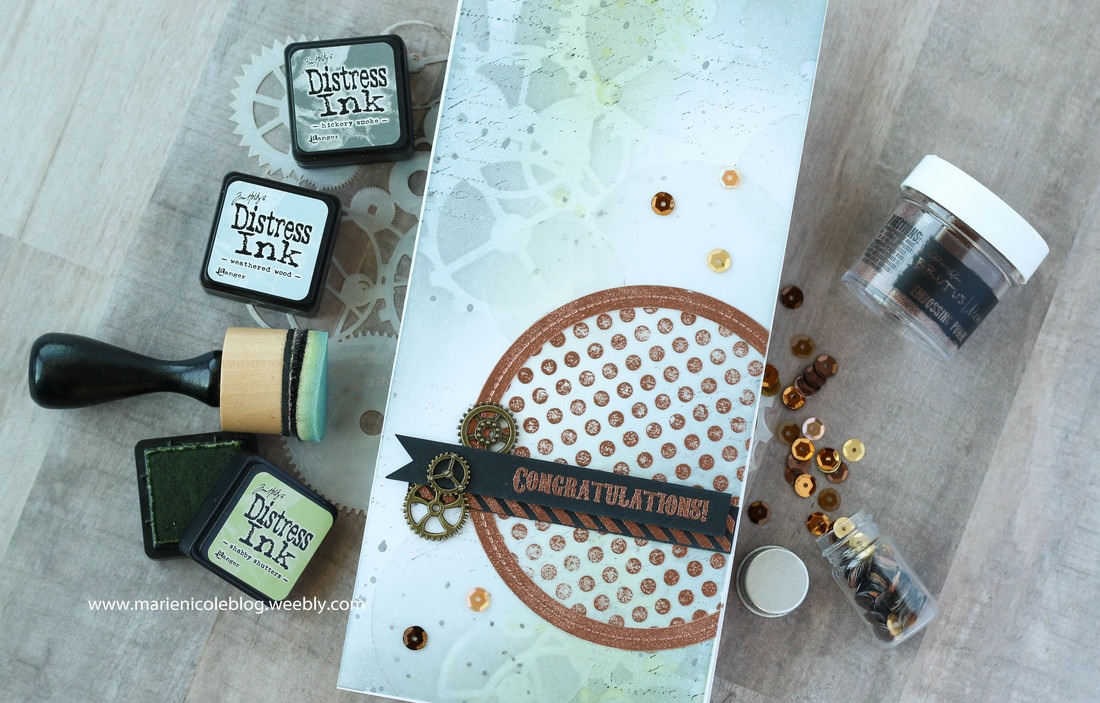
The sentiment was also stamped and embossed in Penny, as well as a strip of black cardstock that was stamped with a striped pattern. To embellish, just a few bronze gears were added, and then a few gold sequins. Like I had mentioned, its a different style than my normal girly cards, but I like it! It would be a great card to give to guys to celebrate and achievement. Thanks for stopping by today! If you are interested in any of these items, please check out the links below!
More from Marie Nicole...
0 Comments
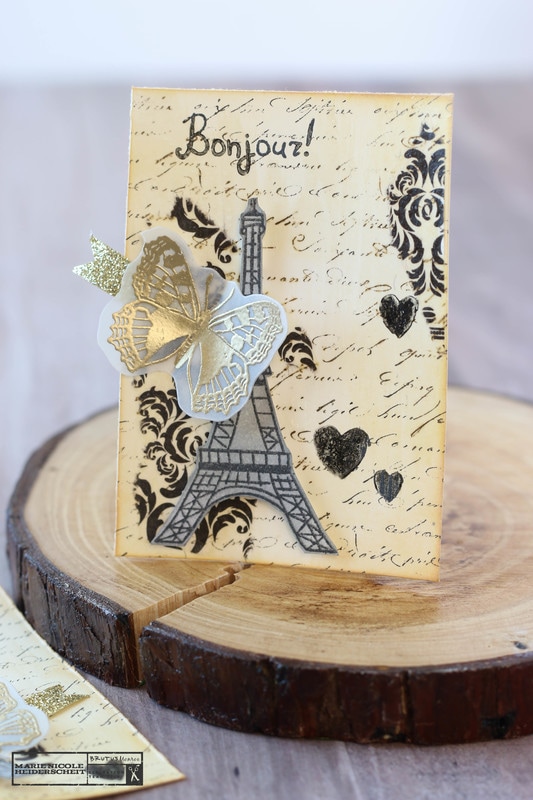
ATCs can be a fun way to create a lot of projects for your crafty friends at once. A typical ATC is 2.5x3.5 inches. They are little cards that you can decorate, either all the same or each one unique, and then send or give to friends. For these ATCs, the Brutus Monroe stamp set, From Paris with Love, was used to give more of a vintage Paris feel. The base for these is some Canvas Corp Ivory Cardstock cut down to size. Then, some Damask Tissuestock was adhered down using Tattered Angels Clear Glimmer Glam. Over the tissuestock, I used a French Script background stamp that was inked up with some Raven Detail Ink. 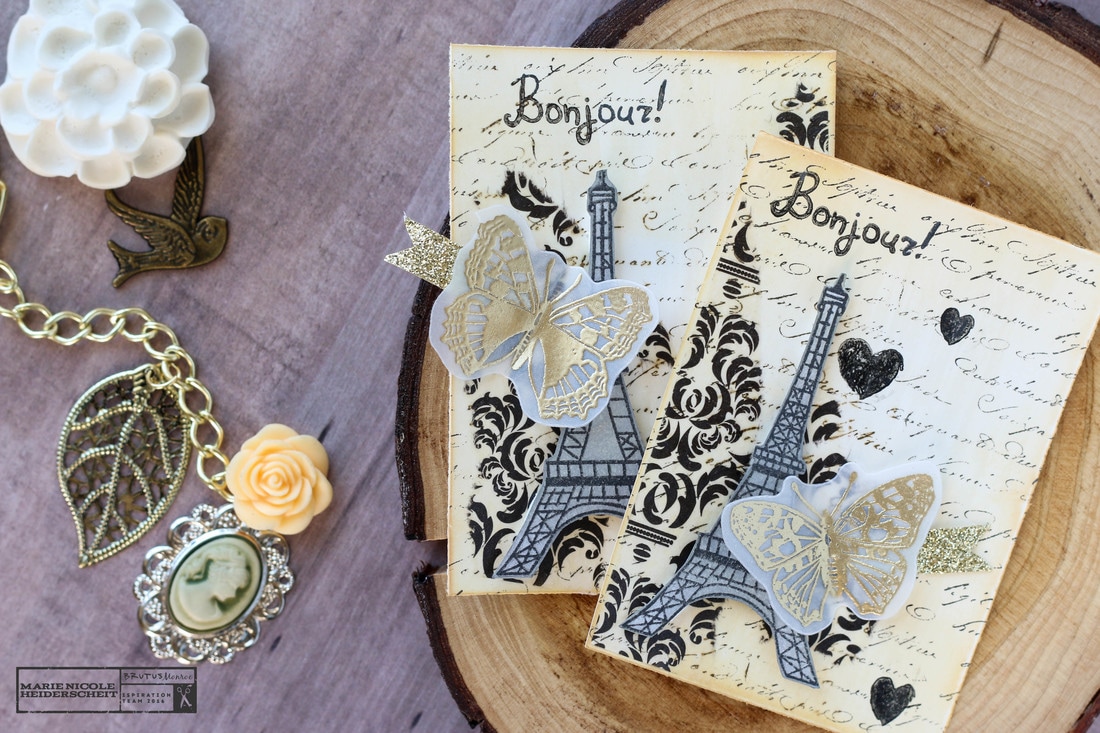
The sentiment and the Eiffel tower image are both from the Brutus Monroe stamp set. I stamped the Eiffel tower using my new, all-time favorite tool the Misti, then fussy cut it out and then colored it with some Hickory Smoke Distress Ink. To add some glitz and glam, some glitter washi tape and a gold embossed vellum butterfly added just the right finishing touch. These were so fun to create and send away to the rest of the Brutus Monroe Inspiration Team. There are so many more fun images on this stamp set and I can't wait to get my hands on them and create some more! I'll also be linking this up with: Simon Says Stamp's Monday Challenge!
More from Marie Nicole...Creativation 2017 was such an exciting and amazing experience! So many new memories were made from helping Canvas Corp Brands set up their booth, to walking the show floor and seeing the major craft companies showcase their new products. One of the new products that is definitely a show stopper is 7Gypsies' new Architextures. These are a variety of vintage-inspired pieces that can be used for mixed media, cardmaking, papercrafting, and anything you can think of! There are rub-ons as well as self adhesive pieces that include vintage Mason jars, dressforms, lanters, trucks, chicken wire, and SO MUCH more! These pieces are meant to look and feel like the real thing. You can see through the glass of the mason jars, and the dress form feels soft just like a real fabric dressform would. CCB had a "Create and Take" table where some of us designers could sit with customers and just create with the new pieces. This little tag here is one that I created with some of the new 7Gypsies Architextures. 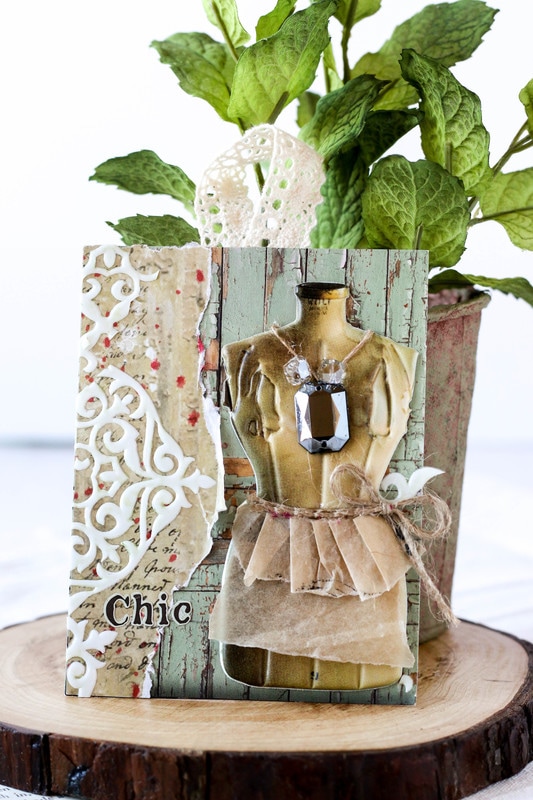 What's so cool about this piece is that the background is actually made from the Architextures packaging. 7Gypsies cleverly created the packaging to be these amazing designs so that you can cut and create with them, as well. It definitely adds more value to the product! Since the dressform is self-adhesive, it was just adhered down onto the background. Then, with some tissue paper bits and a little bling, I was able to dress her up a bit. The details along the lefthand side is just some torn paper and then bits of another design of Architextures that I cut and pieced together. To finish the tag, I added a few sticker letters to spell the word, "Chic" and then added a lace loop at the top. 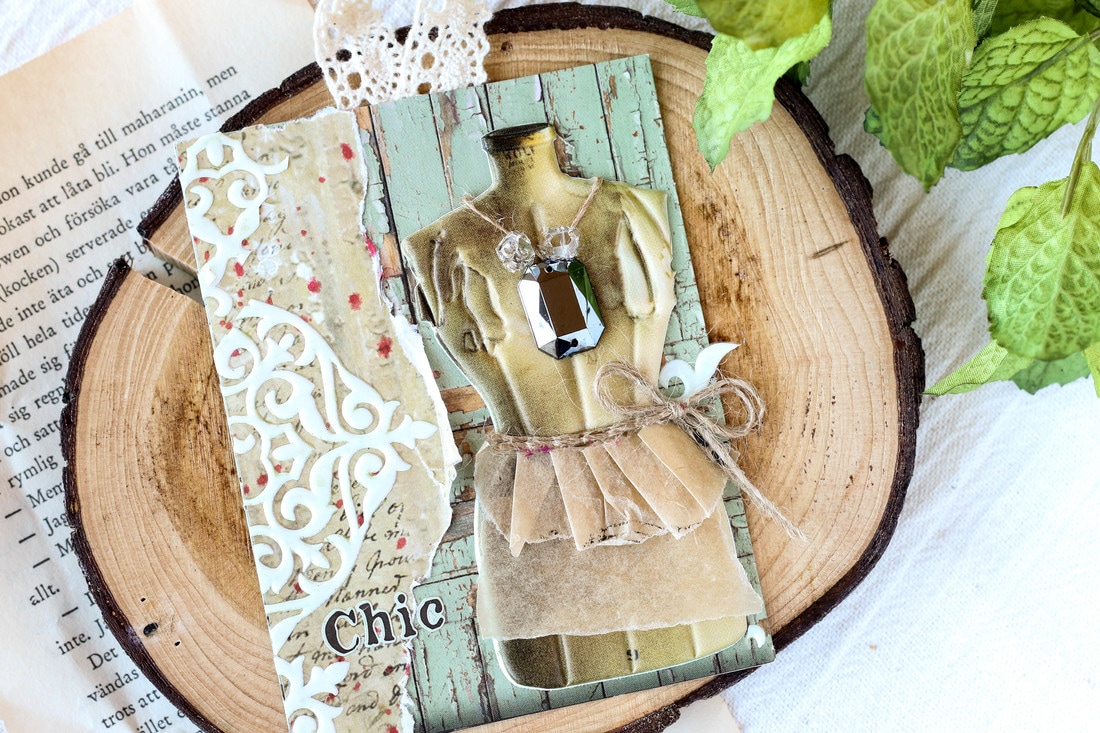 These Architextures are so much fun to play with! If you are interested in getting your hands on some, they should be available in the Canvas Corp Brands' shop on February 2, 2017. Keep your eyes peeled for them! Im sure we will see some amazing creations coming up using these 7Gypsies Architextures! More From Marie Nicole...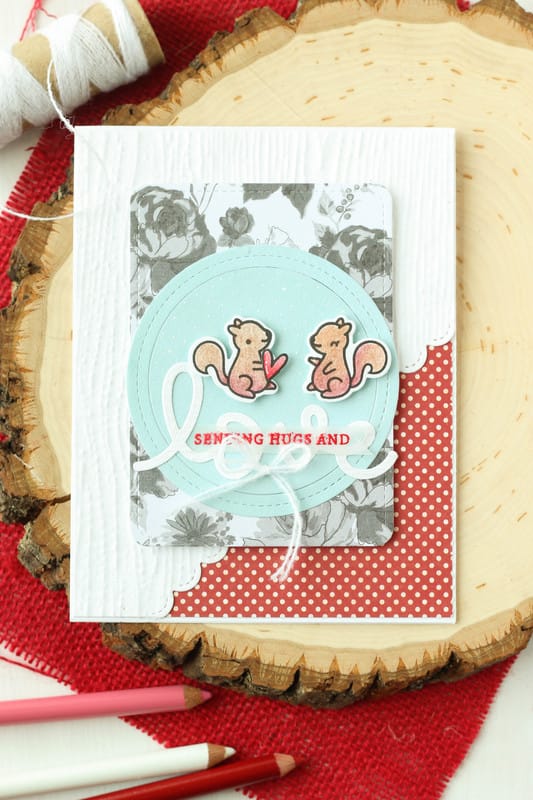
Did you get any fun crafting supplies for Christmas? I received a few items this year. The cute little squirrels on this card are from Lawn Fawn's Cheery Christmas stamp set. I stamped them out with Versafine Black ink and then colored them in with my new Prismacolor pencils. I have to say, I am LOVING these new pencils for coloring my stamped images. I am not that great at watercoloring, especially on regular cardstock. I dont like when the paper warps when you add water to it. These pencils blend great and work on my cheap cardstock. I used the coordinating dies from the stamp set to die cut the squirrels and the little heart. Then, I used Lawn Fawn's Stitched Circle Frame Dies to cut out the circle from some blue paper. I adhered that down to some floral paper that I also die cut, using the Stitched Journaling Card die from Lawn Fawn, as well. All my papers I pulled from my scrap bin. I am trying my best to use up scraps! I then cut the background white paper on an angle with the Stitched Border dies, and ahdered it over some red polka dot paper that peeks out on the bottom right corner. I then added the sentiment, the squirrels, and some white twine to the front, and placed the whole stitched journal die cut piece to the front of the card with foam adhesive. Cute, easy card that has a Valentine's Day feel to it, without being too overly red and white. 
Thanks for checking out my card today! I have been slacking on making YouTube videos lately with the business of the holidays, but I hope to get back into it soon! If you are interested in some of the items I used on this card, I've included some links below. Happy Crafting!!
Check out these other fun posts!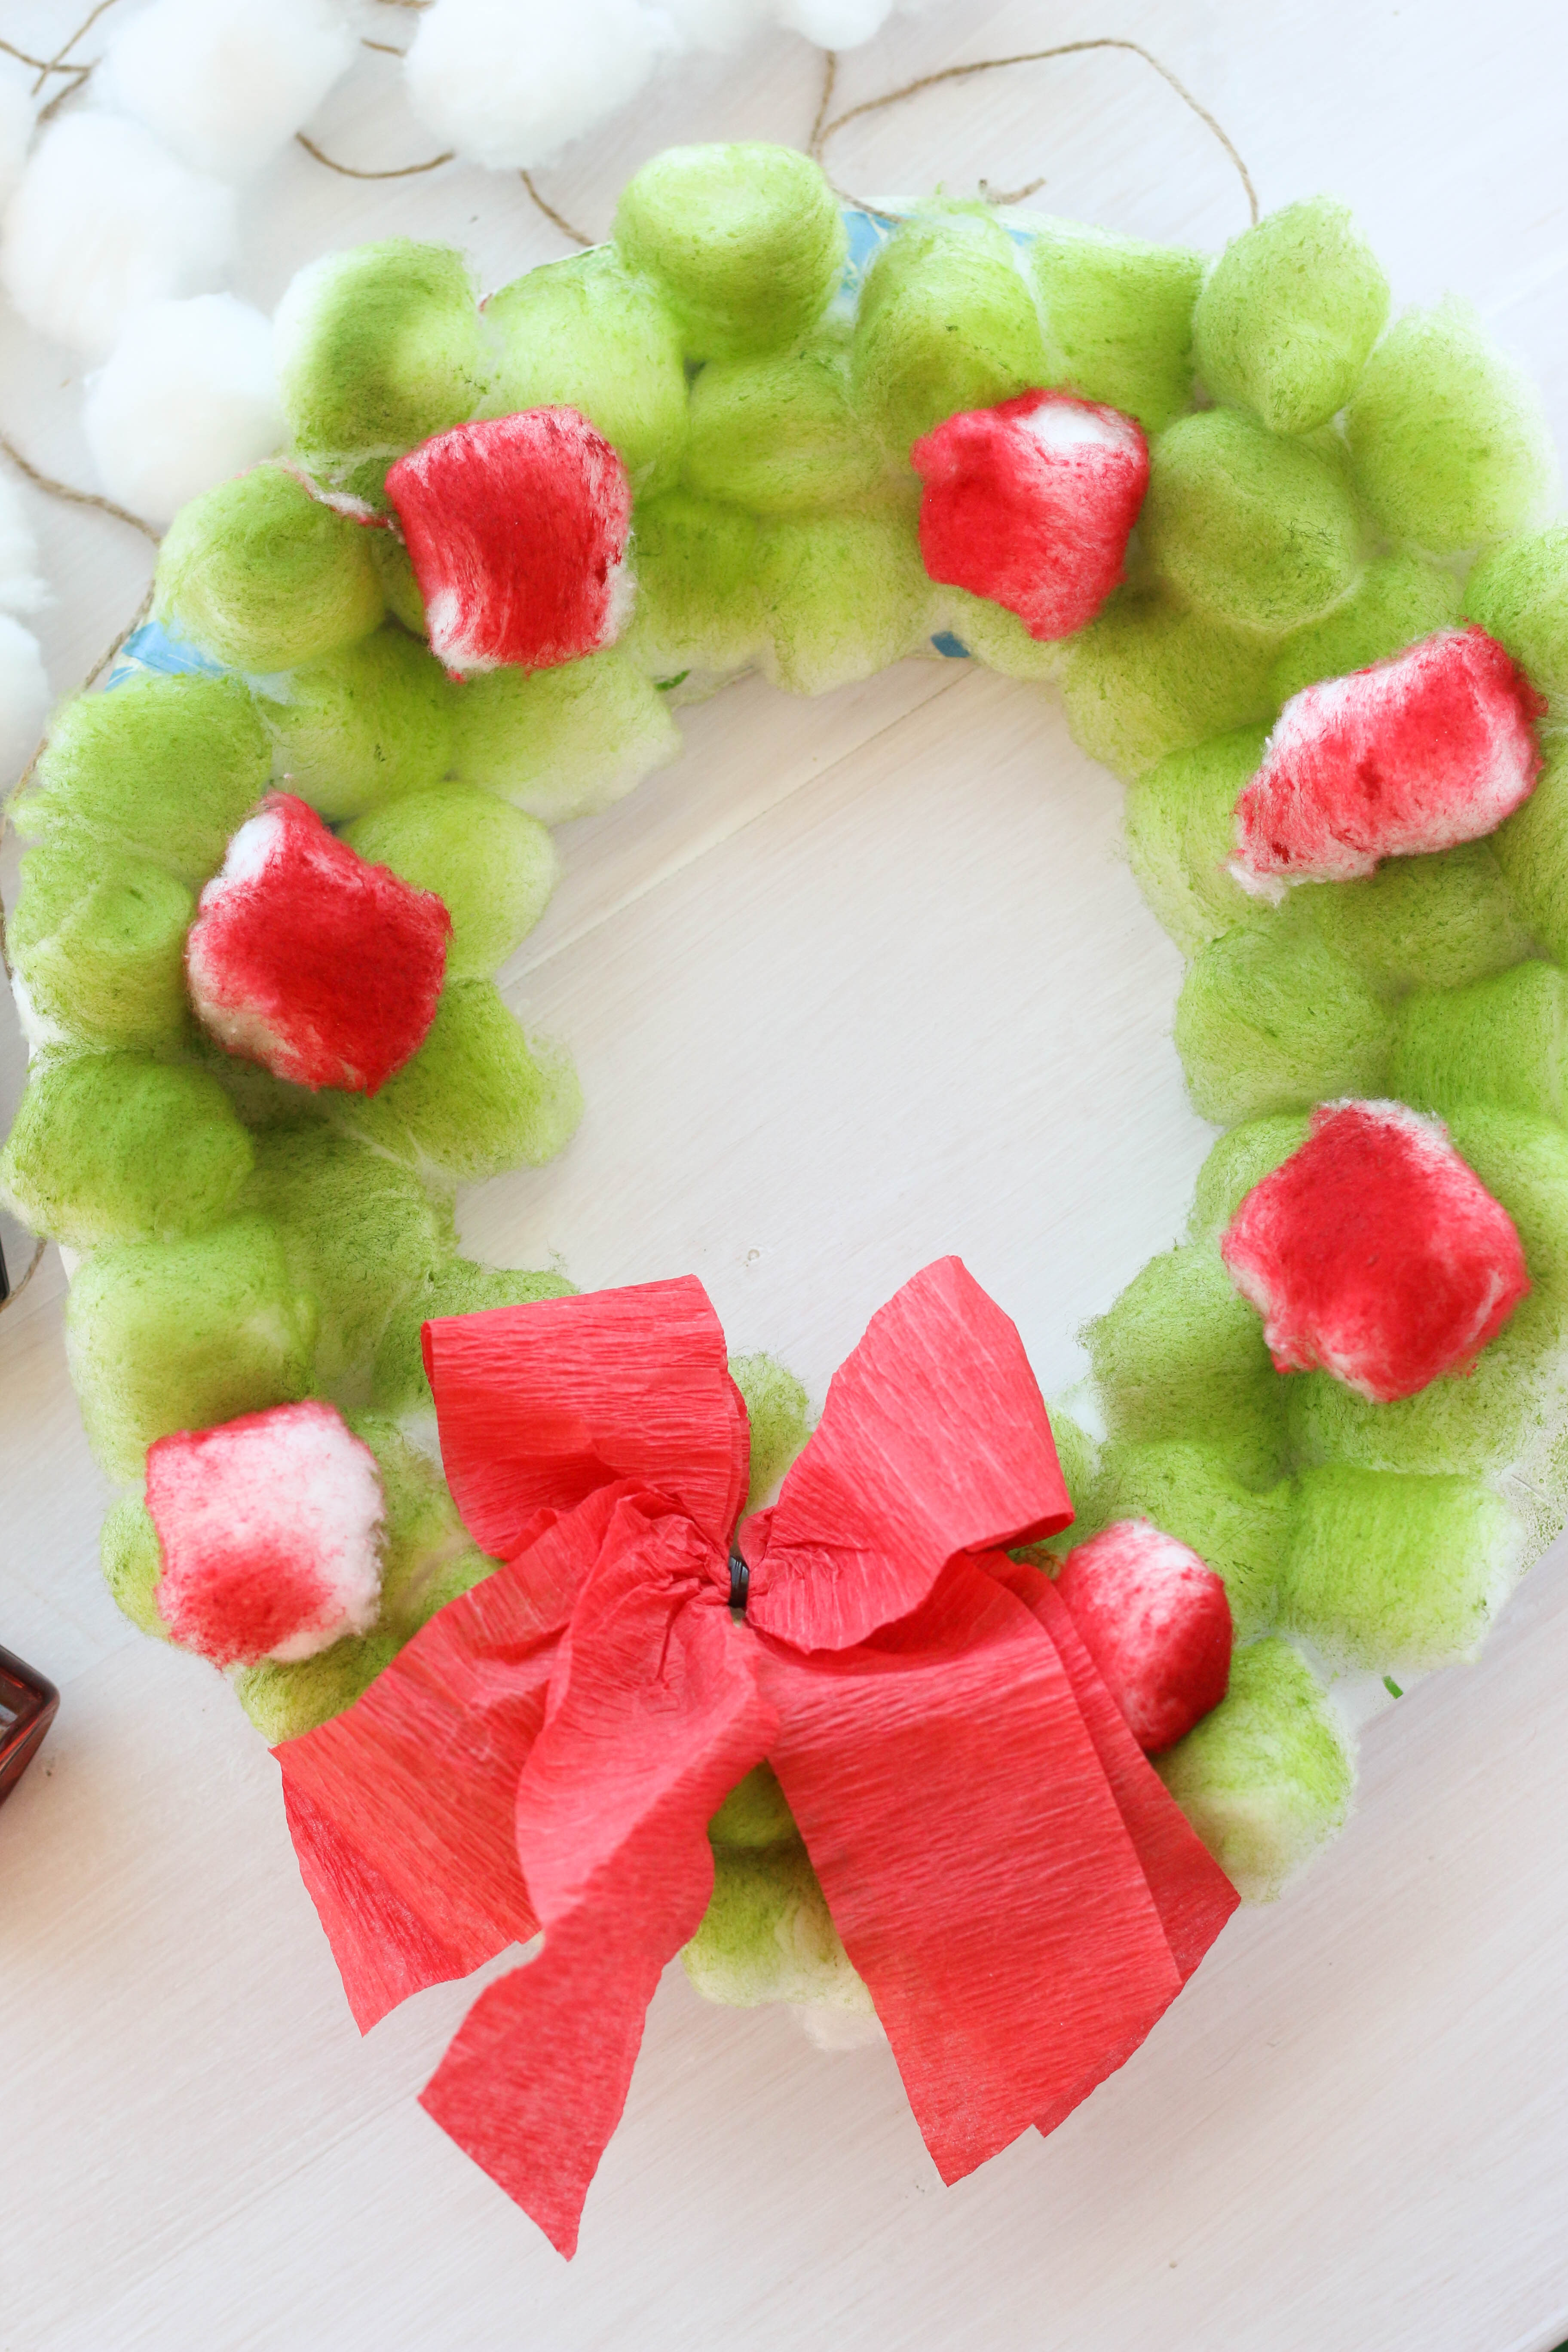
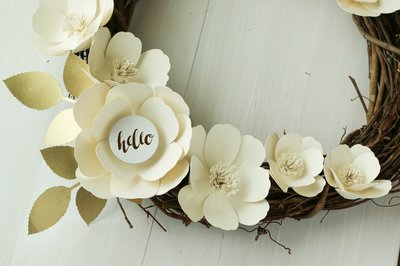
Christmas is coming soon, and as much as we crafters and DIY-ers love to make our own home decor, lets not forget about our kids!
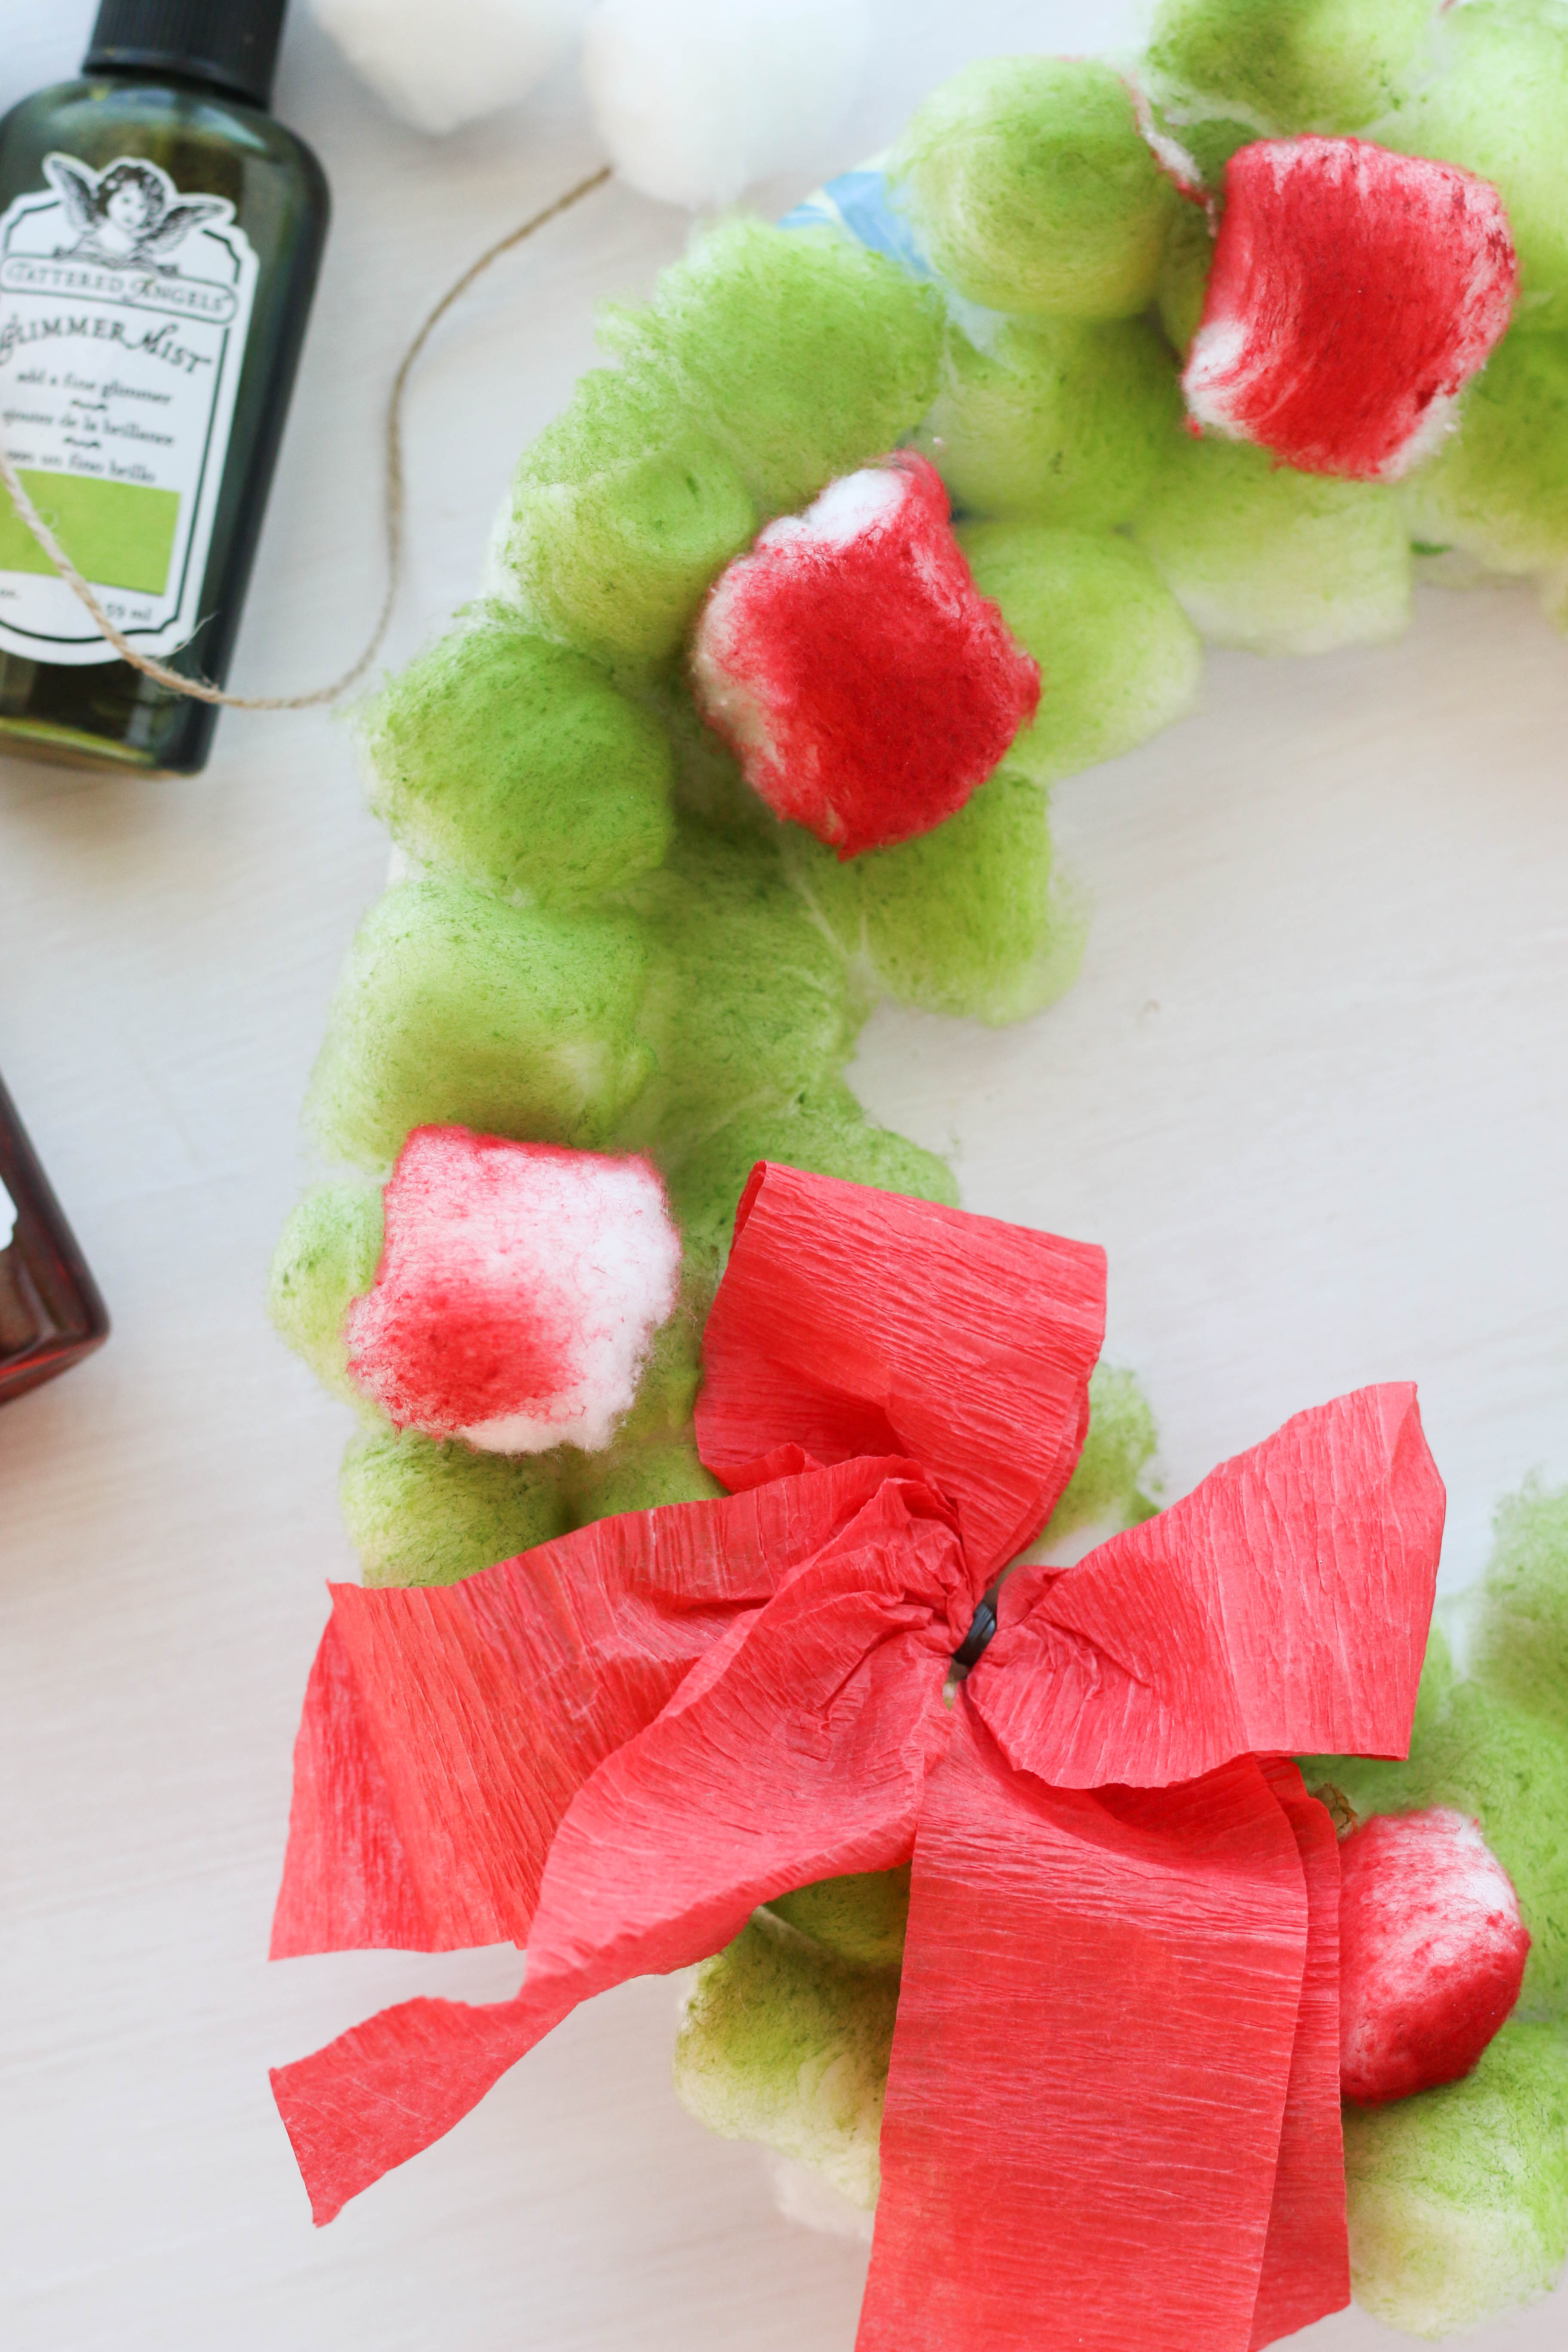
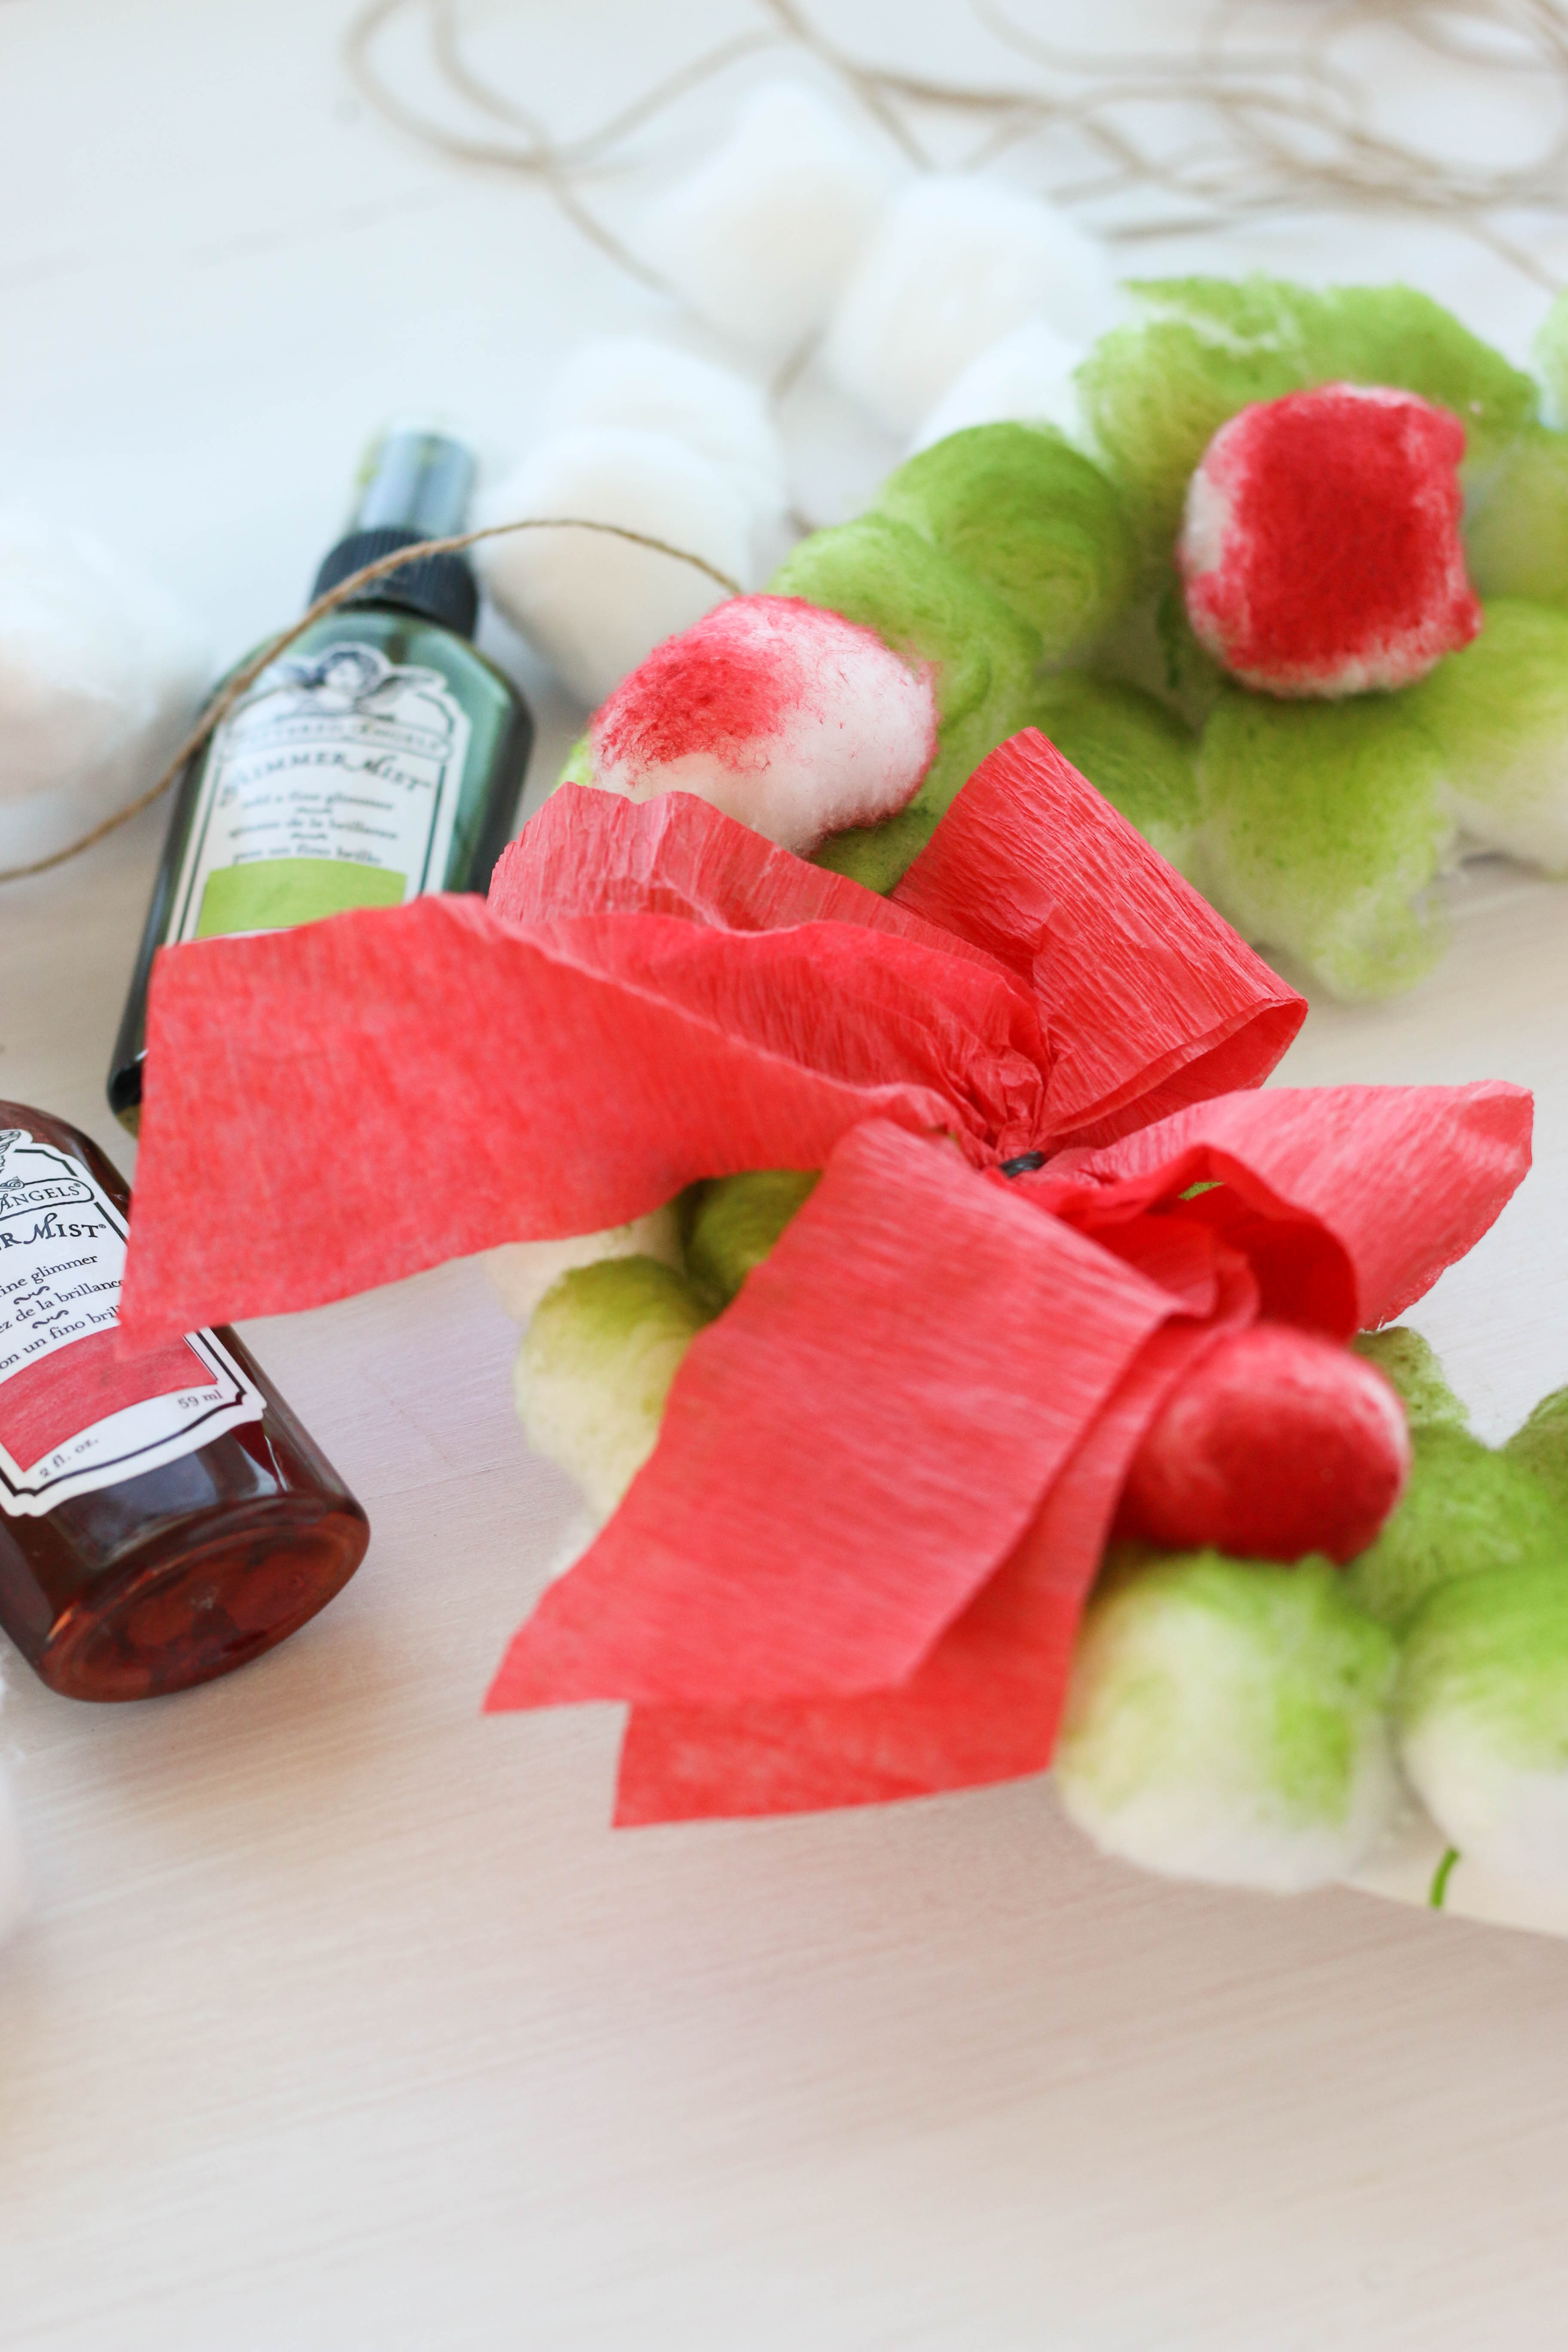
My toddler is getting to where he is curious about my craft room and the things in there. Doesn't bother me a bit! I think its fun when we can do a craft together, especially on a day that we are stuck inside. This project is super simple and you probably have most of these inexpensive items on hand already. All you need is: A paper plate Cotton balls Glue (I used Aleene's) Tattered Angels Glimmer Mist A box, towel, or some other kind of table covering Ribbon and embellishments String or cord 
Start by cutting a hole out of the center of the paper plate. Dont worry about making a perfect circle, you wont see it anyway after the cotton balls are glued on. After your plate center is cut out, glue on the cotton balls to completely cover the surface of the plate. Now comes the fun part! Spraying! I took a cardboard box to place our wreath in to contain the spray, but you could use an old towel, some kraft paper to cover your table, or even take it outside to spray. Go ahead and spray all over your cotton balls in any color you wish. I used Moss Glimmer Mist. I also sprayed a few single cotton balls using Lobster Glimmer Mist because I wanted to glue them on to look like berries. 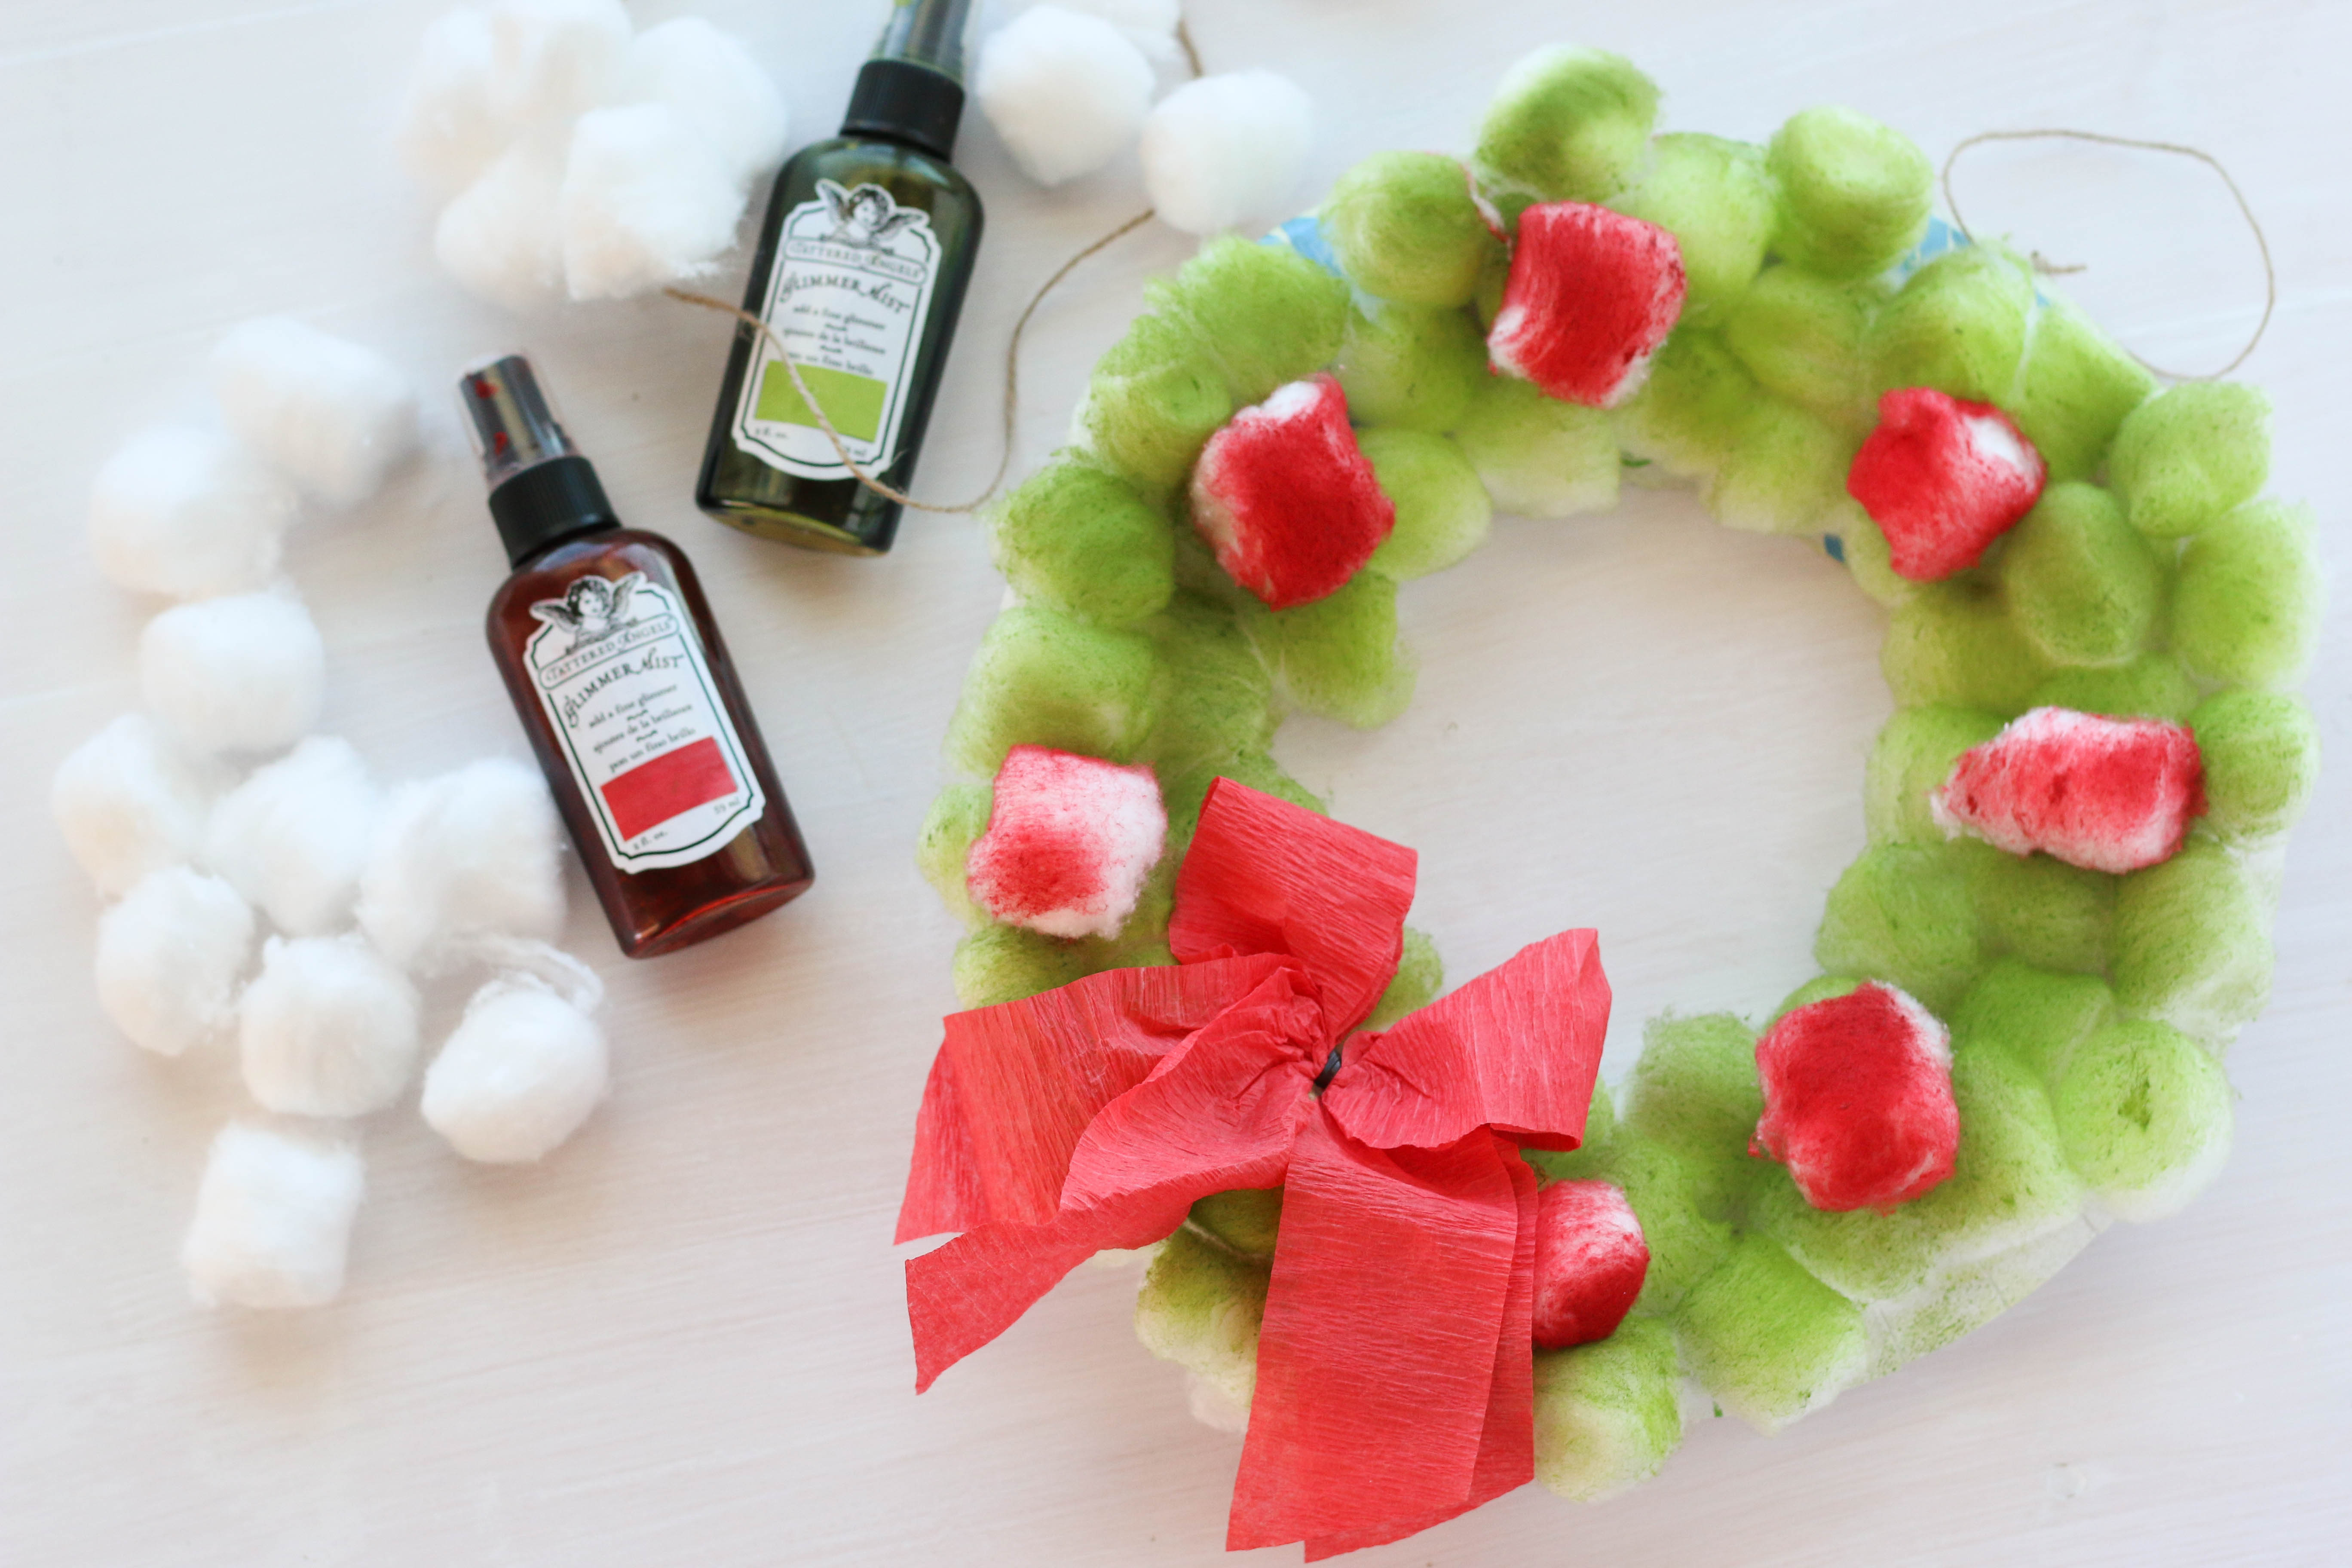
Now, I will warn you, the cotton balls take a little time to dry. They are meant to suck up moisture so go ahead and spray them, let them dry, and come back later to finish!
I glued on the red cotton balls around the wreath and then took some red crepe paper to create a bow for the bottom. Then, all you need to do is punch a hole in the top of the paper plate and add a string to hang it by! Super easy and its something the kids will enjoy! You can get creative with the different embellishments you put on the wreath. Try glittery ribbon, little Christmas bells, leaves, and anything else you have on hand! The kids will love using their creativity! I think it would also be fun to add a photo in the middle and give it to the grandparents. Grandparents love this kind of thing, right?? I did take a video of the process while I was doing this craft with my son. My toddler is almost two, and this is totally appropriate for his age but you can also use it for older kids as well! With a little help with the glue and the spraying my son had no problems doing this (other than just being distracted by all the other cool toys in Mommy's craft room). Hope you enjoy the video! Thanks for stopping by today! I hope this gives you some fun ideas you can do with your kids or in your classroom. Happy Crafting!!! If you are interested in theBrutus Monroe Chalk Ink that I used in the video, I've included a link below: 
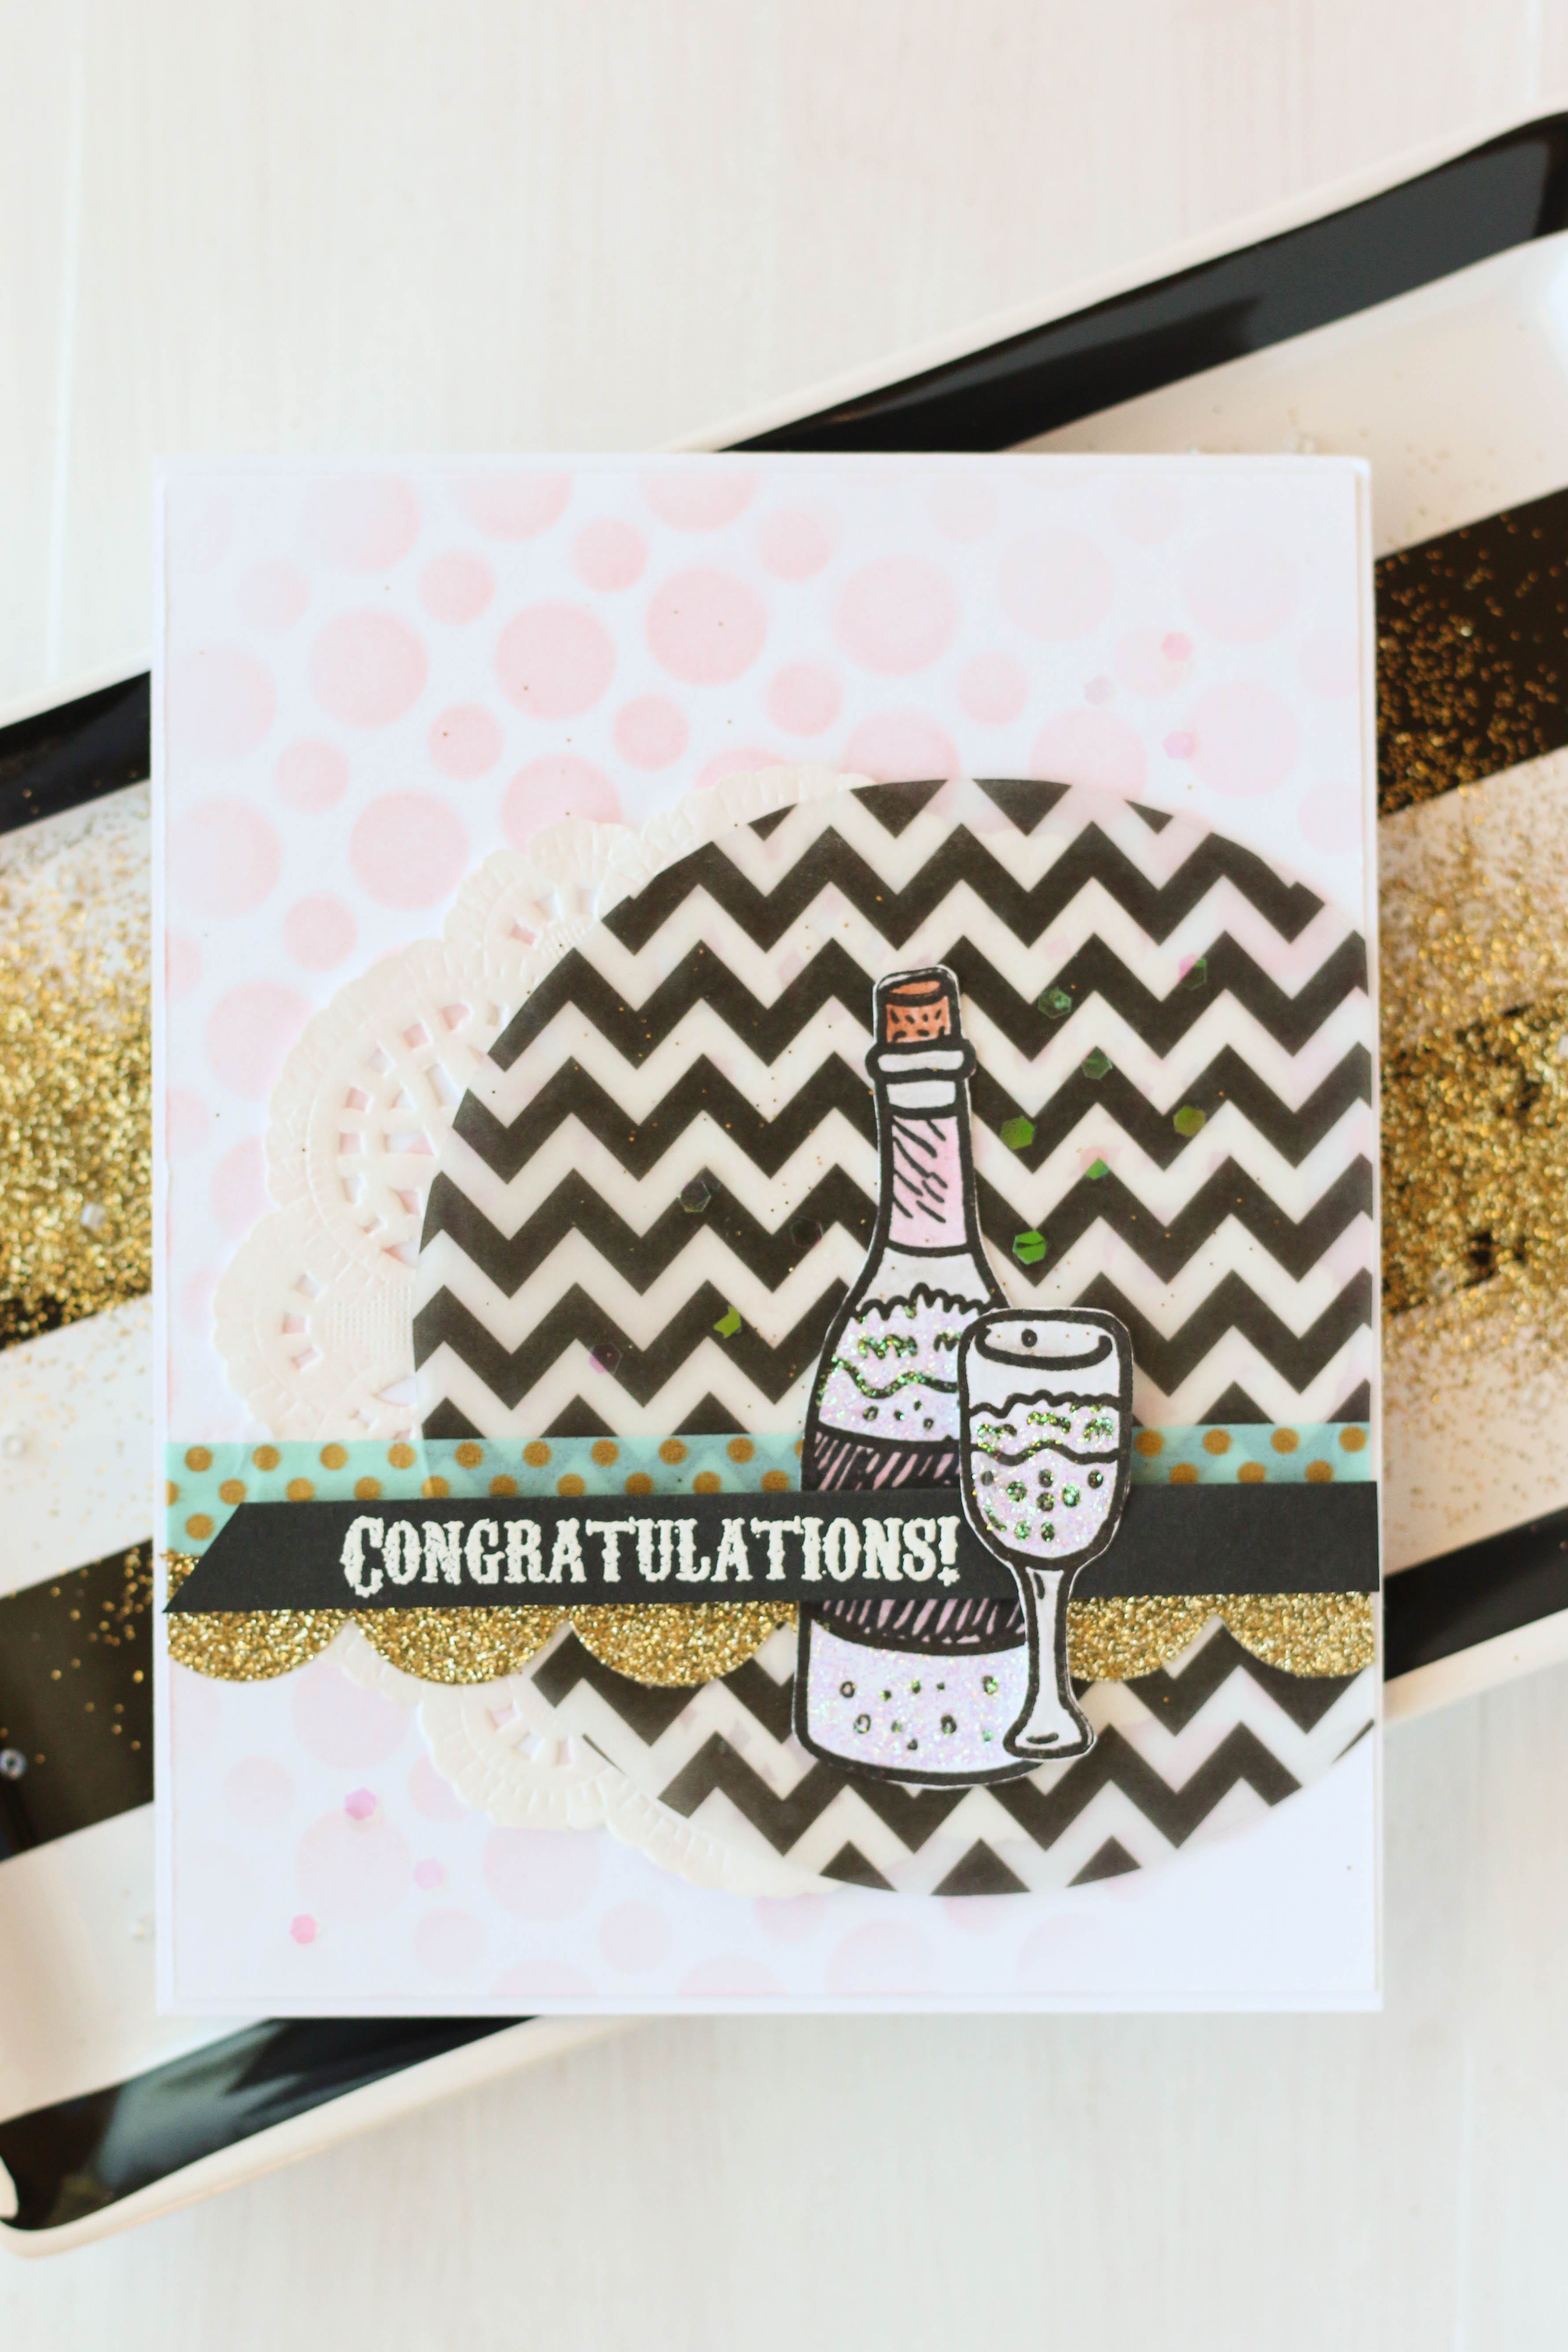
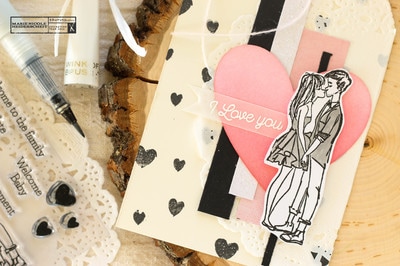
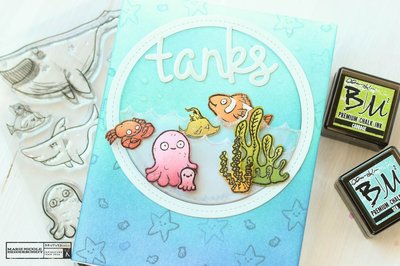
Brutus Monroe offers a great deal with the monthly Stamp Club. Each month, there is a special stamp designed by Christopher Allen and it is totally unique to the stamp club, so it wont be available in the store. December's stamp this year is this fun bottle and glass image.
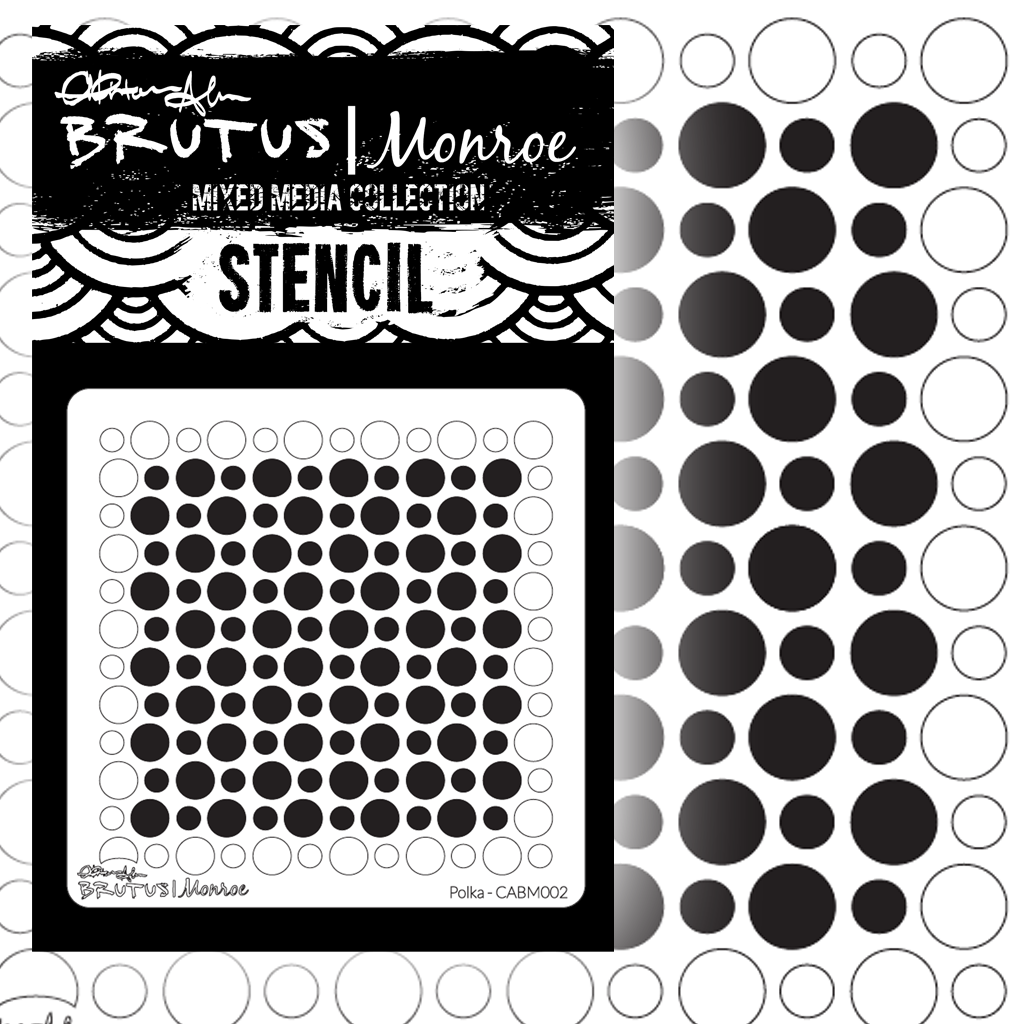
I stamped out the image, fussy cut it out, and set it aside. Then I started building the base of my card. I stenciled some light pink circles on the card base usingBrutus Monroe's Polka Mixed Media Stencil. I thought the circles kind of looked like bubbles. I then cut out a large circle from a chevron piece of vellum paper and layered it off to the side with a paper doily behind it. Then I added some fun washi tape. The gold tape I ran through my Sizzix with my Scalloped Border Die from Lawn Fawn. 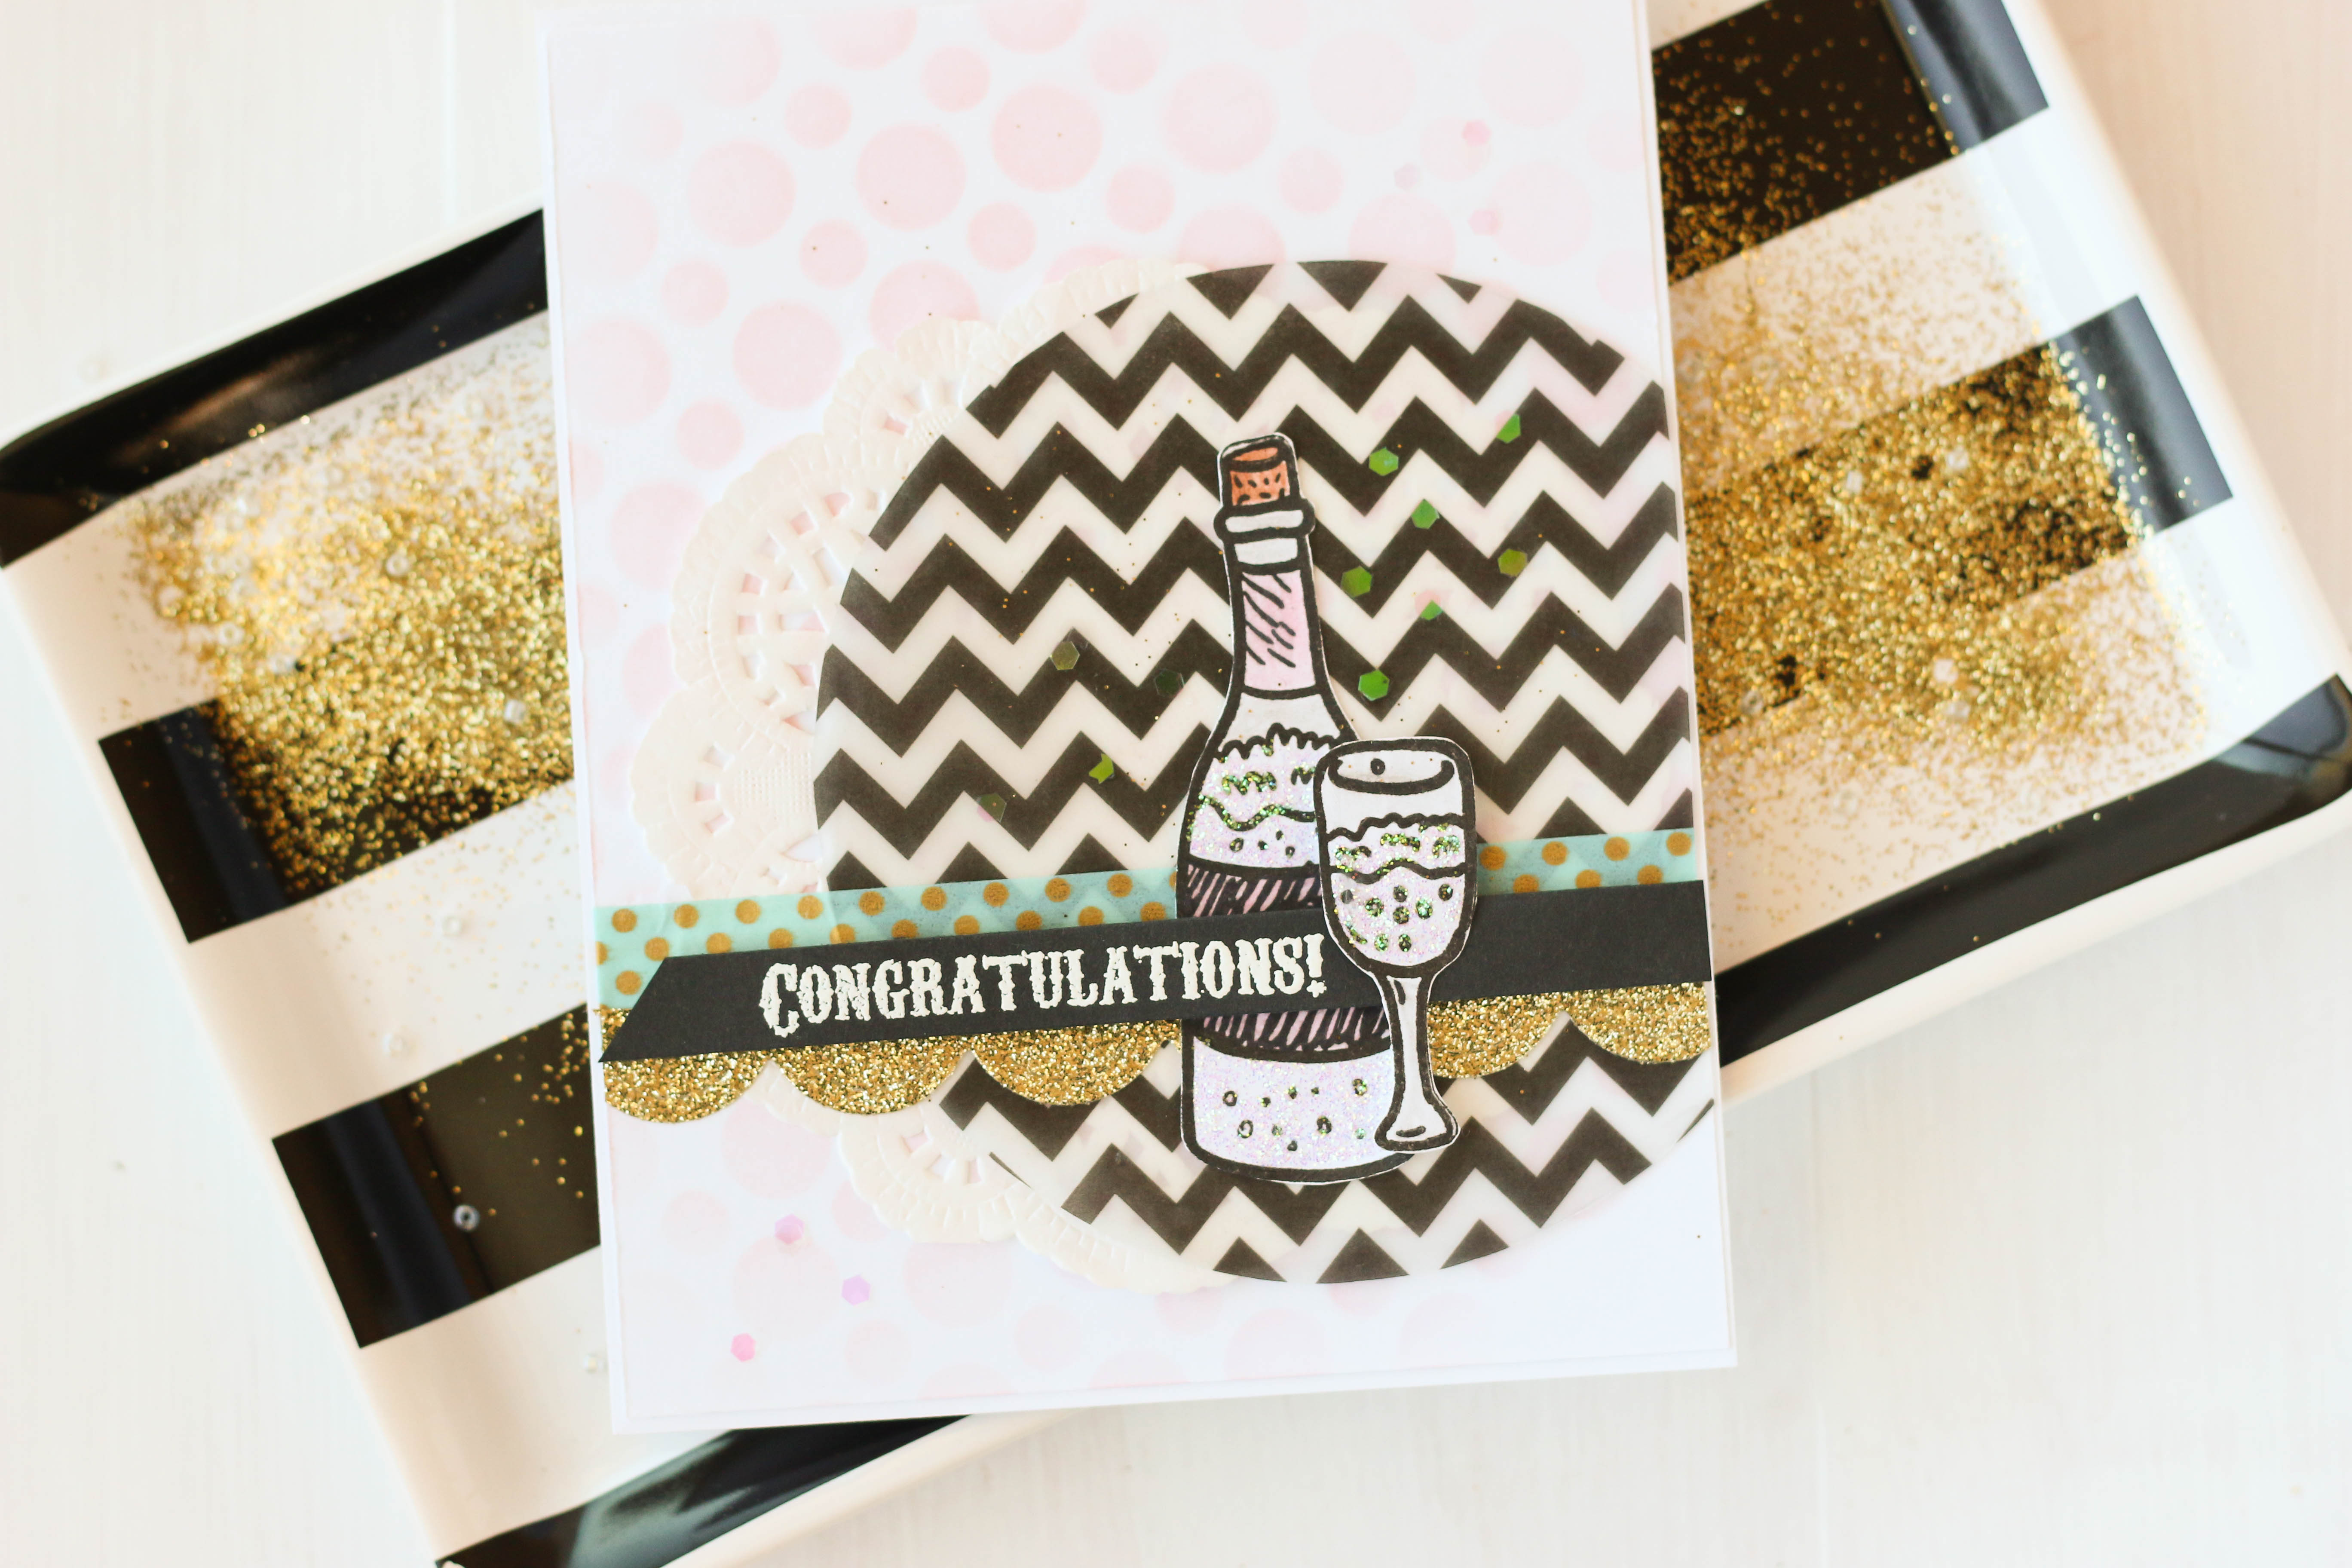
I then adhered the bottle down over the washi tape. I stamped the word "congrats" on a thin piece of black cardstock, and embossed it in white. I stuck it down over the bottle using a few pieces of foam adhesive to give it some dimension. Then, I added the glass off to the side and over the sentiment strip, again using some foam adhesive.
The very last thing I did was add some tiny pieces of iridescent glitter to the background, and I also added some Stickles to the liquid inside the bottle and the glass. 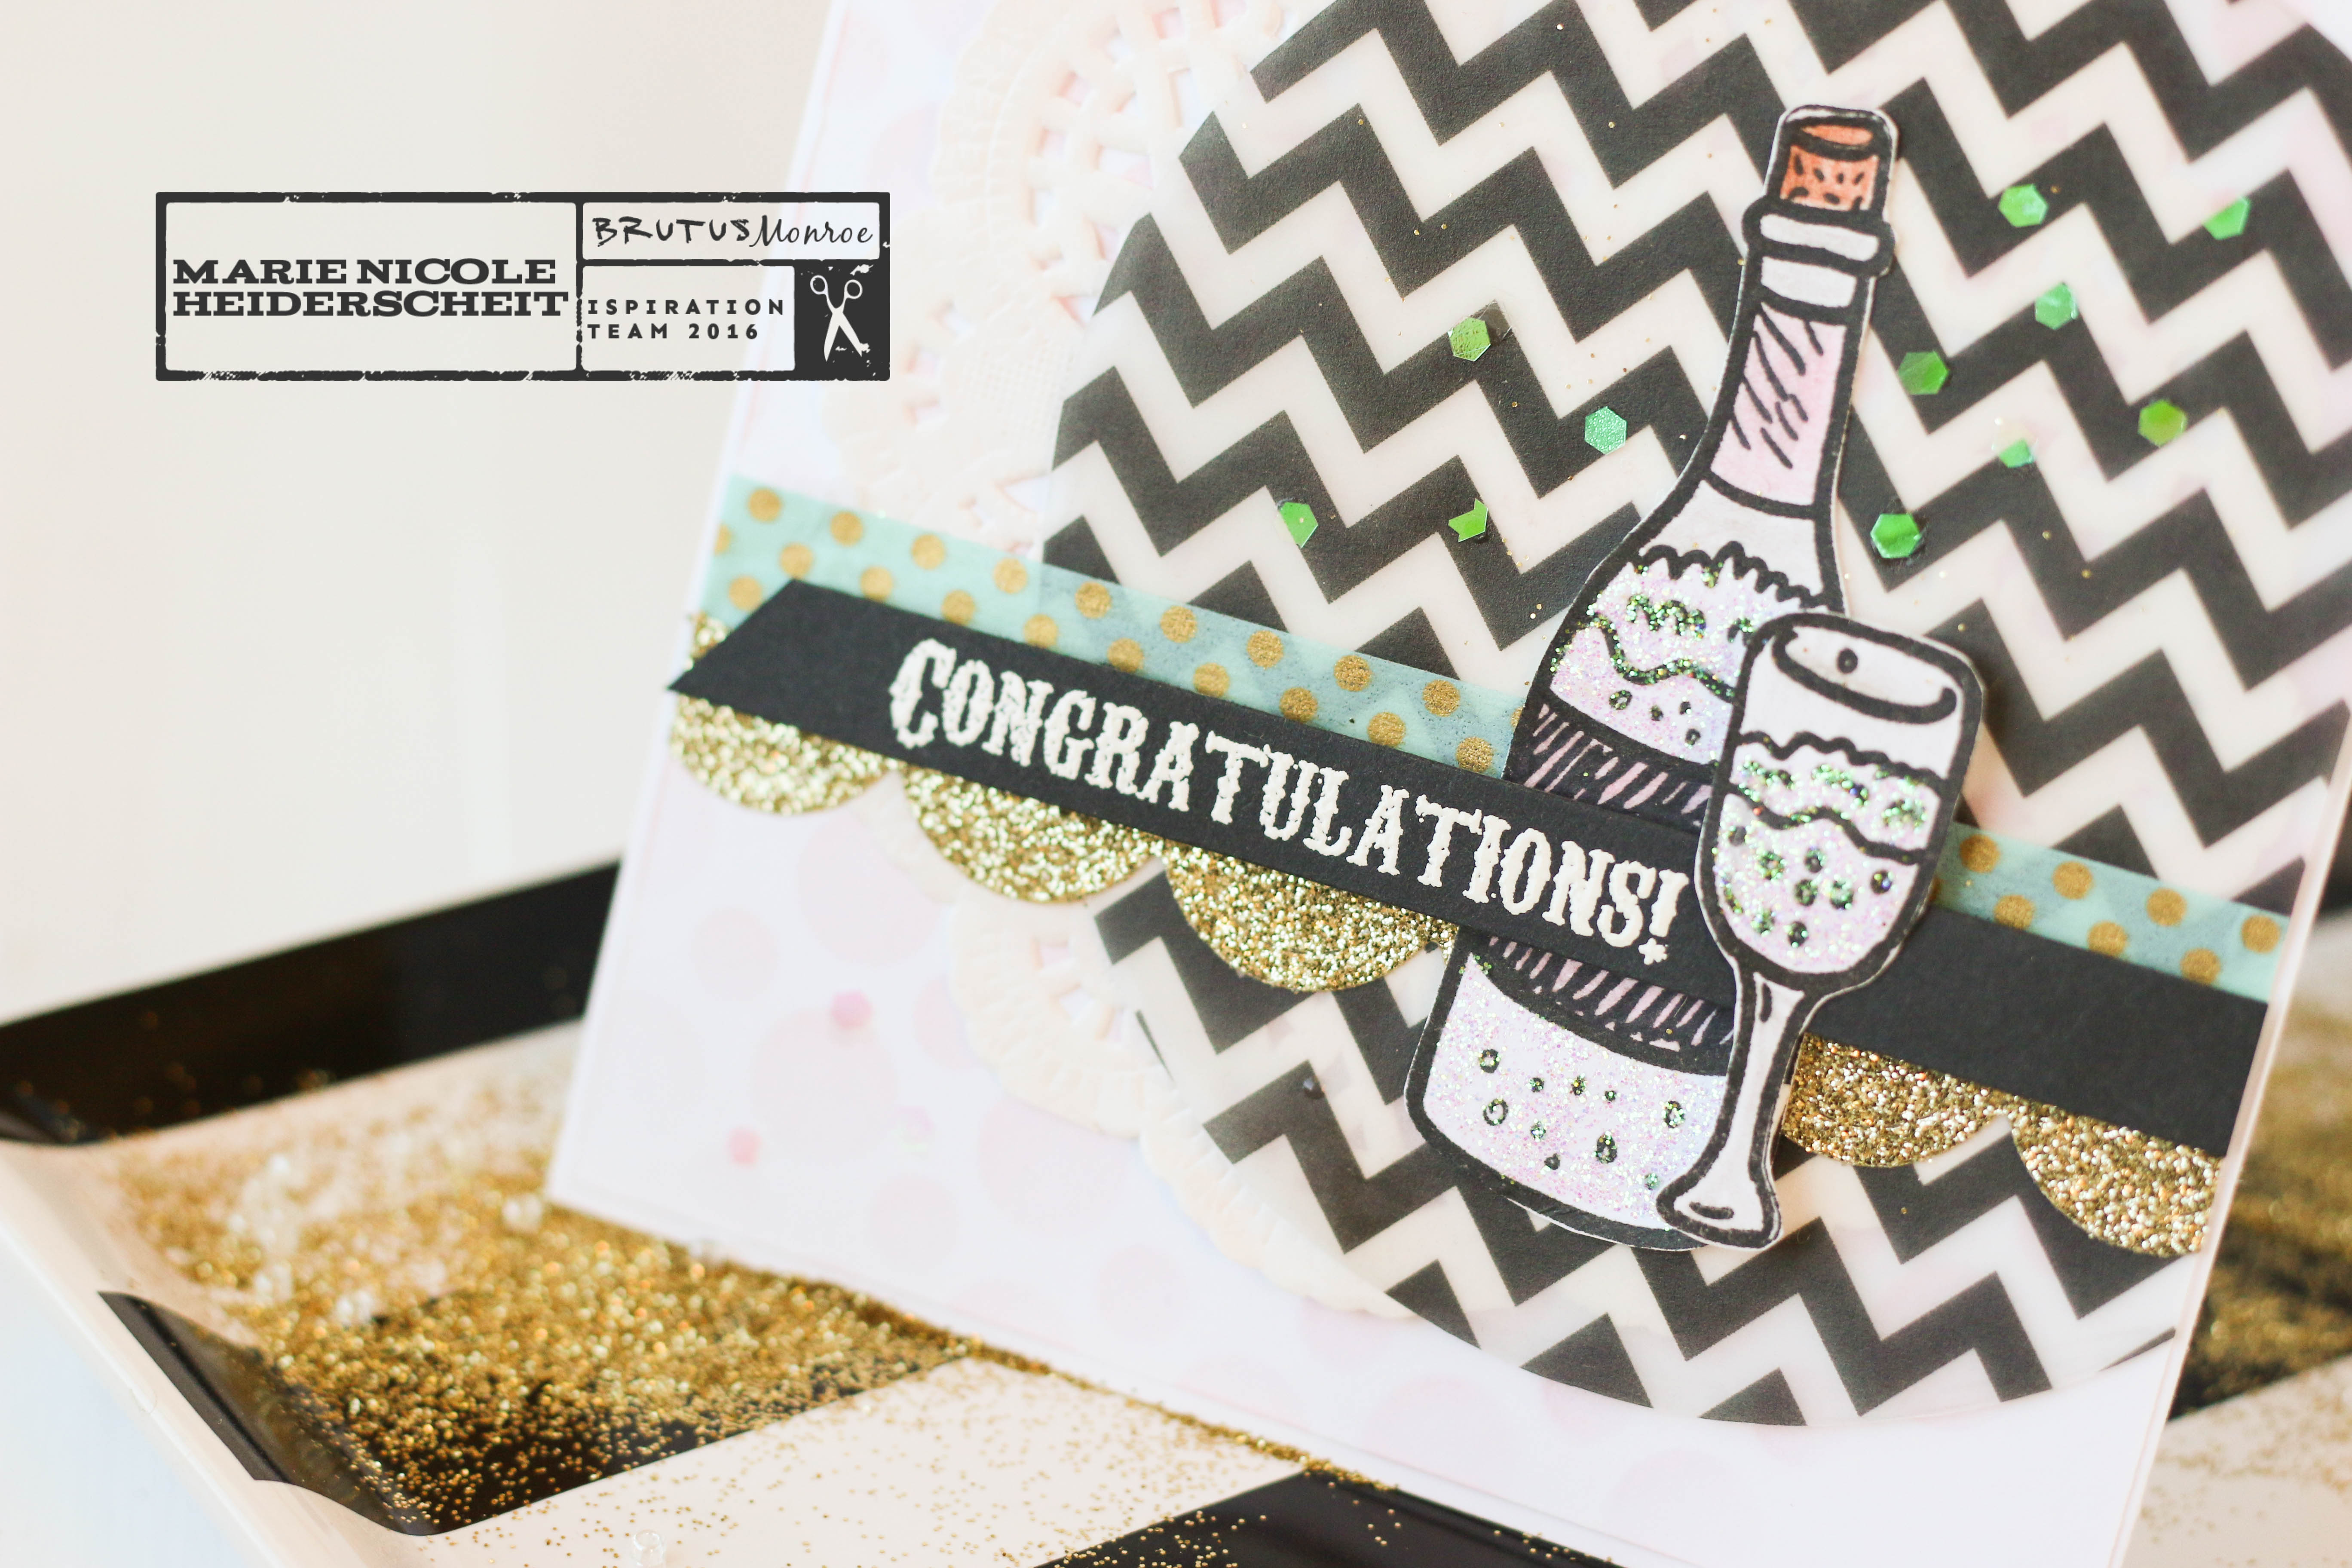
I thought this was a really fun stamp set, and not only is it perfect for New Year's, but it can also be used all year long for weddings or other events that you might want to celebrate. This card ended up having a somewhat girly feel with the light pink and the glitter, so I think it would be perfect for a bridal shower or bachelorette party! Thanks for stopping by today! Dont forget to check out the Brutus Monroe store and Stamp Club. If you are interested in any of the other items I used on this card, I have included a few links below. I'm also linking up with: Simon Says Stamp's Wednesday Challenge! Happy Crafting!!
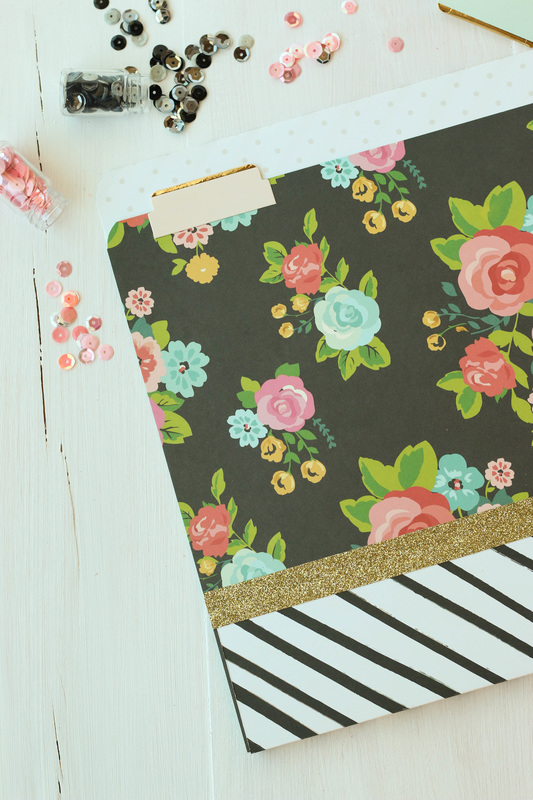
Recently, Shannon Green shared a video on How to Make a File Folder. It's pretty simple! You just need two sheets of 12x12 paper, some adhesive, and a paper trimmer. You can also use whatever embellishments you would like, but thats totally optional. Anyway, after she posted her video, she challenged a few of us from the Creative Crew to go ahead and make our own file folders in our own styles. Well, ok then! I think I can handle this one! I started by grabbing a few papers that I've had for a while now. I like to hoard those pretty papers but then I realize I end up never actually using them and that does no body no good, right? I followed Shannon's instructions from her video and came up with a bright and modern file folder. Here's my video of the process: I've always got more and more papers coming into my house and I really need to keep them organized, so hopefully having the knowledge to make my own folder with help in that area! 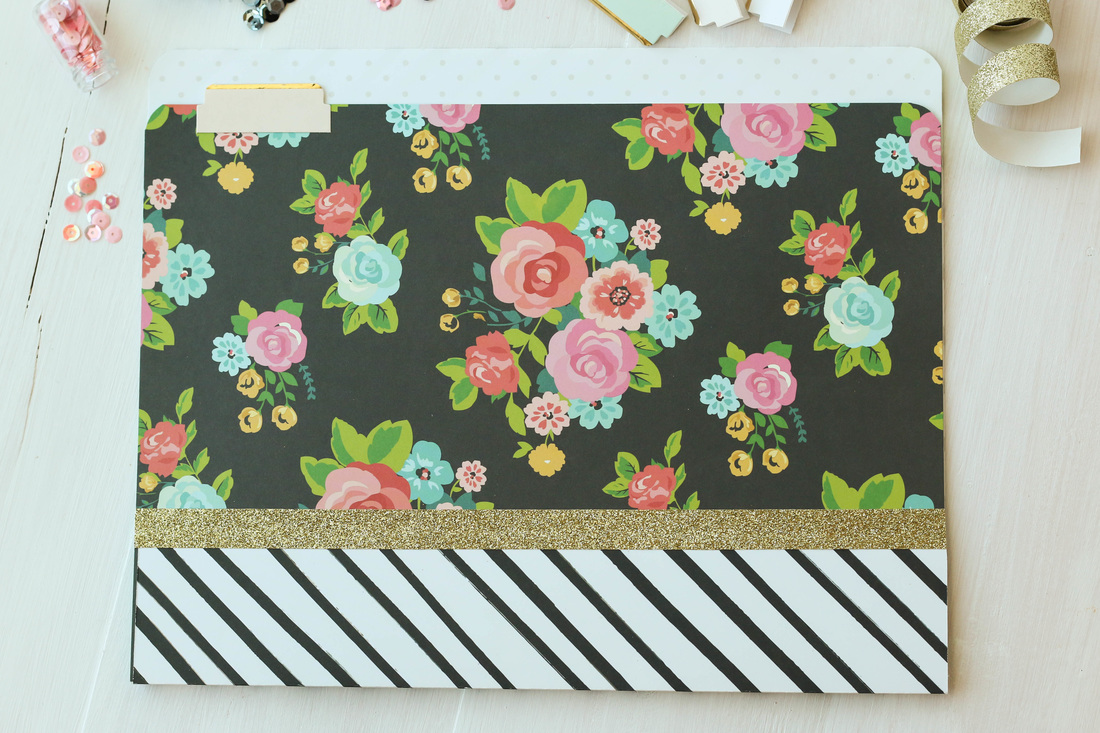
Best thing about making your own is that you can customize them to fit whatever office decor you may have! Hope this gives you some ideas on what to do with that paper you have been hoarding (don't deny it, we all do it)! Thanks for stopping by, and Happy Crafting!
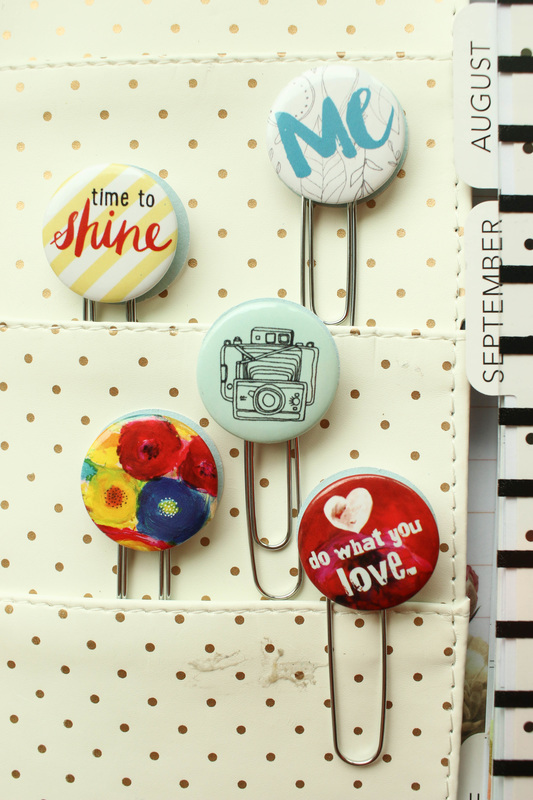
Are you ready for a super simple idea you can use in your planner?
I have had these little Flair buttons from Fancy Pants Designs for a while now, and they have just been begging for me to turn them into something cute for my planner! All you need is these buttons (or any other cute little embellishments you might have), paperclips, paper, and foam adhesive. 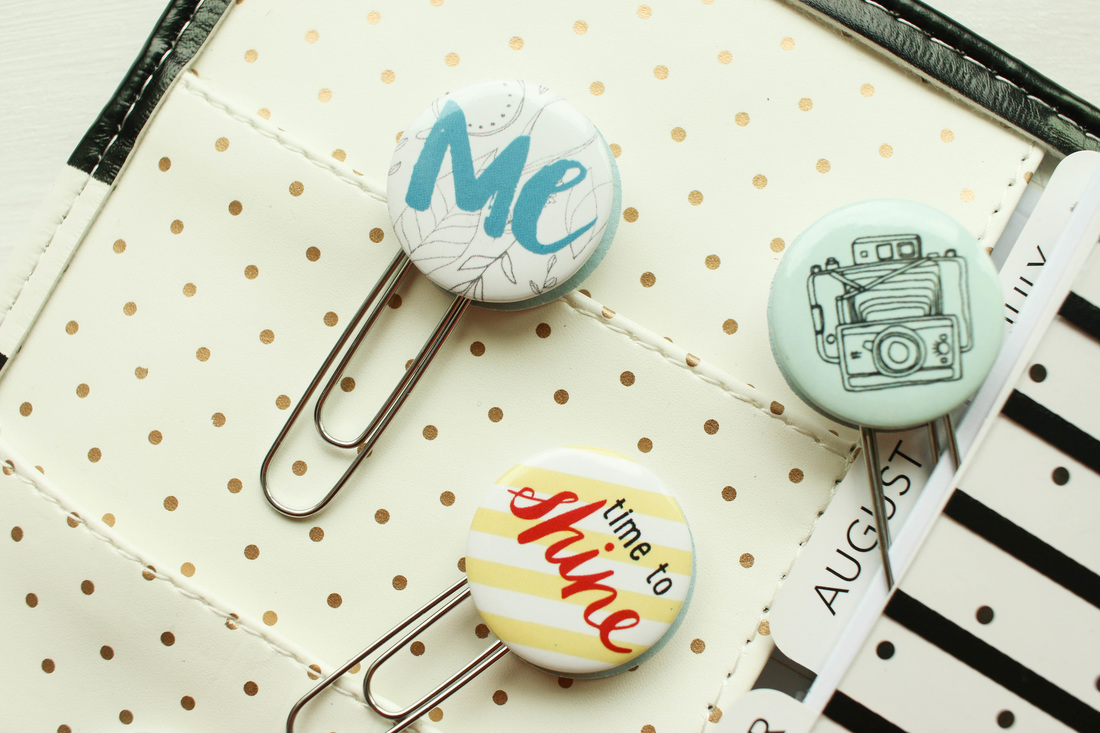
First, take your paper and cut out some circles the same size or slightly bigger than your clips. Then, using foam adhesive, Adhere your clip to the back of your embellishment.
Remove the backing from the foam adhesive and sandwich your paperclip between the button and the paper. Thats it! 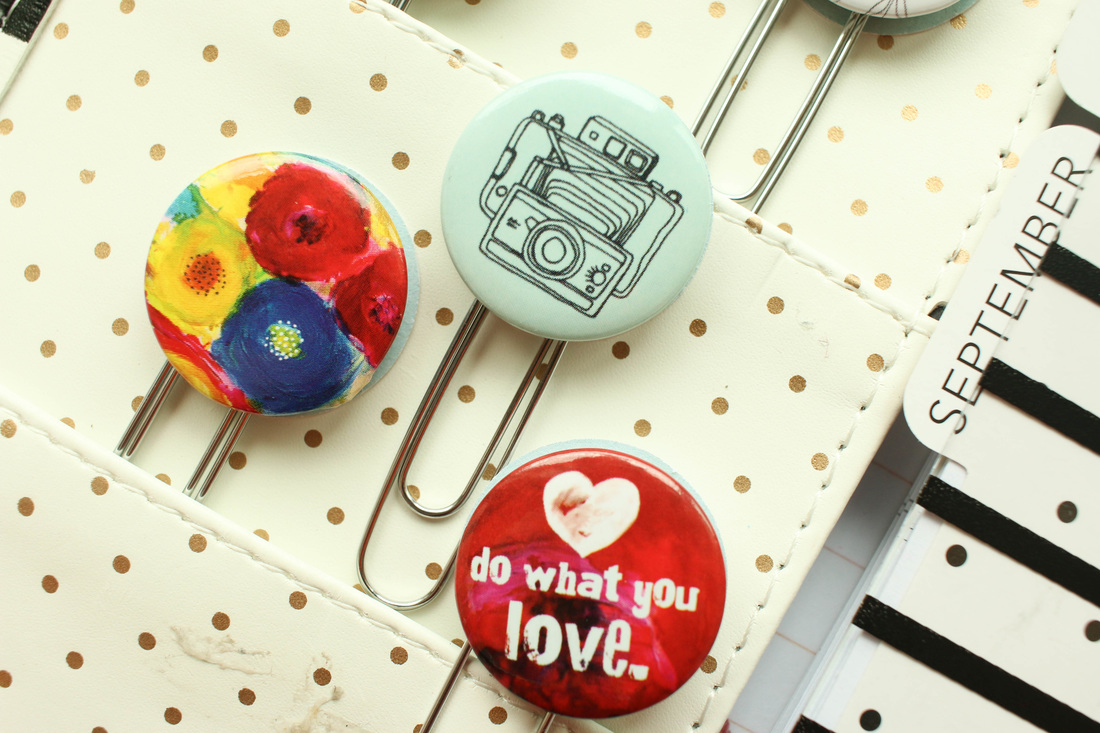
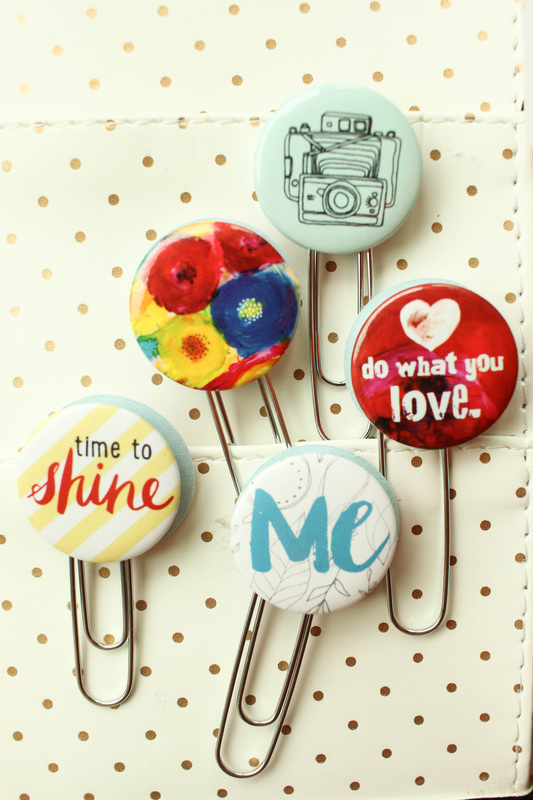
These are so simple you can make a bunch in no time at all. You aren't limited to only using them in your planner, either! Use them on cards or in scrapbook layouts, in your office, or as school supplies.
I also made a quick little video of how I put these together. Enjoy!
Hey, everyone!
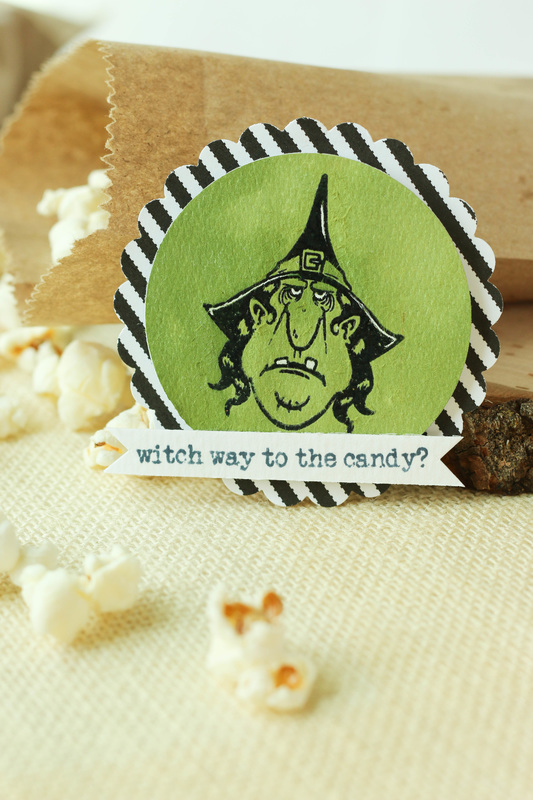
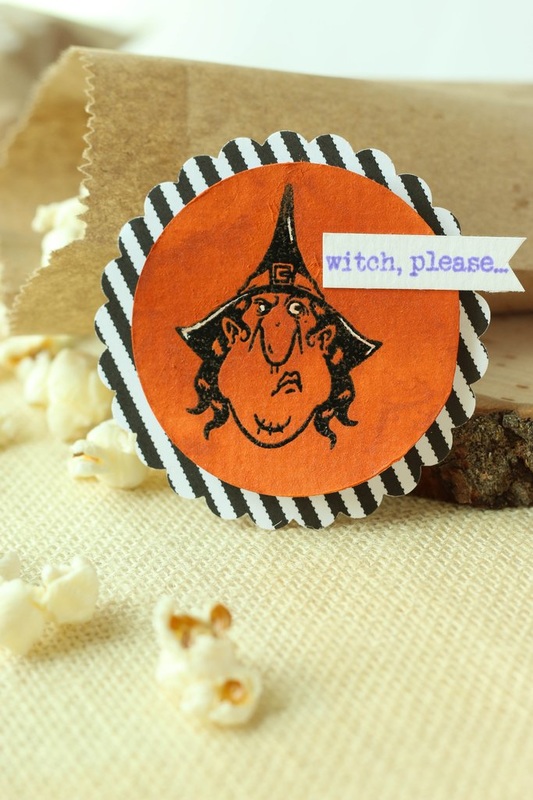
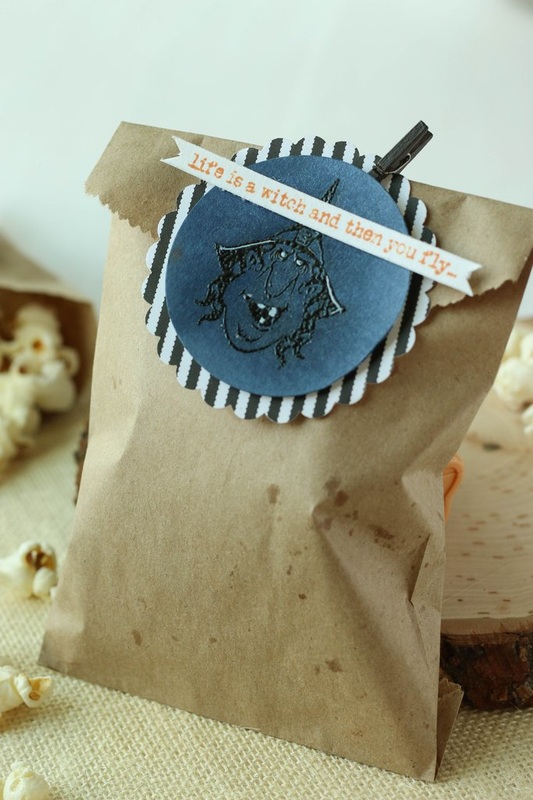
I'm over on the Brutus Monroe Blog with these fun little Halloween tags! These were so fun and easy to make, and they have so many possible uses. I used them here on some Canvas Corp paper bags filled with popcorn, but you could clip them on candy bags, use them on cards, or they could be gift tags. Use your imagination and get creative! If you want to see how I created these tags, go ahead and watch the process video! 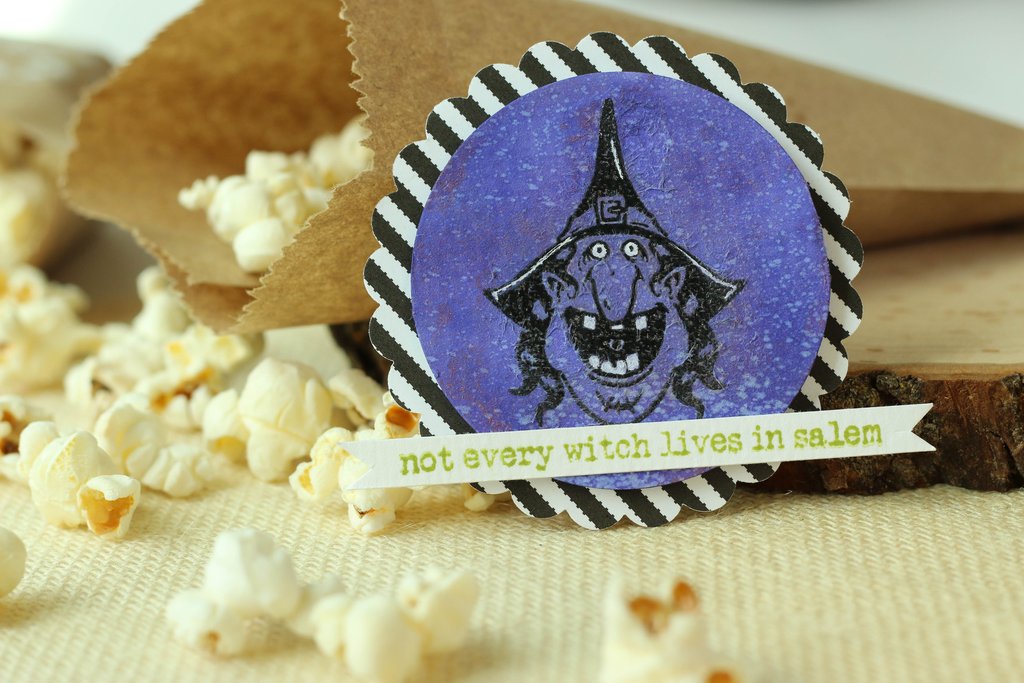
I started out by using my circle punch and I punched four circles out of watercolor paper. Then, I stamped one witch face on each circle using Brutus Monroe's "Witch, Please" stamp set. I stamped each face out with Versamark black ink, and then quickly sprinkled some clear embossing powder over the ink before it dried. This gives me a nice black, shiny embossed image! I then used Brutus Monroe's Shimmer Sprays to color each circle with a different color. I hit the Shimmer Spray with my heat tool to speed up the drying process and then grabbed my white gel pen to color in a few details on the stamped image. I felt that highlighting some of the details with the gel pen really made the image pop! Next, I grabbed a sheet of Canvas Corp's Black and White Ribbon Stripe paper and punched out four scalloped circles slightly larger than my watercolor paper circles and adhered them behind. Lastly, I stamped the sentiments on a little strip of paper and adhered them to each tag. 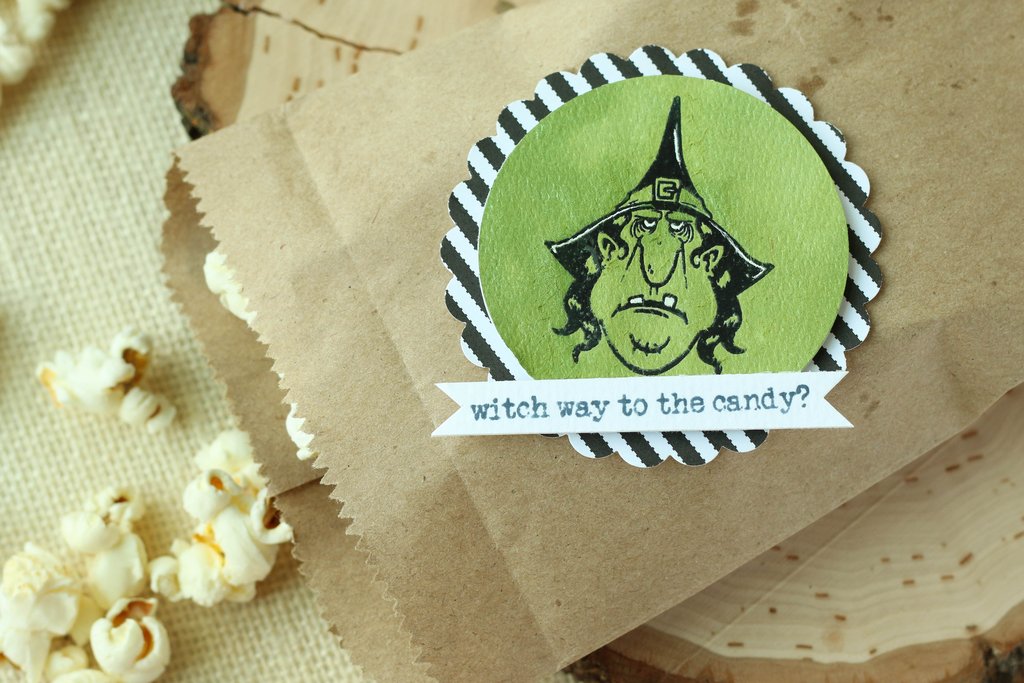
I also used some Canvas Corp Mini Clothespins to clip the tags to each popcorn bag. Super cute, easy, and sure to bring a smile to your Halloween guest's faces! As you can see, my little munchkin couldn't wait to get his hands into the popcorn! How fun would these treat bags be on a Halloween buffet or candy bar? Let guests fill their own little bags full of treats and toys to take home with them. 
If you are interested in more craft goodies fromBrutus Monroe, check out their online store HERE. They have tons of stamps, inks, sprays, papers, and more! Ill also include links below to some of the other craft supplies I used for this project. Thanks so much for stopping by and Happy Halloween!
I'm also linking this up with:
Simon Says Stamp's Monday Challenge! Simon Says Stamp's Wednesday Challenge! 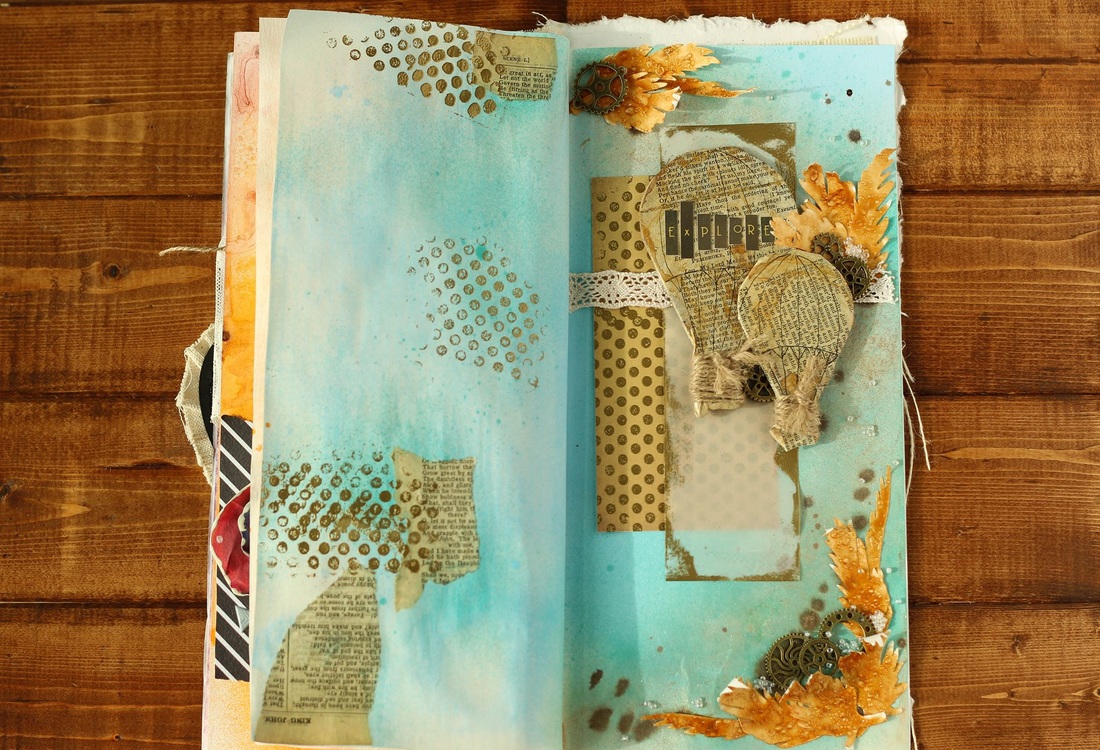
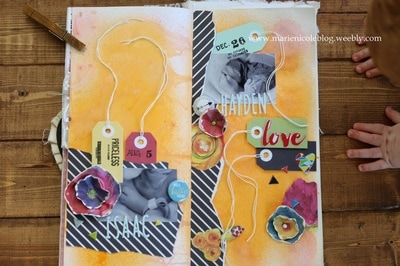
I really havent done a lot of mixed media journaling so I have been surprised at how much I've been enjoying this Recollections Mixed Media Journal. The pages are so fun to build on and work with. For this page I went with a fun, summery travel theme!
I wanted to use my Naturally Aged Weathered Copper Kit from Tattered Angels on this page, so I went ahead with those paints to build the background. Since there was a lot of gold shimmer in the paints, I decided to go with the gold theme, and I love the final result! 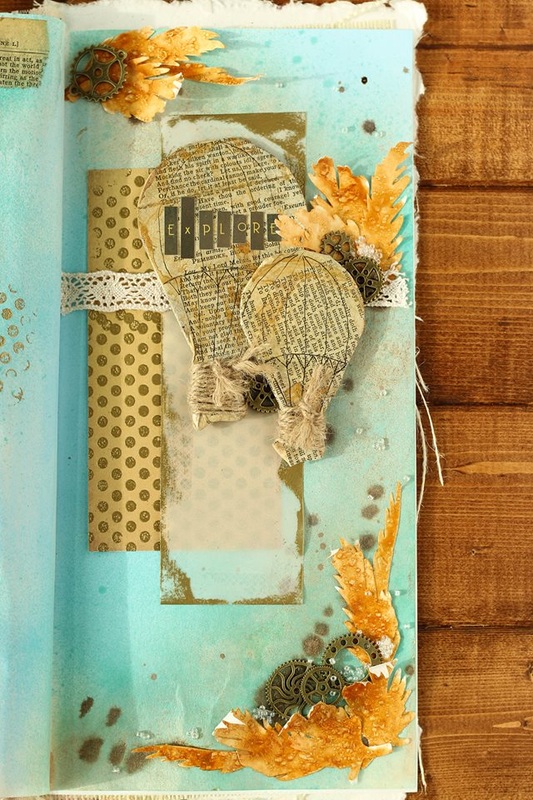
I used my Cricut and cut out a bunch of these paper feathers out of plain white cardstock. Then, I used a heavy layer of Camel Glimmer Glam over the feathers. I also created some bubbly texture on the feathers by holding my heat tool very close to the paint and letting it bubble up. This is a fun feature of the Glam paints- they react to the heat to add some gorgeous texture.
After the feathers were dry I glued them down using my Tombow glue stick. I left some of the edges unglued so they would curl up a little bit. 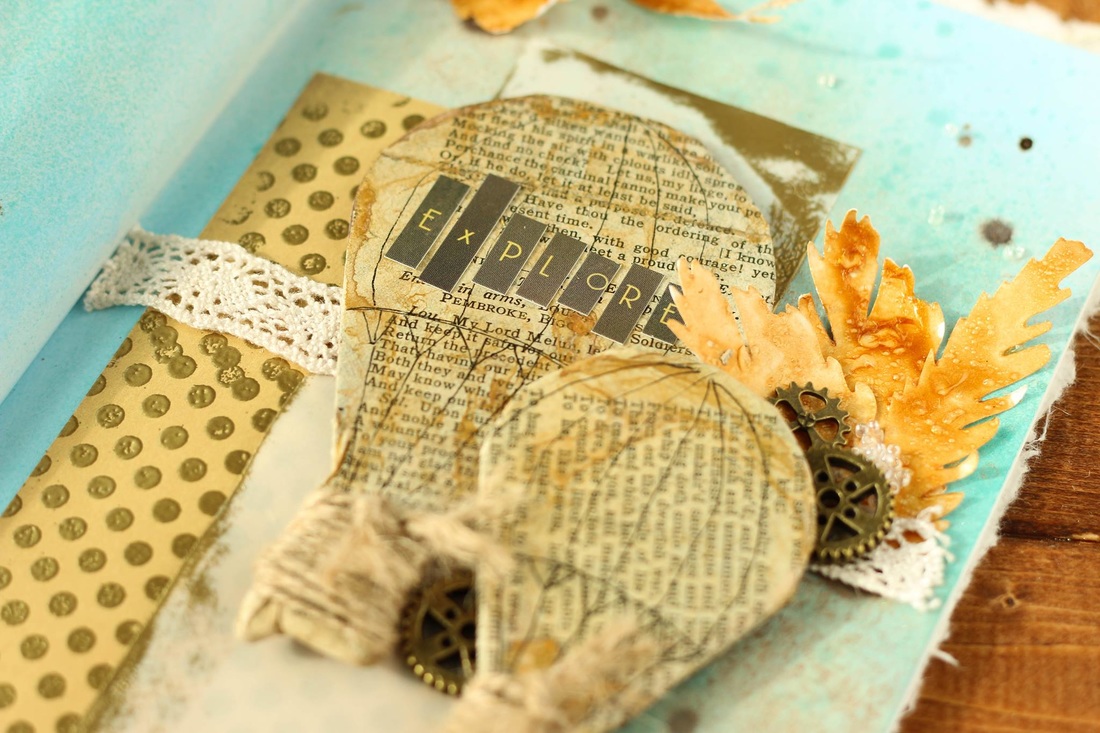
To create the vintage hot air balloons, I used some chipboard balloons from my stash and covered them with an old book page, sticking them down with Clear Glimmer Glam. Then, I sprayed Vintage Brass Glimmer mist over them and dried it, leaving some messy gold splatters on top. I wrapped the bottoms in twine and then drew on some lines to give them more of a hot air balloon look.
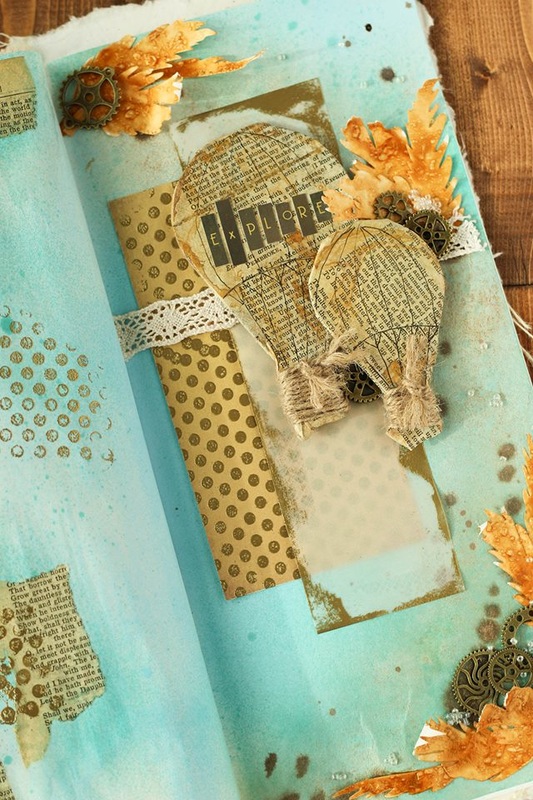
I layered some paper and vellum behind the balloons, and I also did some heat embossing on them with gold embossing powder. For some finishing embellishments, I added some metal gears and some clusters of clear, tiny beads here and there.
If you want to see the process of how all this came together, go ahead and watch the video I put together!
Thanks for stopping by and Happy Crafting!
|

Pin it!

AuthorSo glad you found me! This blog is my little space where I can share bits about my life and my latest crafting projects (mostly handmade cards). My goal is to share, inspire, and to be a positive presence in the creative community. 

Find me on Instagram!Archives
January 2018
Categories
All
Link Love
 

|


 RSS Feed
