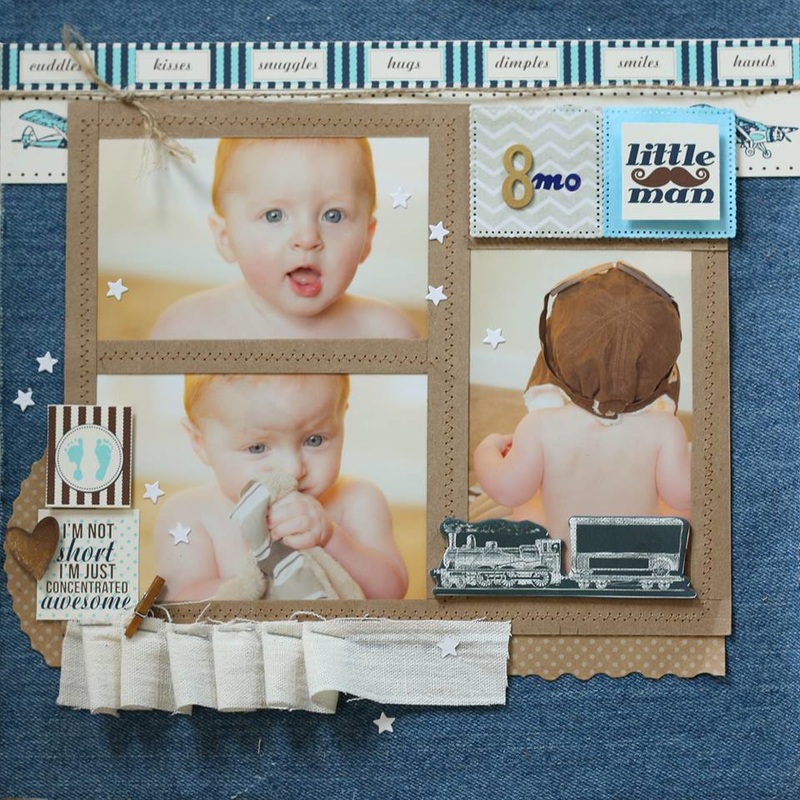
Finishing all of Hayden's first 12 months has been going slow, but I managed to finish this 8 month page recently!
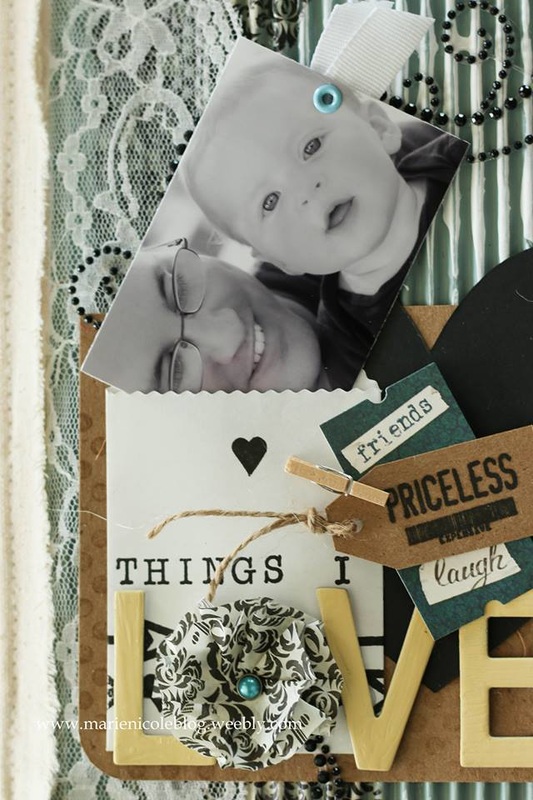
I don't think there is anything that says "boy" better than some denim. I decided to use Canvas Corp's denim 12x12 sheet as the background for this page. I printed out three 4x6 photos for this page, and then framed them using strips of kraft cardstock. I also sewed a zig zag stitch around the border. I die cut a few squares for the top right corner, and then added some embellishments here and there. I think my favorite part of this (other than the pictures) is the little canvas ruffle on the bottom left. I just took a strip of canvas and folded and stapled. 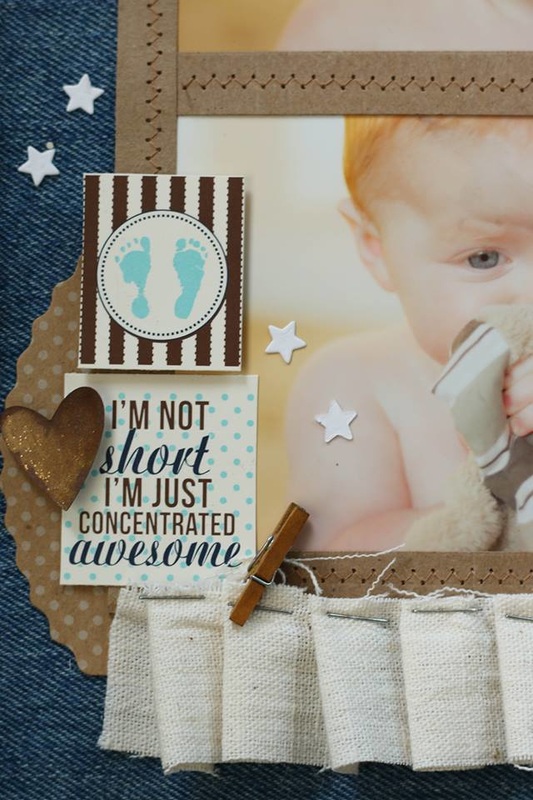
Pretty much all the papers except for a few bits are from Canvas Corp. I used the Snips and Snails paper pad. It has so many cute papers, quotes, tags, and cut outs you can use for a little boy themed scrapbook or cards. The train I added isn't actually a part of the scrapbook. I just placed it for the photo so I wouldn't be showing the world my little boy's bum (you are welcome, teenager Hayden). 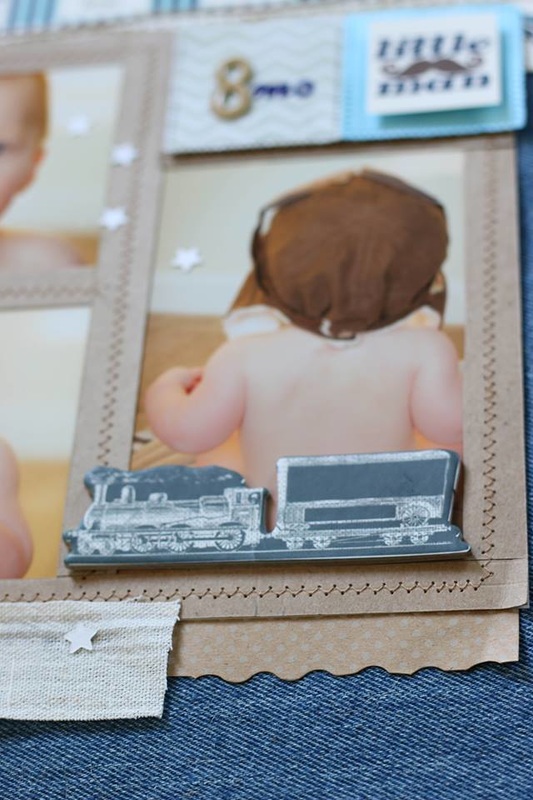
I hope to get the next few pages done soon to complete all 12!
Thanks for stopping by and happy crafting!!
This project was also featured on CCB's Denim Roundup!
I am linking this up with: Simon Says Stamp's Monday Challenge Simon Says Stamp's Wednesday Challenge
2 Comments
I've been playing around with Tombow's Irojiten Color Pencils and they are basically amazing! I have their Tranquil Coloring Set. The colors are soft and beautiful.
I decided to use these pencils on a one-layer card to color in some stamped images. I am definitely no coloring expert, but I was able to achieve the look I was going for. I kept the coloring light and simple. When I had my image colored in with the Irojiten pencils, I took a blending pen and blended out the colors just to give it a smoother look. These pencils work wonderfully with the blender pen! Thanks for stopping by and checking out this card! I made a process video of this card so if you wish to see it in more detail, go ahead and watch! 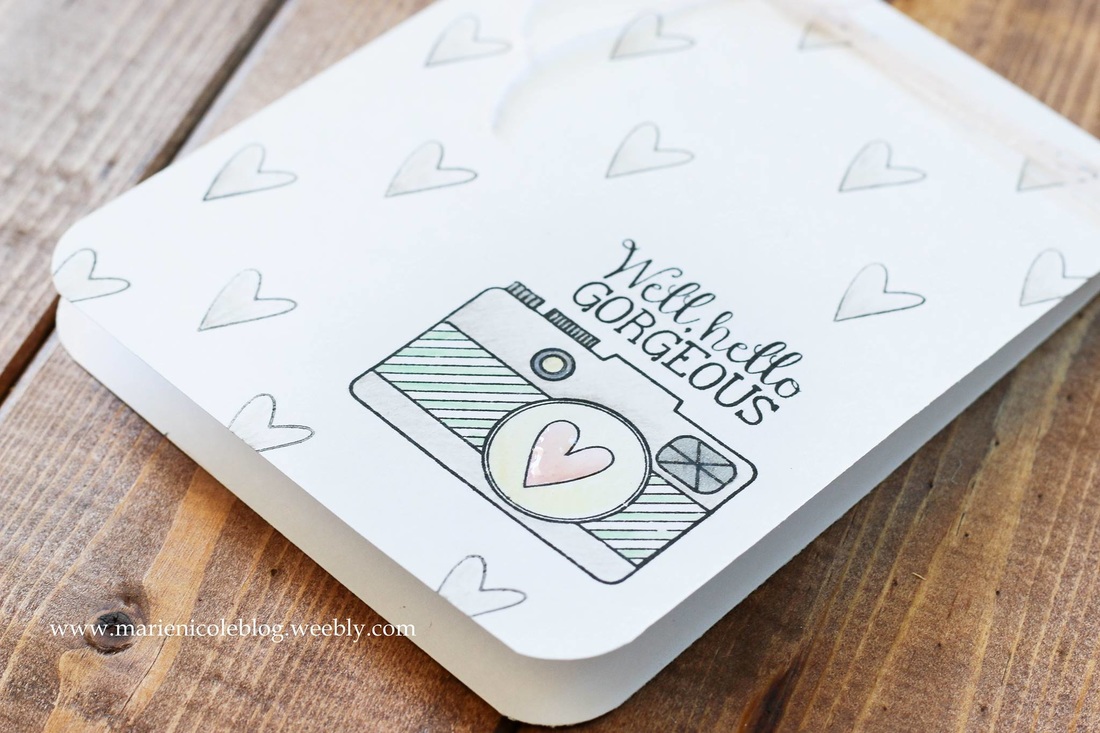
Happy Crafting!
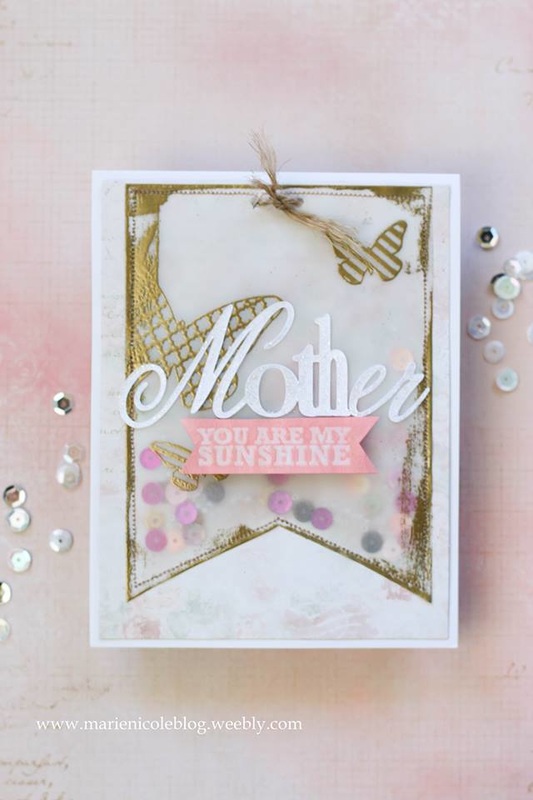
There's nothing more fun than shaker cards! However, the amount of foam adhesive that traditional shaker cards use makes it a little tricky to pull one off. This is a simple way to make a shaker card without messing with the adhesive!
First, I cut a piece of patterned paper down to slightly smaller than my card base and adhered it down. Next, I took a piece of vellum and cut it into a flag shape. I stamped and embossed some butterflies in gold embossing powder, and then also embossed around the edges. I used a little tape adhesive to adhere the flag down on top of the background paper. BUT I DID NOT PUT ADHESIVE ON THE TOP OF THE VELLUM FLAG. This is important, because you need to leave the top open in order to fill the pocket with your shaker goodies. I then ran the card through my sewing machine to sew down the sides of the flag pocket, again leaving the top open. Then I filled the pocket with several colors of sequins and some tiny clear beads. After your pocket is filled, go ahead and sew the top shut. 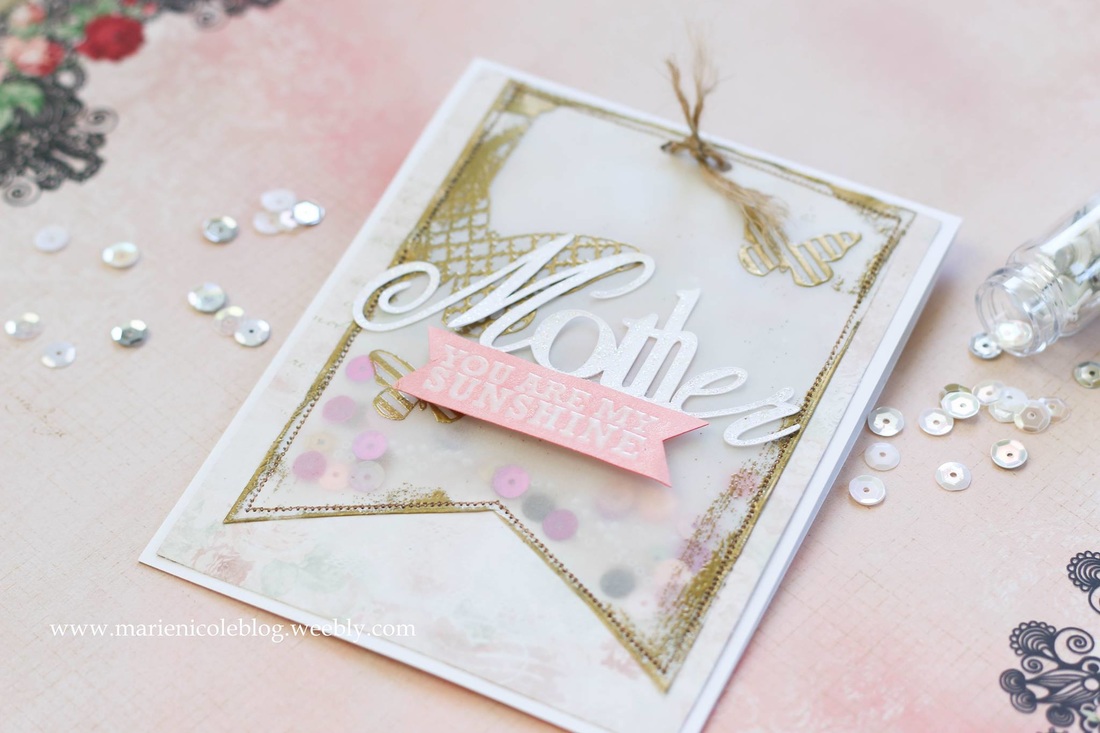
You;ve just made a fun shaker pocket card! I added a die cut "mother" to the front, and stamped and embossed the rest of the sentiment and adhered it below.
I hope you take a look at the process video to see how I did this in more detail! Thanks for stopping by and Happy Crafting!
I am also linking this card up with
Simon Says Stamps Monday Challenge Simon Says Stamps Wednesday Challenge
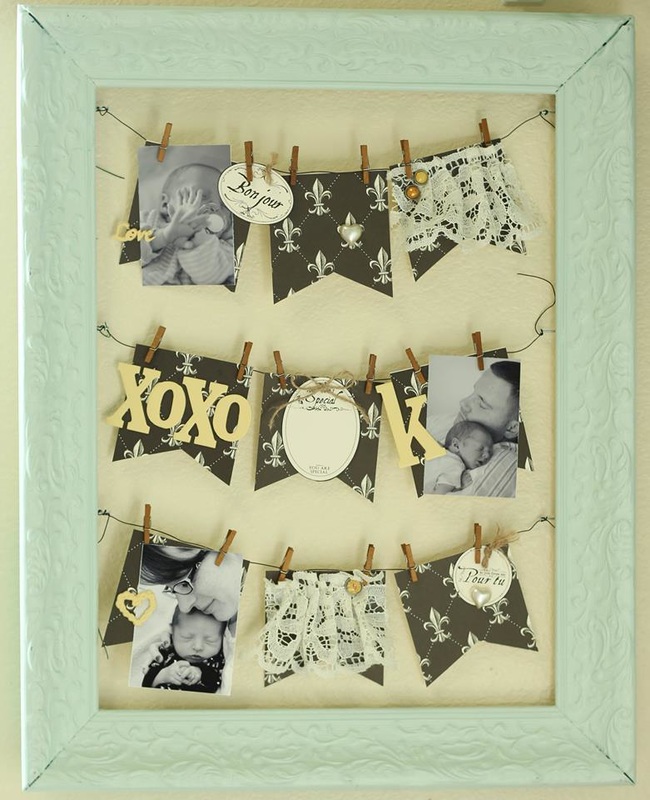
Several years ago my husband and I took a weekend getaway to the Washington coast. It was beautiful, but it rained the whole time so we didn't get a lot of beach time in. Thankfully, the hotel we were staying in was hosting a vintage sale right on their property! We decided to check it out and I was able to find two of these beautiful but beat up frames for $1.
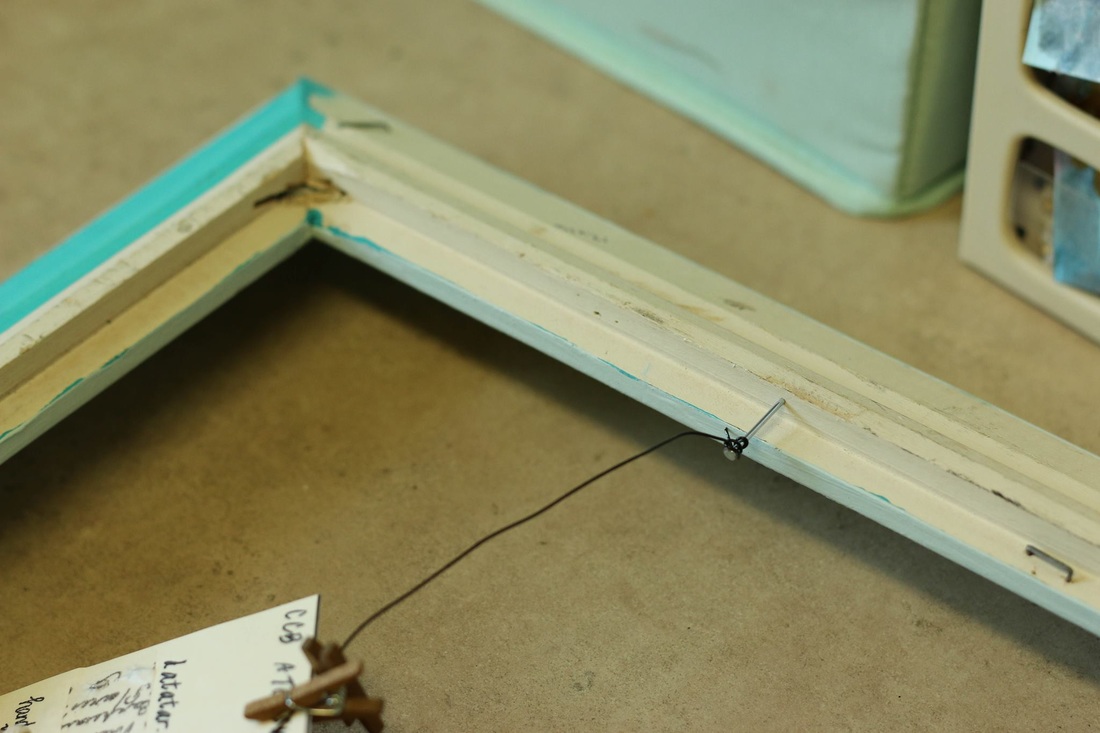
My husband turned one of the frames into a shelf for my craft room. I absolutely love it! For now it is housing all my Tattered Angels paints. For this frame, I turned it into a banner and photo display. 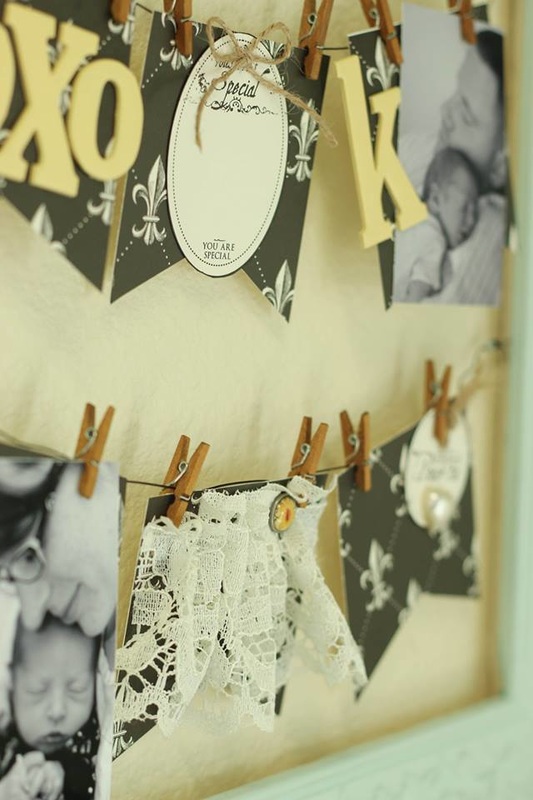
First, I painted it in a color that coordinates with my craft room. Then, I turned it over to the backside and nailed in three nails on each side. I then wrapped some floral wire around the nails to create three lines to pin my banner on.
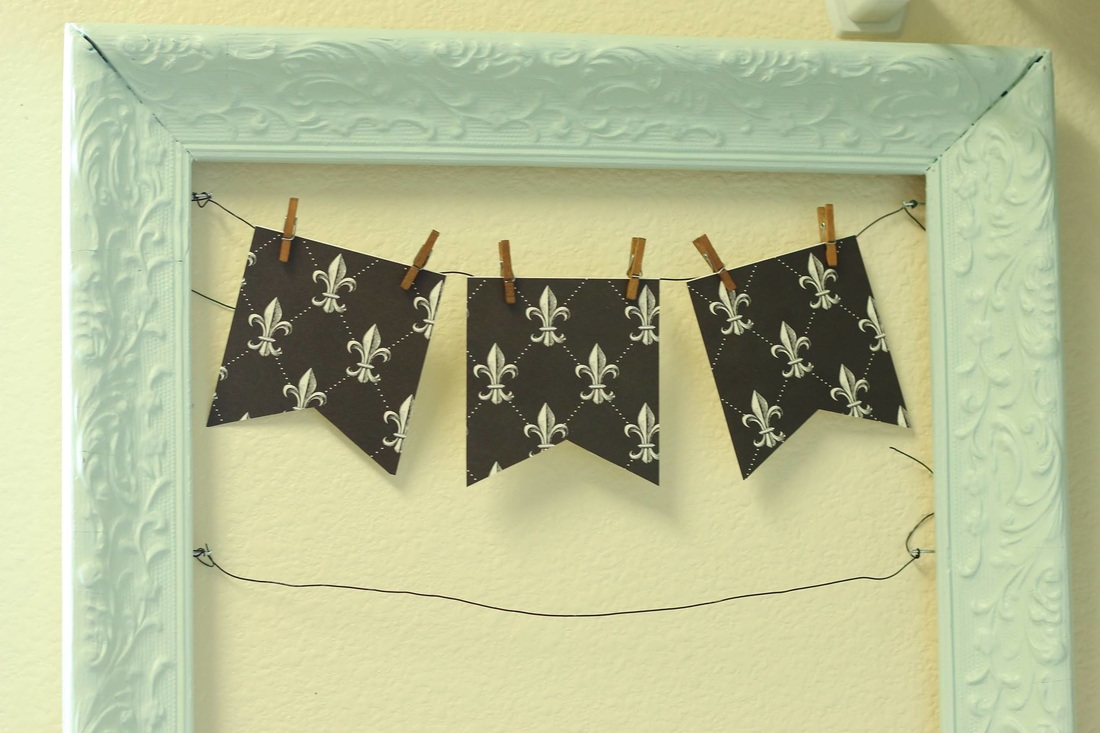
I used Canvas Corp's Fleur di Lis paper to create my banner flags. I cut them into 3x3 squares and then cut the little triangle out of the bottom to create the flag shape.
Then I laid all 9 flags out on my craft counter. I thought this would be the easiest way to visualize where my photos and embellishments would go. 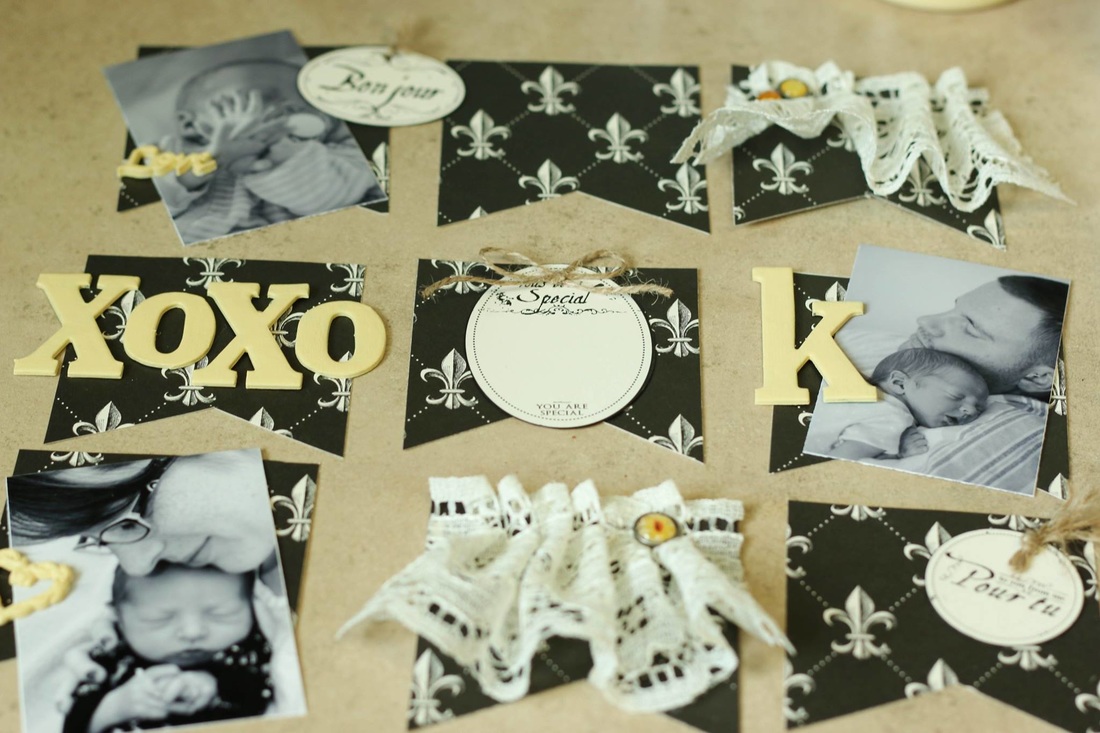
I had some old chipboard letters in my stash that didn't match at all, so I took some Decor and DIY Paint from Tattered Angels and painted them. I used Chamois, which is a light yellow color and absolutely gorgeous.
I also used some 7 Gypsies lace trimmings to create some ruffles on a few of the flags. I just laid down some adhesive tape and applied the lace, ruffling it along. 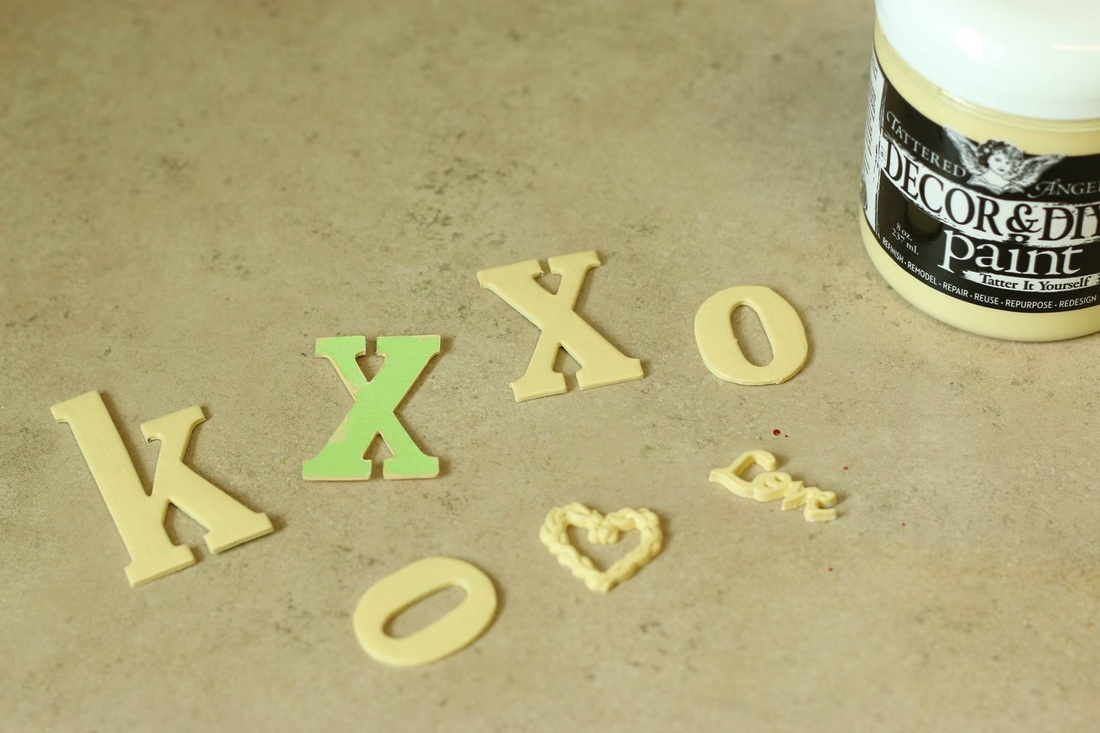
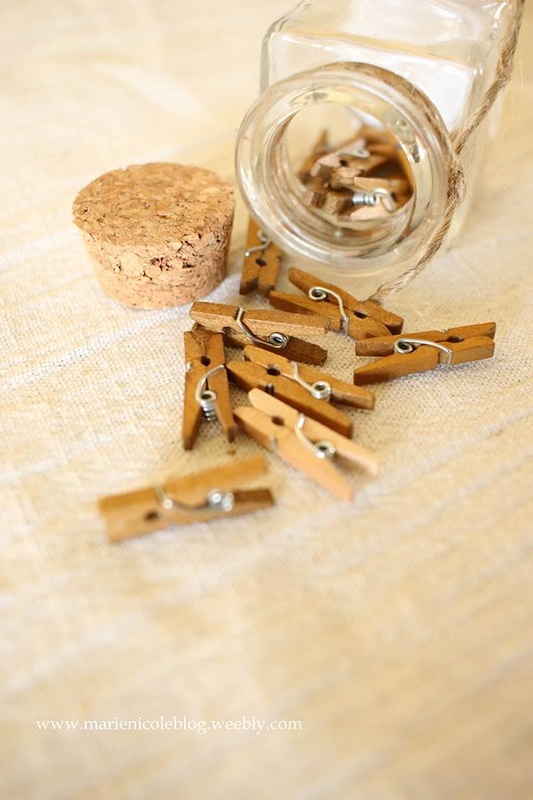
Once I was satisfied with all the embellishments, I just hung up the flags using Canvas Corp's Jacobean mini clothespins.
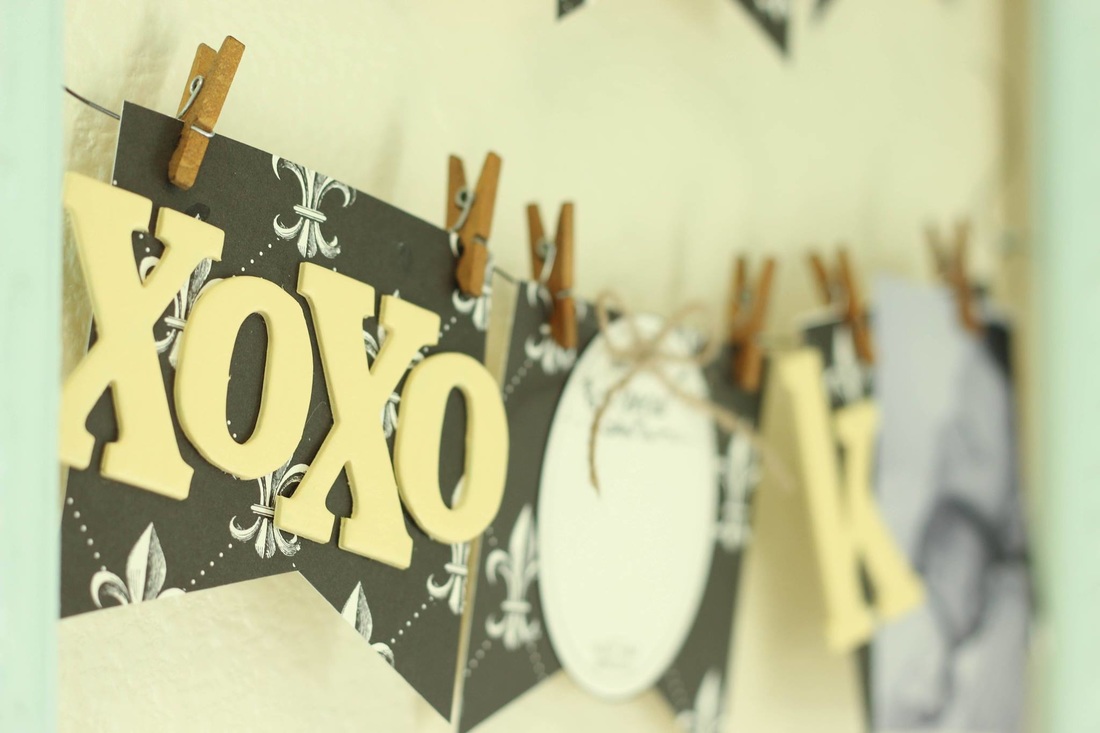
I love the way it turned out and its a welcomed display in my craft room now! The pictures I used are from when my son was just a few days old and they are so special to me! I love having them showcased in this beautiful way.
This project was also featured on Canvas Corp's Blog, so head on over there to check it out as well if you are interested! Thanks for stopping by and happy crafting! Here's a few of the supplies I used!
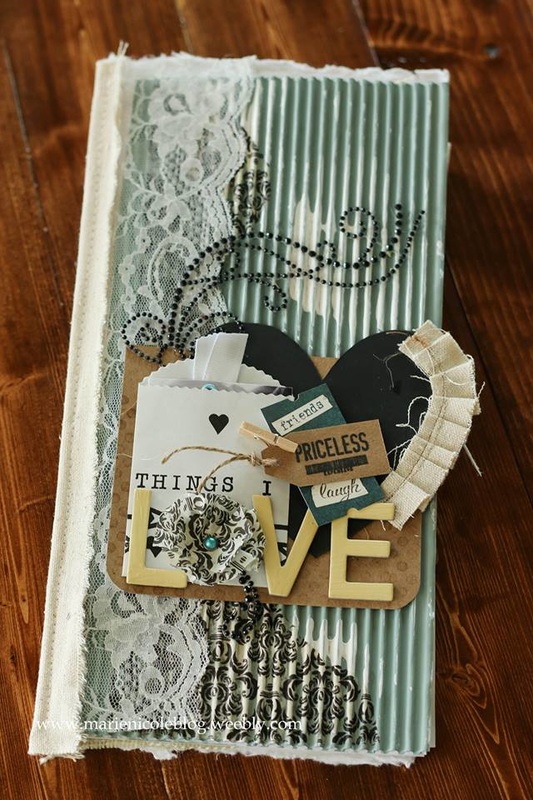
I recently got a few fun items from Michael's Recollections collection. You can find these things at Michaels and they have so many more fun products as well. I got this beautiful mixed media journal and went ahead and decorated the cover of it. I am new to mixed media so I kept it simple. 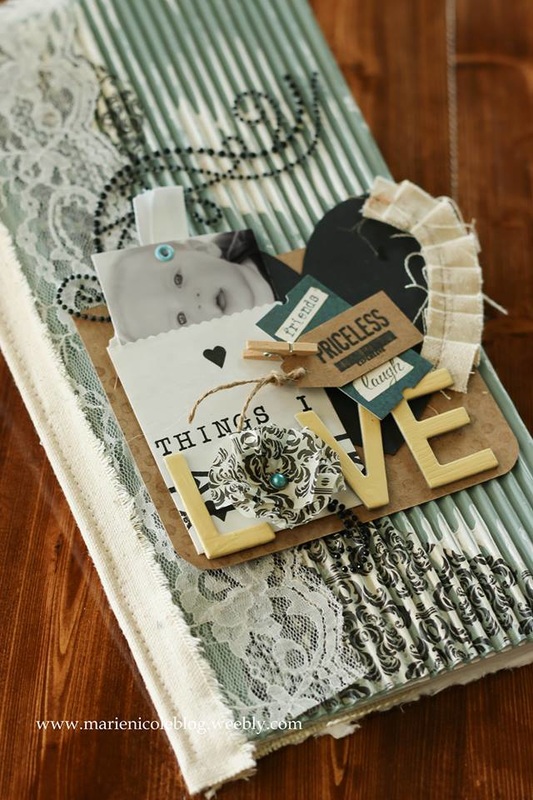
First I went ahead and painted the background with Tattered Angels' DIY and Decor paint in the color Mankato. Its a gorgeous greenish-blue color. Then, I took some white gesso and scraped it on in random places. When all that was dry, I tore a few pieces of CCB tissue paper and painted it on with some Clear Glimmer Glam.
The background was finished so I went on to build some embellishments on top of it. I took a piece of kraft cardstock and stamped some polka dots in VersaMark ink. Over that I placed a heart that I sewed a canvas ruffle onto.
Canvas Corp also has these cute little treat bags that I stamped and tucked a wallet-sized black and white photo into. I painted some 7 Gypsies chipboard pieces with Tattered Angel's DIY and Decor paint the the color Chamois. 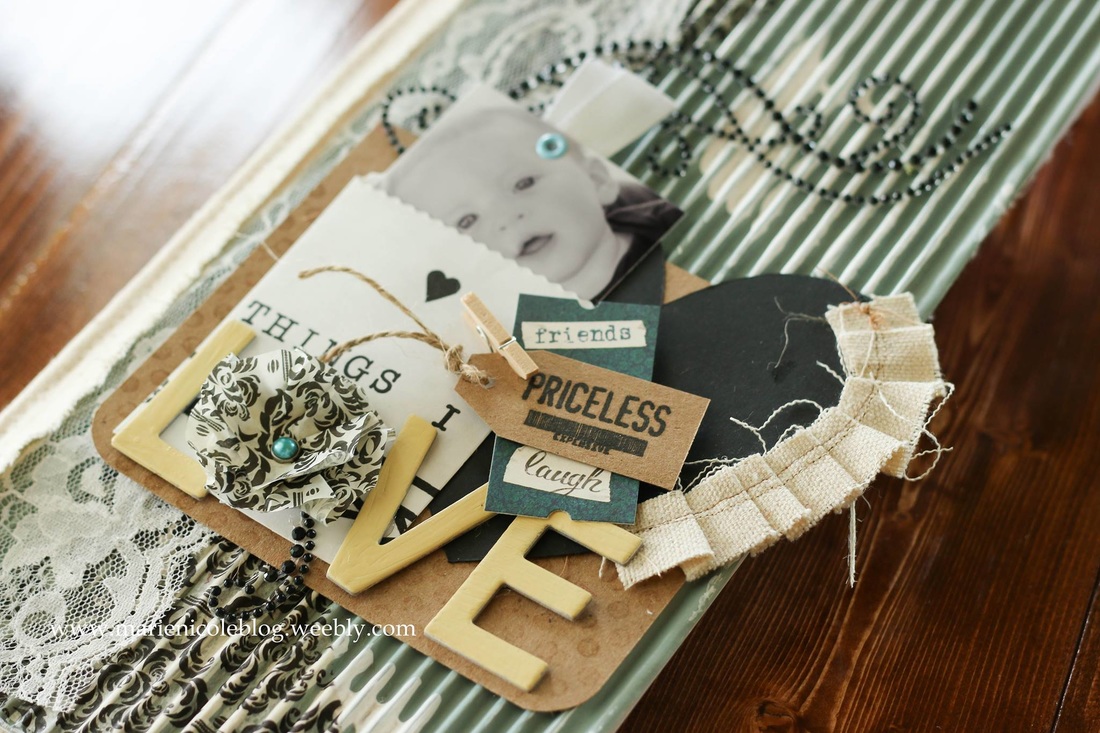
To see the process in more detail I hope you'll watch the video!
Thanks for stopping by! I have included links to a few of the products I used for this.
Happy Crafting!
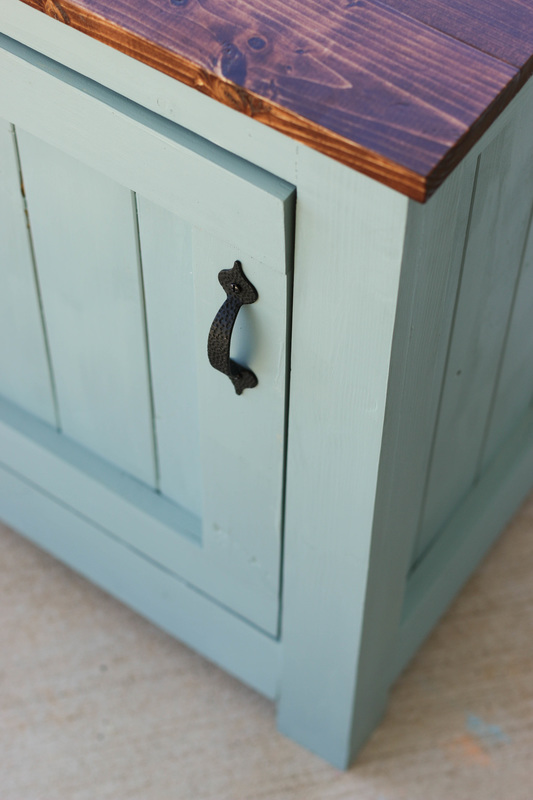
I feel very fortunate to have a husband that enjoys woodworking! I'll be honest, I have a long list of projects that I have in mind for him to do for me. One project that he did last summer was this little end table. I was looking for something specific and just couldnt find anything in our price range. So, he went ahead and built me one!
I debated on how to paint or stain it for a while, and finally decided on staining the top and painting the bottom. 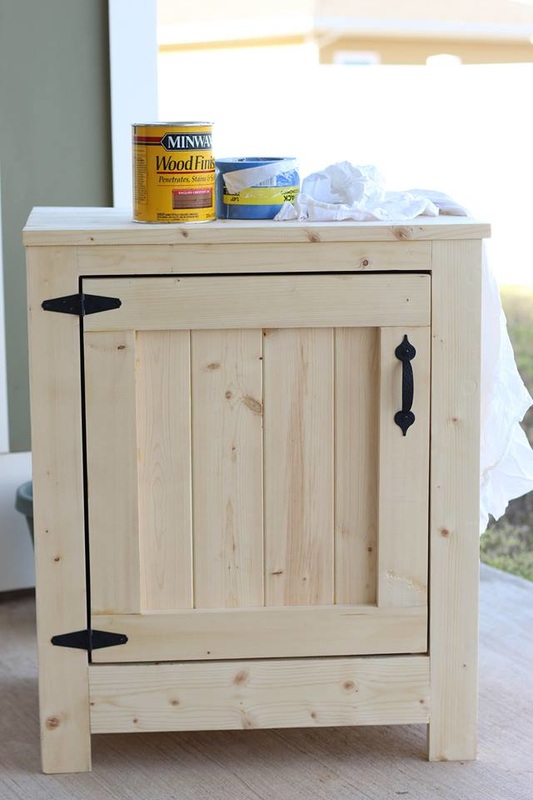
So the first thing you want to do before painting or staining is always to wipe down your furniture with a damp cloth. You want a clean surface! Then, I just took some painters tape and taped off the area right underneath the top. I didnt want any stain getting where it shouldnt be.
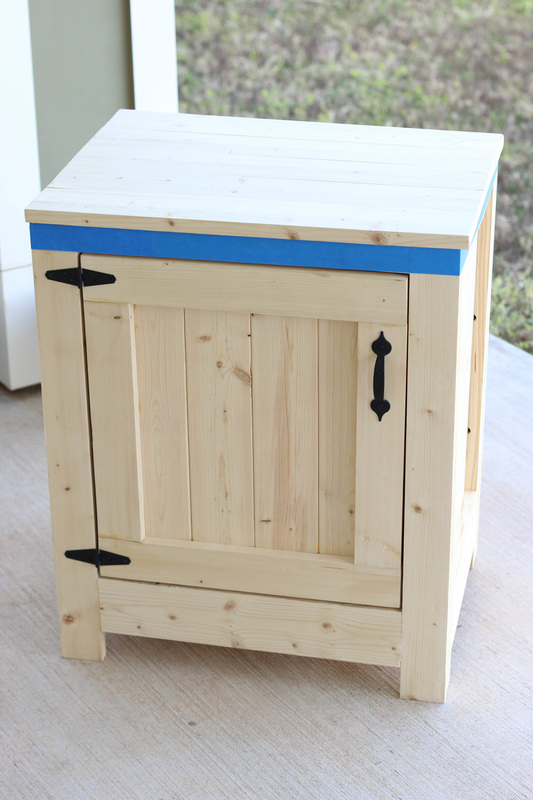
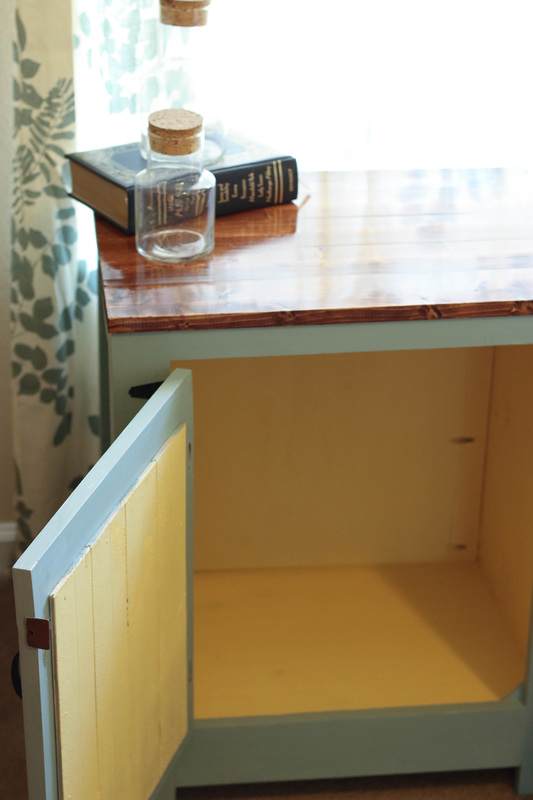
I used cloth rags to stain the top with. You can absolutely use a paintbrush but using a cloth is just a personal preference for me. I feel it leaves less drips. I did two coats of stain and then two coats of satin poly over the top.
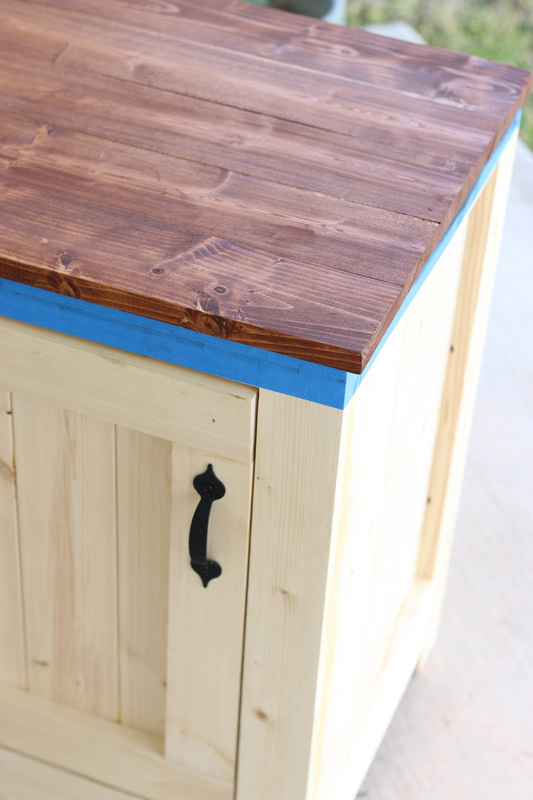
Once the stain was done I moved on to the painting! I chose to use Tattered Angels Decor and DIY paint in Mankato. I love this color! Its a greenish blue. Kind of a turqouise but not a super bright hue. It matches perfectly with my living room curtains.

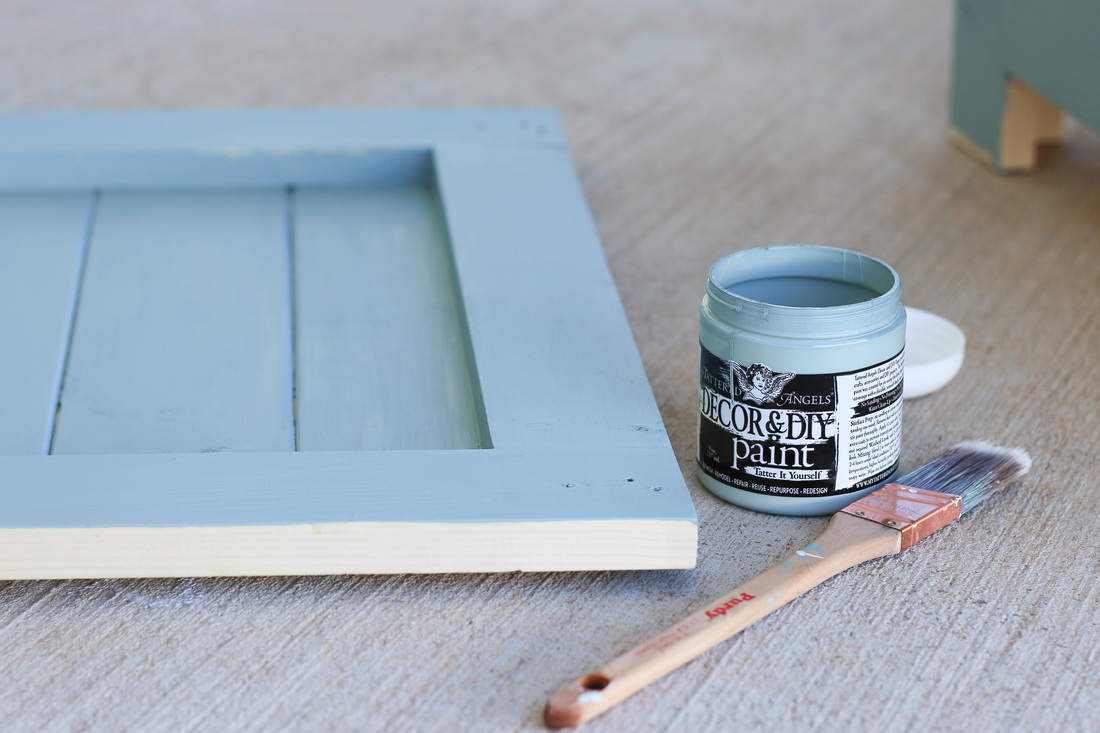
One coat of paint covered it well enough that I didn't worry about a second coat. All I had to do was go back and touch up a few spots after it was dry. Then, for the inside I decided to do a fun color. I used some more paint from Tattered Angels, this time in Chamois. Its a light yellow and pairs beautifully with Mankato.
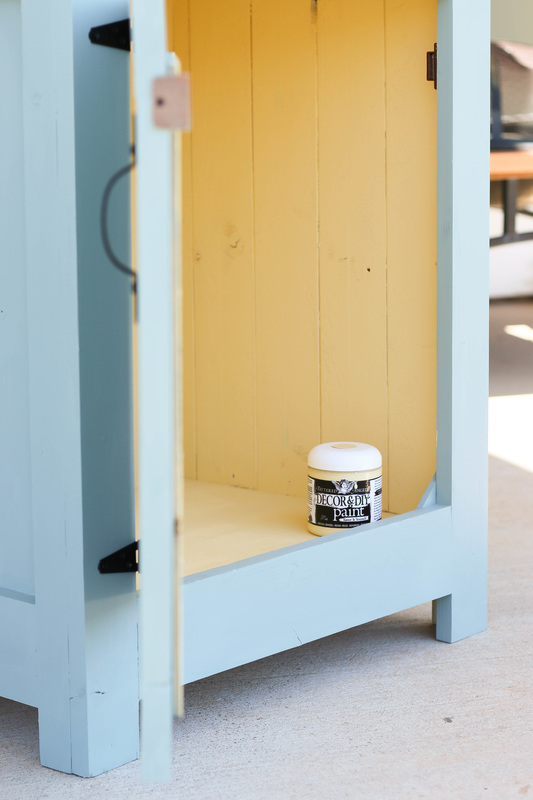
Again, one coat of this yellow was enough. I didn't even bother to touch up the inside, since it would be filled with Hayden's toys and not seen much anyhow.
After the end table was completely dried, I brought it inside to my living room. I love the finished product! 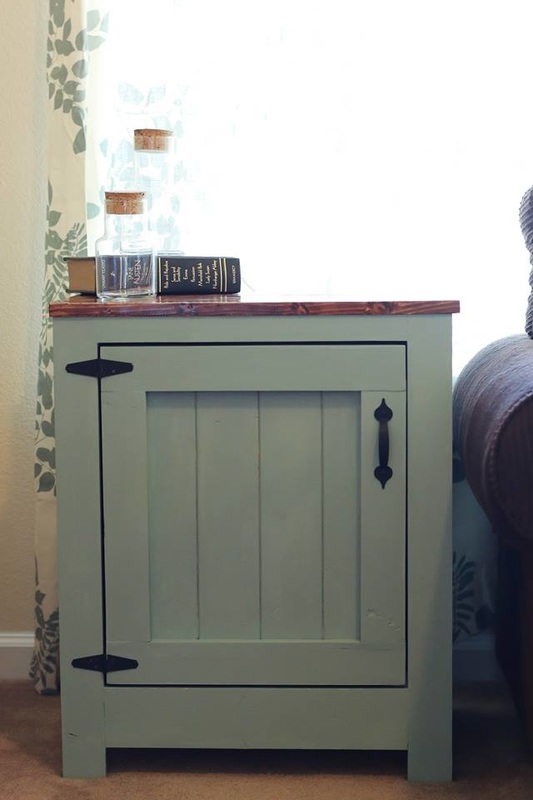
Thanks for checking it out!
If you are interested in some of the products I used, I included links below!
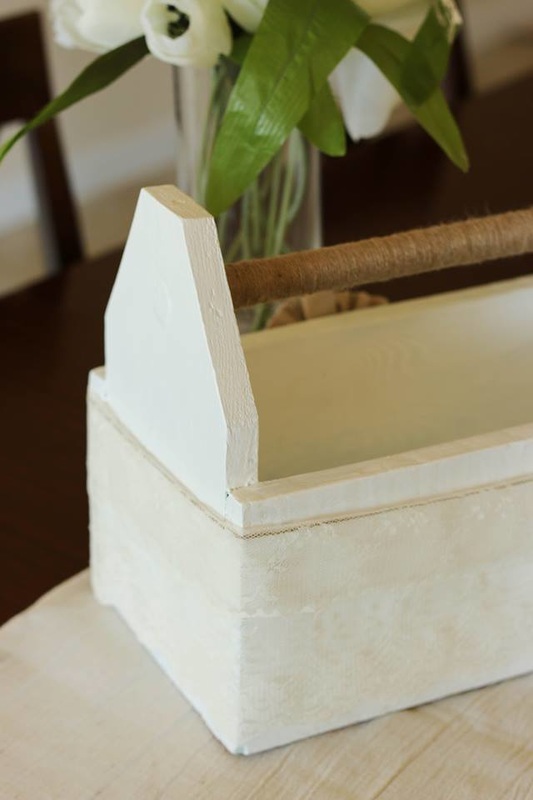
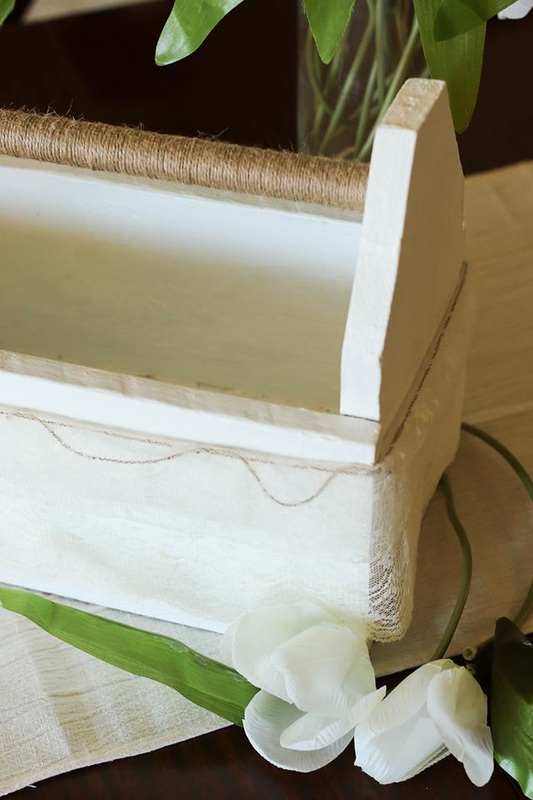
So I have had this old wooden toolbox in my possession for quite a while. In fact, I can remember my sister and I fighting over it when we were kids. I guess I must have won that fight because somehow I ended up with it.
Ive been using it to store my acrylic paints in but I thought it was time to give it a makeover, and after glimpsing at the photo below Im sure you can tell why! 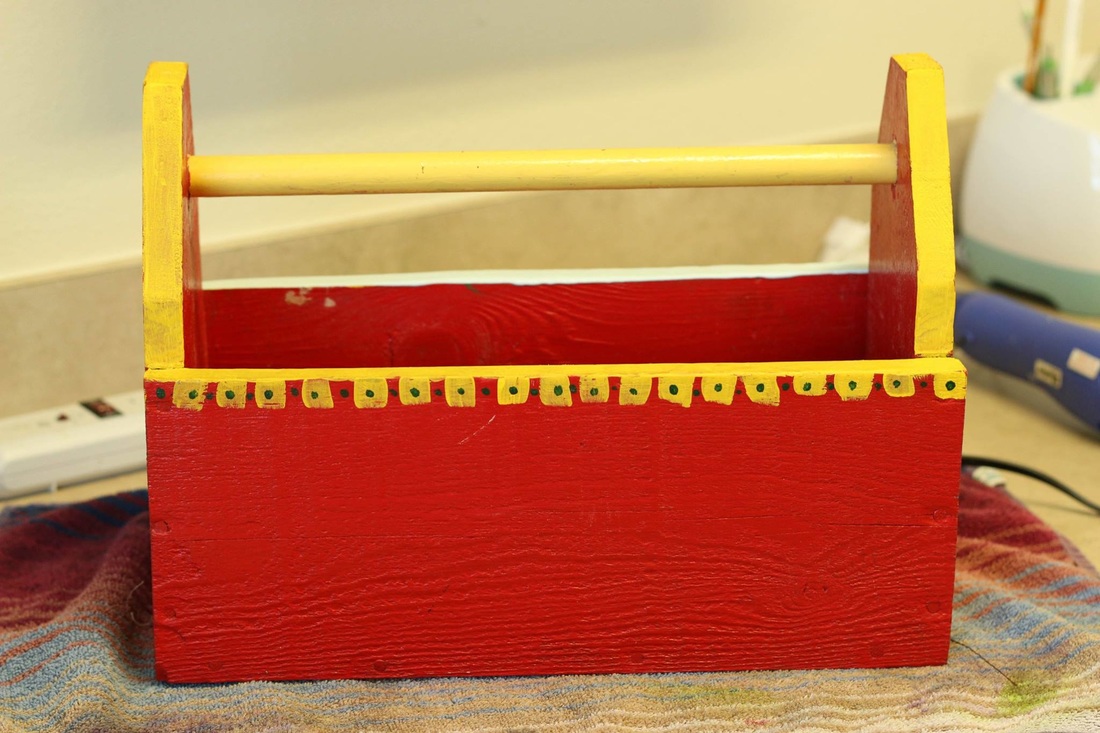
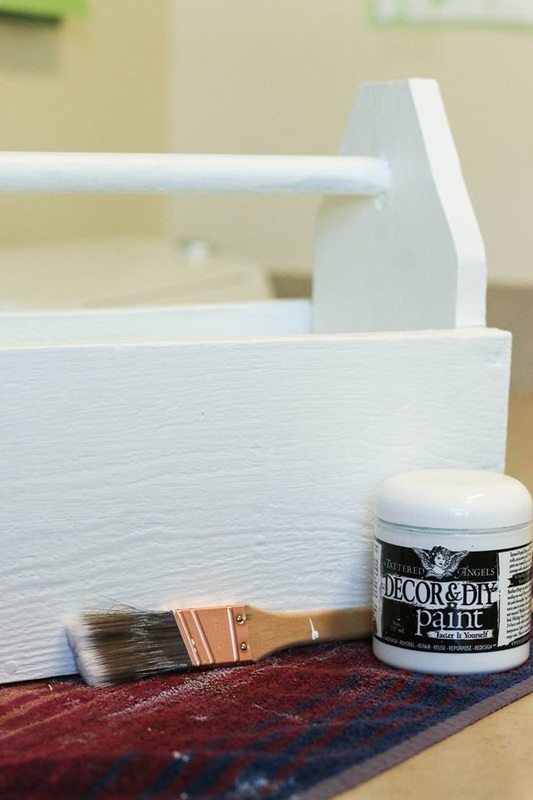
I used Tattered Angels' Decor and DIY paint in Crystal white to cover that hideous red. I used two coats, just to make sure it was completely covered. When the toolbox was painted and completely dried, I wrapped the handle in some twine.
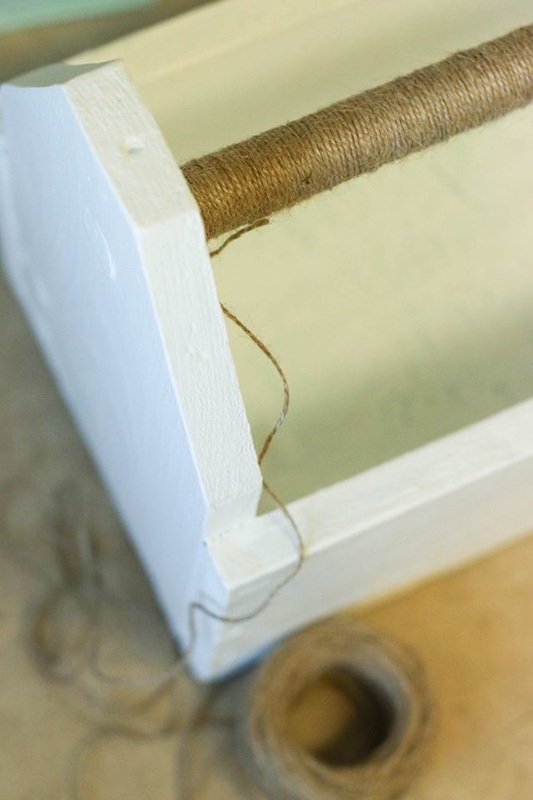
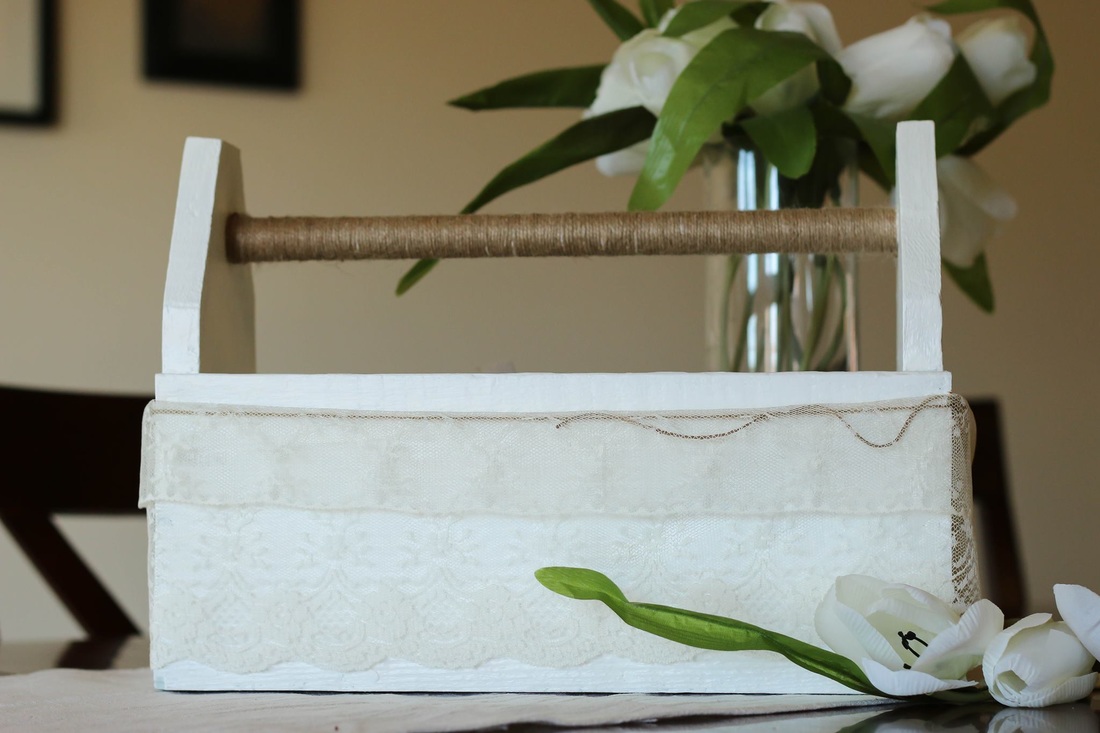
Finally, to finish it off, I took some 7 Gypsies lace and tied it around the body of the toolbox with some more twine. It looks amazing on my dining room table. I look forward to filling it with different things for the seasons!
Thanks for stopping by and happy crafting!
Here's a few products I used:
Thanks for stopping by today!
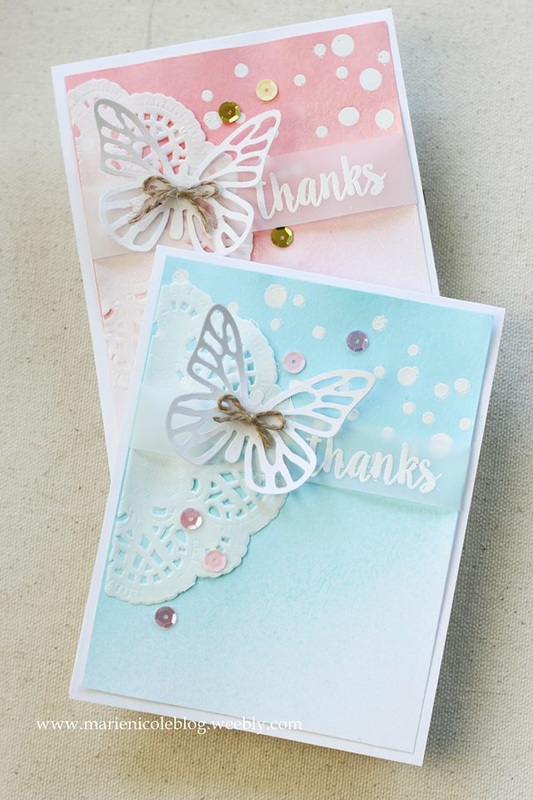
I made a few cards recently using Tattered Angels' Glimmer Mists. These mists are so fun to play with and you can get so many different styles and looks out of them! I made a few cards that are more on the Clean and Simple side. First, I took my Heidi Swapp Confetti stencil and stenciled in some circles at the top of the card using Ranger's Perfect Medium Pen. It puts down a clear, sticky ink similar to VersaMark that you can use to so some embossing with. Then I sprinkled some white embossing powder over the circles and heat embossed them. Next I took my mists and misted the top of the cardstock. I wanted a heavier concentration of the color at the top and have it gradually lighten towards the bottom. The colors I used were Wedding Pink and Patina. Since I embossed first, it created a resist. I just wiped off the mist on top of the embossed circles. Next, I cut a paper doily in half and adhered it to the side. For the sentiment I stamped the word "thanks" on a piece of vellum and wrapped it around the cardstock and adhered it in the back. I cut two butterflies with my Sizzix and placed them next to my "thanks" sentiment. Lastly, I took some coordinating sequins and added them around the butterfly and doily. 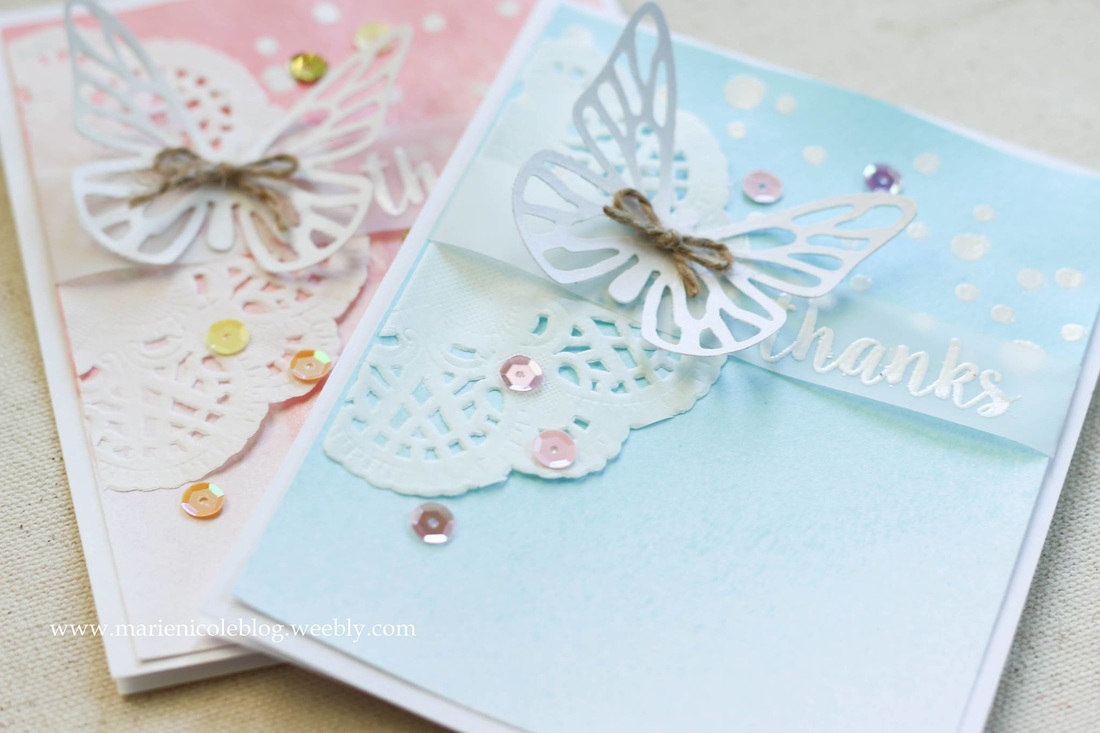
Hope you enjoy today's cards!
Happy Crafting! Here's a few of the products I used:
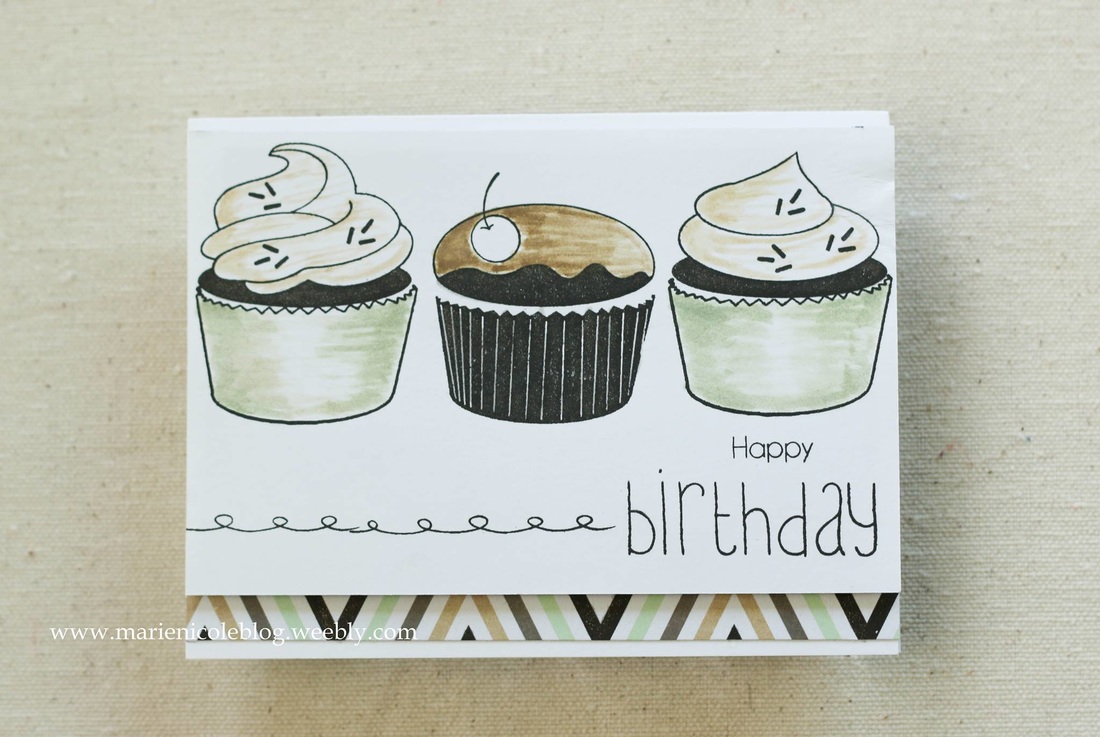
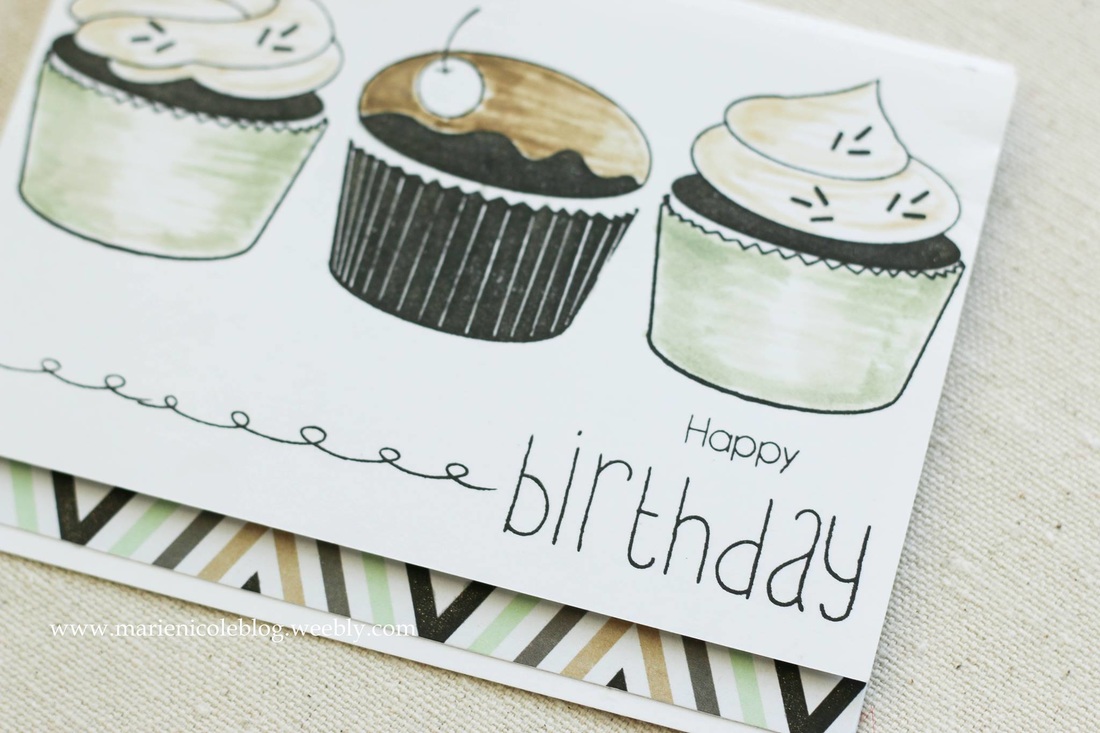
This is a quick easy card I created a while ago. I just used Avery Elle's Cupcake stamp set and stamped three cupcakes using Versafine Black Onyx Ink.
I colored them in with Distress Inks. I picked the colors to coordinate with the strip of patterned paper along the bottom. I used Gathered Twigs, Peeled Paint, and Antique Linen. I used a different stamp set to stamp out the "happy birthday" along the bottom. The cardstock layer that the cupcakes are stamped on is popped up on some craft foam. Lastly, I added some Wink of Stella to the cupcakes for some extra shimmer. 
Thanks for stopping by and Happy Crafting!
Im linking this project up with: Simon Says Stamp's Wednesday Challenge Check out a few products I used!
When we bought our couch it came with three ugly pillows. They didnt coordinate at all with my living room so I went ahead and sewed some simple envelope pillowcases for them out of some canvas fabric. Ive had them on my couch like that for a while now, and decided that it was time to go ahead and decorate them!
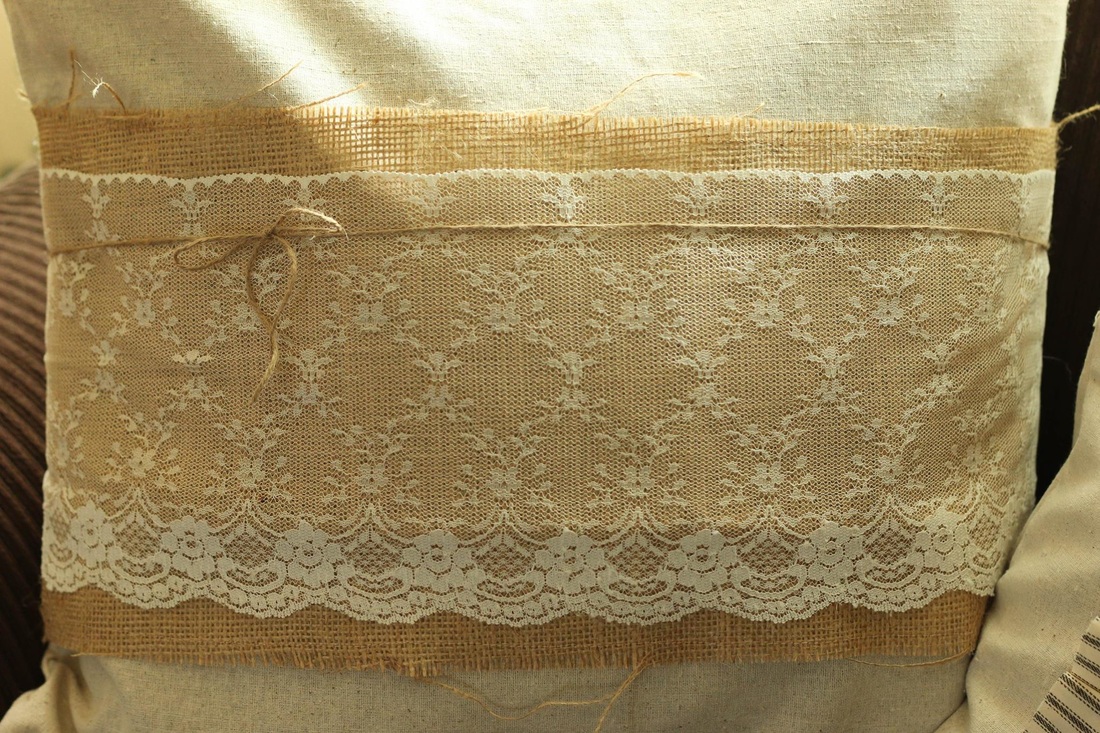
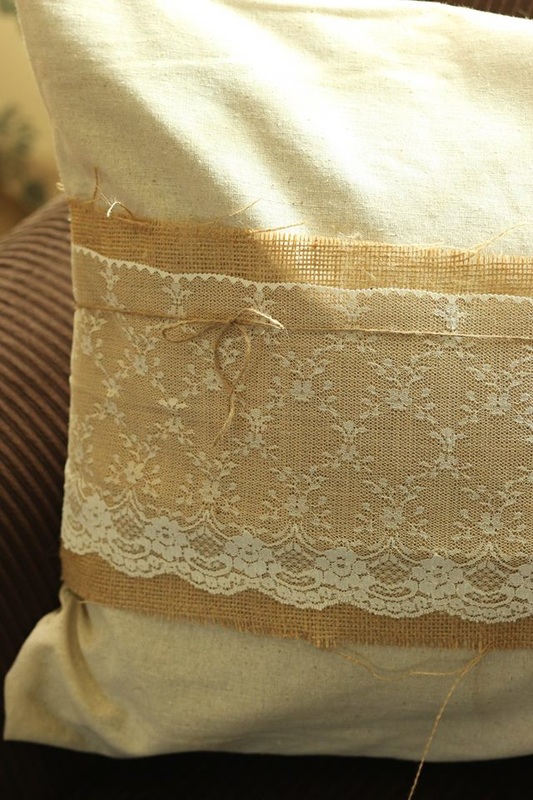
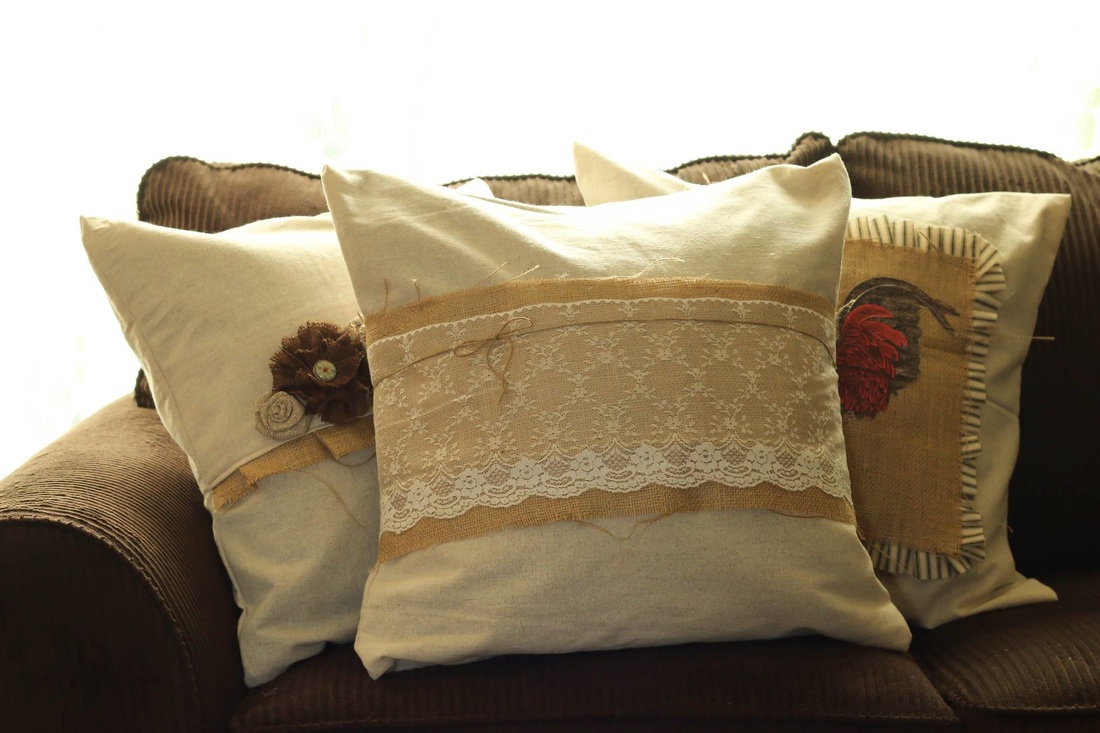
This first pillow I did by simply cutting a piece of burlap from Canvas Corp to go around the middle. Then, I took a piece of 7 Gypsies lace and a piece of Jute Cord and tied those around as well, hot gluing them into place.
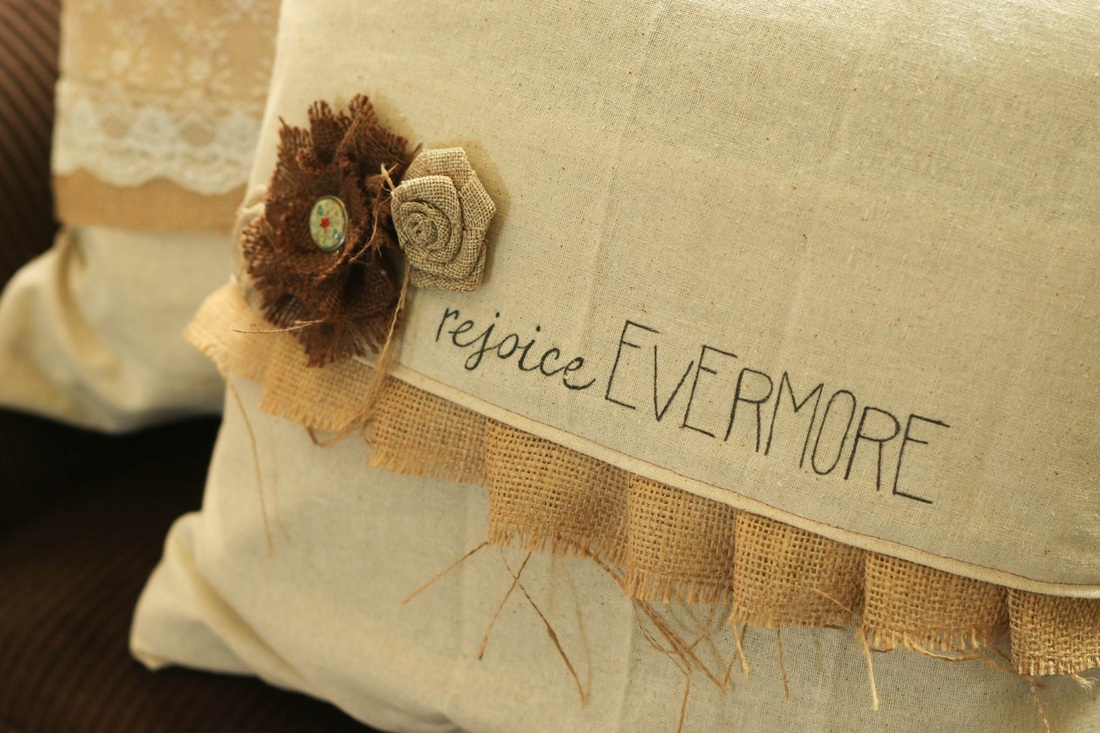
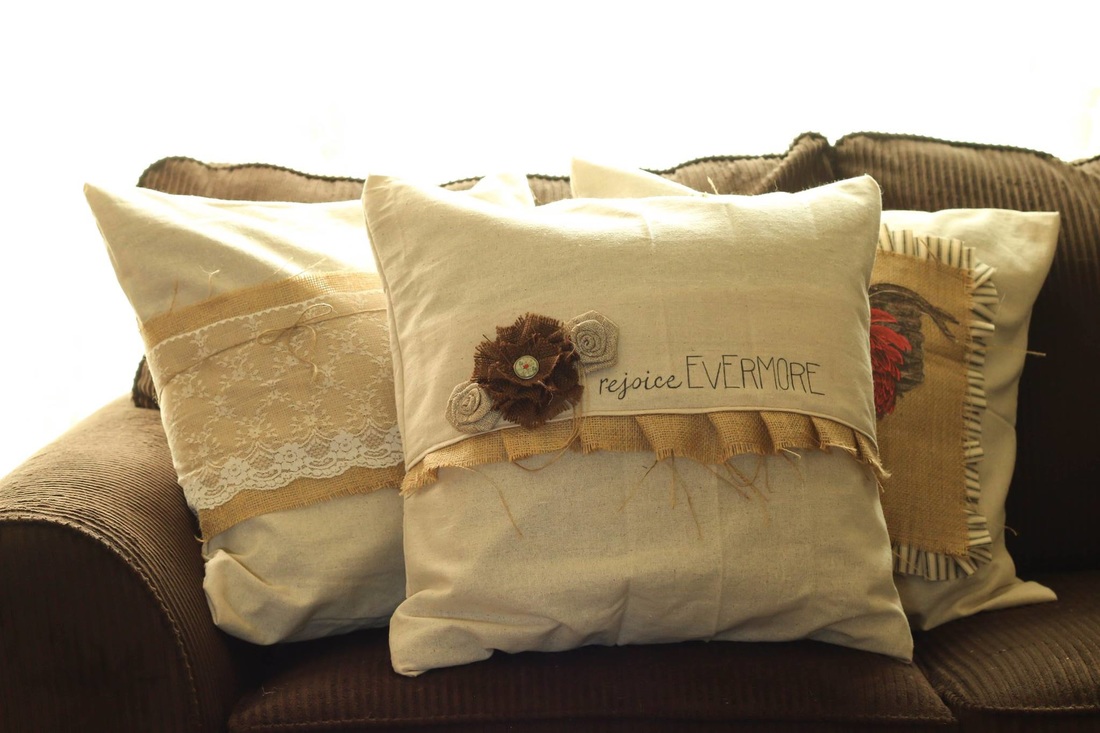
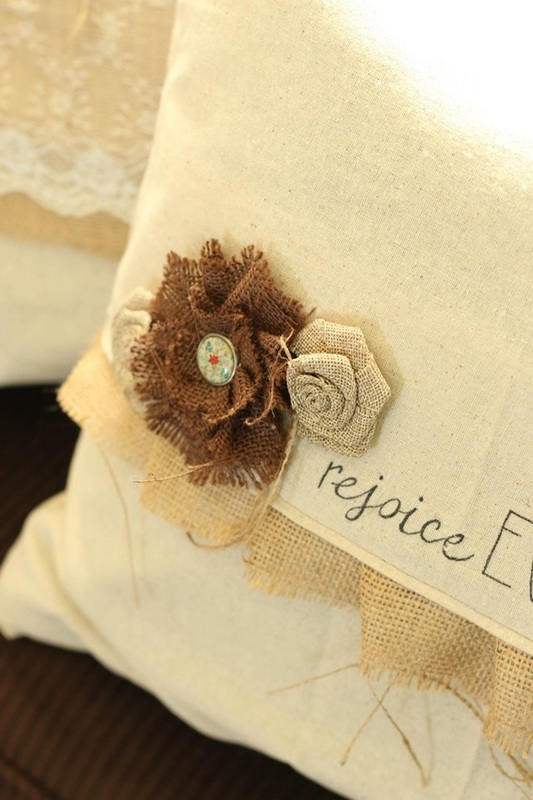
For this second pillow, I sewed a burlap ruffle onto the pillow's opening. Then, I hot glued some fabric flowers to the front. For the lettering, I penciled in "rejoice evermore", and when I was happy with how it looked, I used my Tombow monotwin permanent marker to write over my pencil marks.
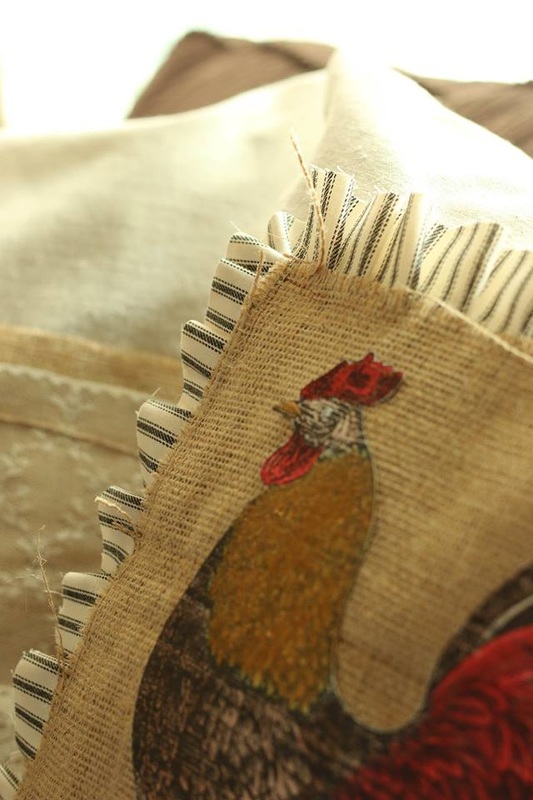
This last pillow took a little more time to accomplish. I took some of the Mixed Media paper from Canvas Corp and painted it in with some Tattered Angels' paints. This paper is so unique because its paper but it feels and acts as fabric. It's so pliable that it makes it possible to sew it on as an applique, which is what I did here.
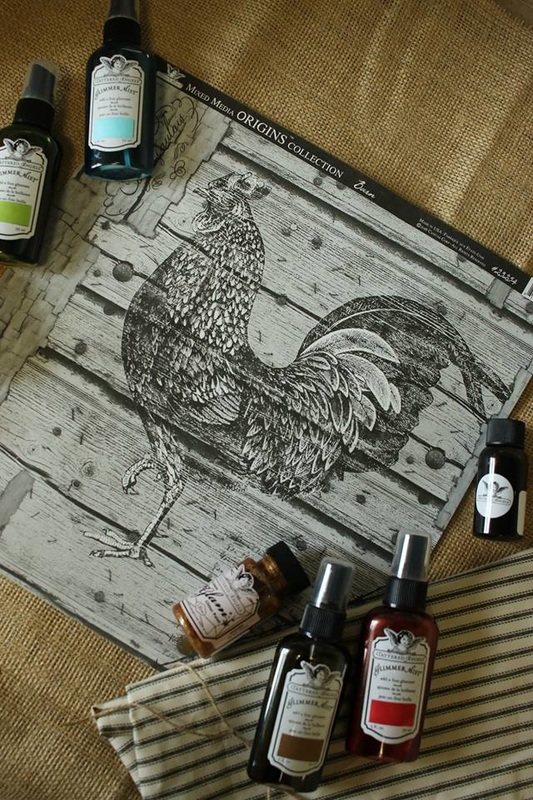
After my paper was painted and dry, I cut it out and then laid it down on a piece of burlap. I cut the burlap into a square for the rooster to fit on. Then, I took some ticking fabric and ruffled it around the burlap. The way I ruffled my fabric is just by folding and pinning into place. After all my ruffles were pinned, I sewed them on.
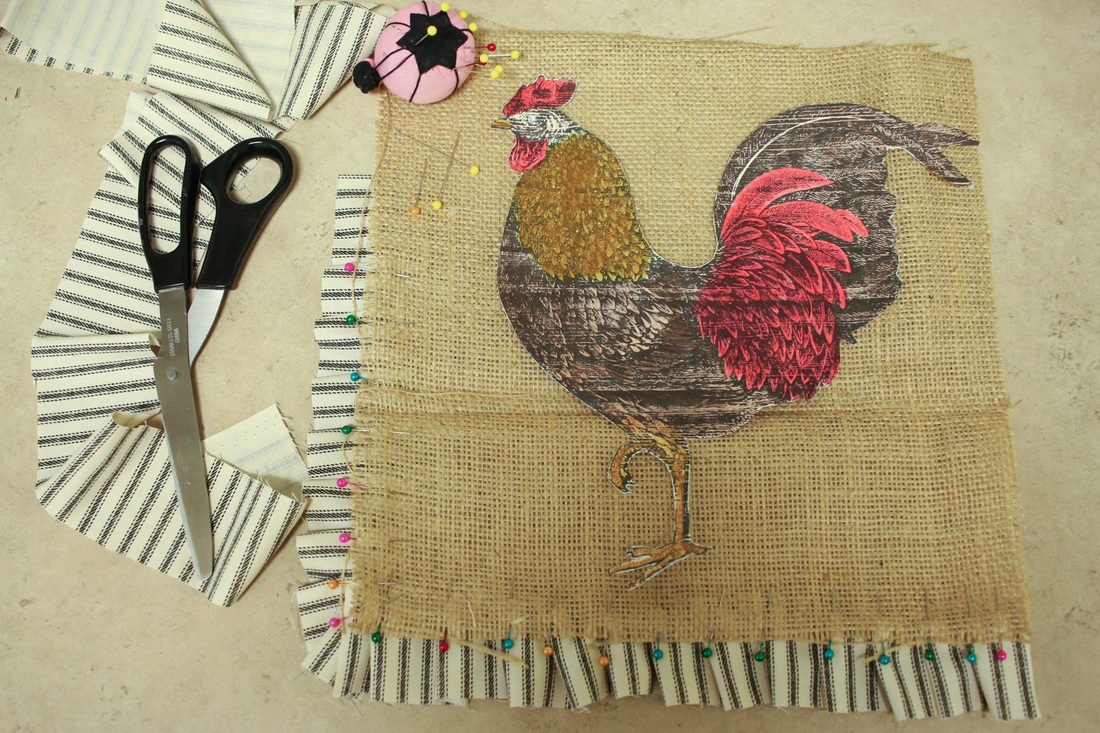
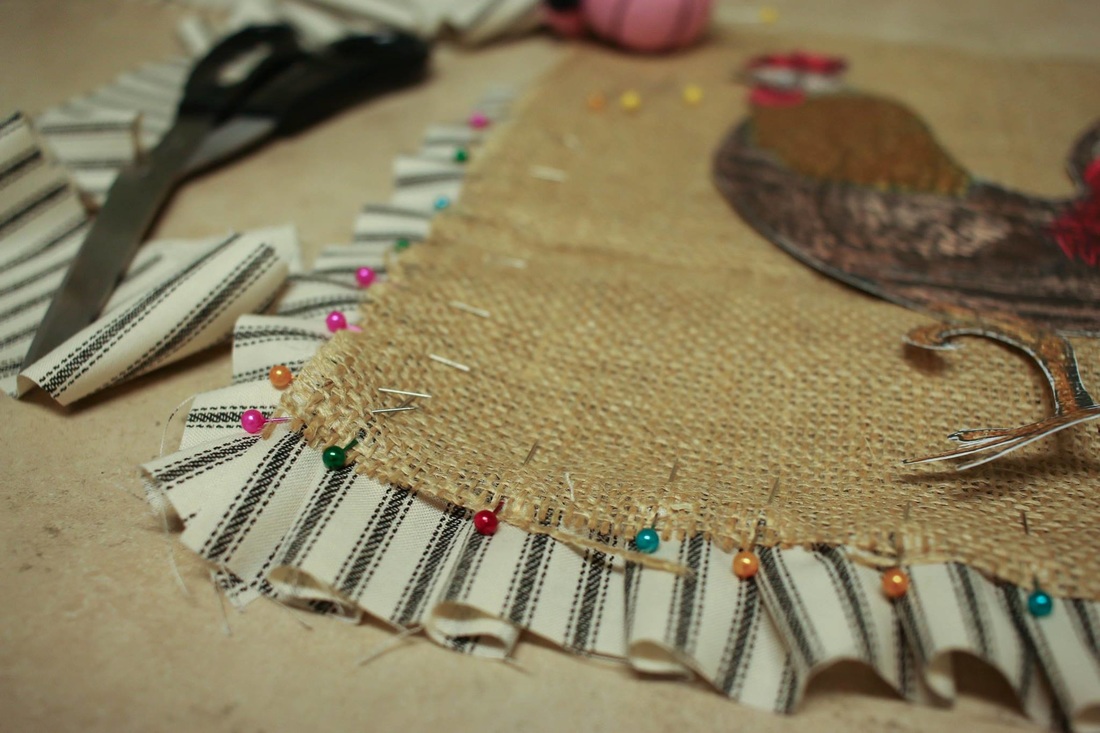
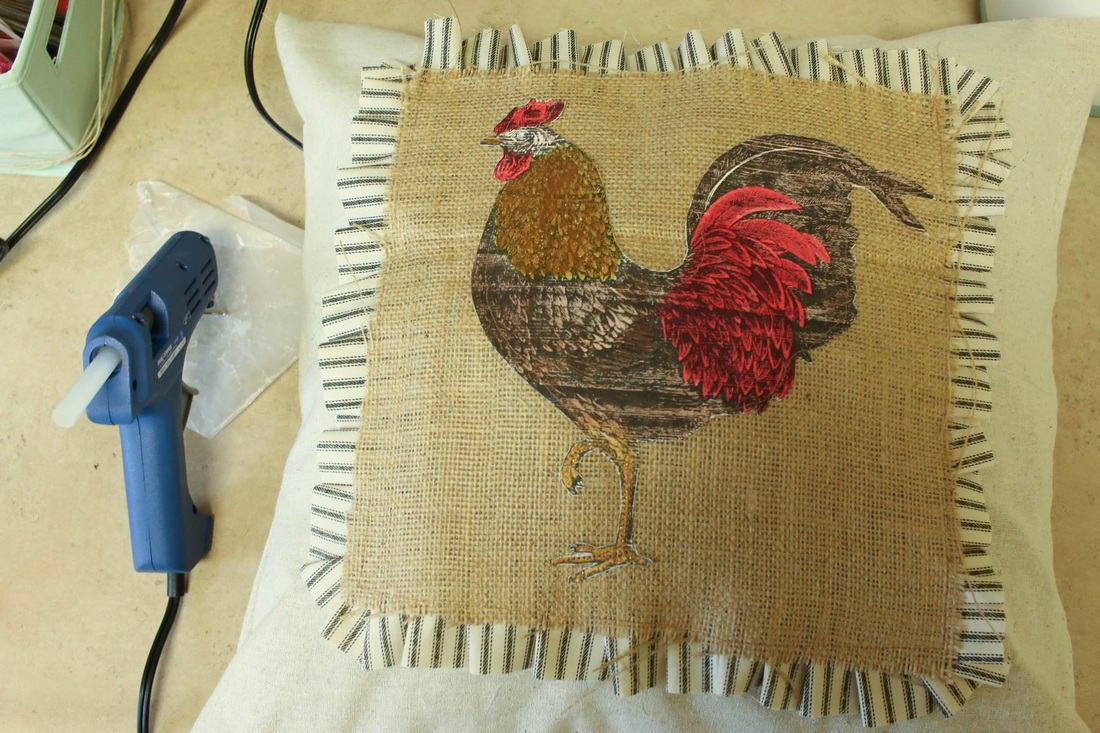
After my ruffles were sewn, I sewed on the rooster. I am not a very good seamstress, so I went very slowly during this part! Then, I took the whole burlap square and just hot glued it onto my pillow. Since these are decorative pillows and I dont plan on throwing them in the washer, I don't mind cheating a little and using hot glue.
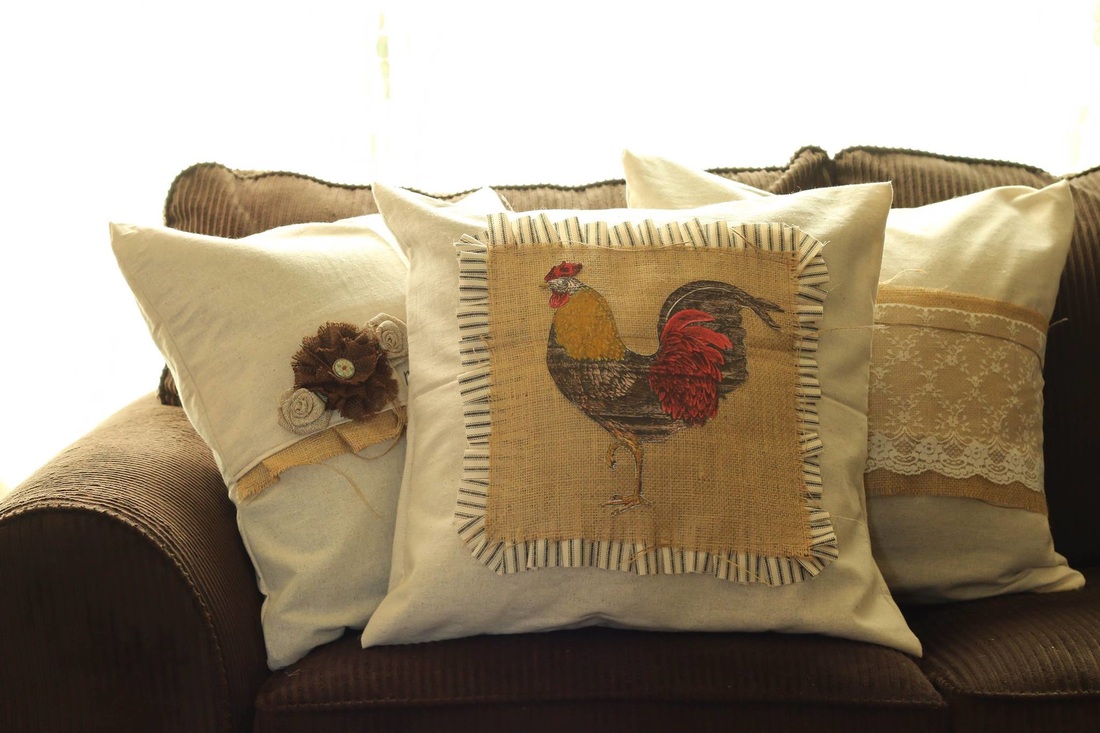
I hope you enjoyed a glimpse of these pillows and have been inspired to try your own! These pillows were also featured on Canvas Corp's Blog, so jump on over there to check it out, as well!
Have a great day and happy crafting! Heres some products I used:
|

Pin it!

AuthorSo glad you found me! This blog is my little space where I can share bits about my life and my latest crafting projects (mostly handmade cards). My goal is to share, inspire, and to be a positive presence in the creative community. 

Find me on Instagram!Archives
January 2018
Categories
All
Link Love
 

|


 RSS Feed
