Hello! I have a simple card to share with you today. I have this "Prayers" stamp set from Simon Says Stamp, and I have been absolutely loving it. It is perfect for sympathy and encouragement type cards.
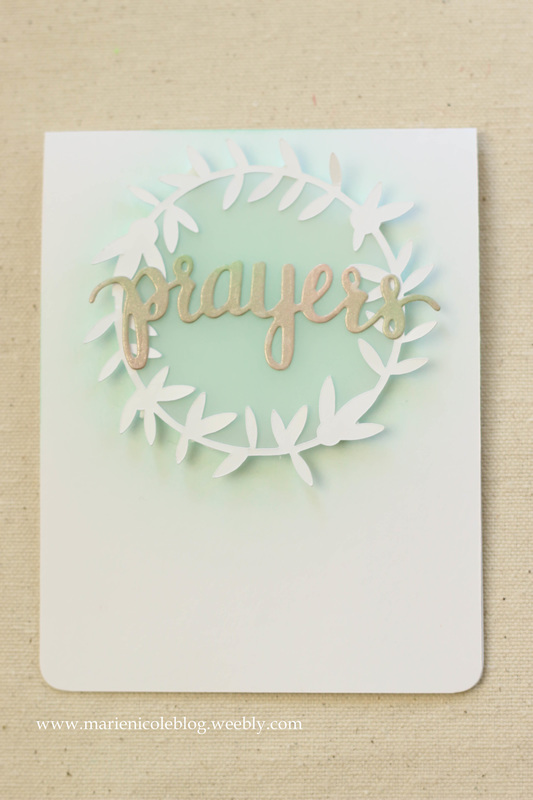
With sympathy cards I feel like you want them simple, classy, and definitely not depressing. I feel this card fits the bill. I started by taking some Cracked Pistachio Distress Ink and lightly applying it to my white cardstock base. I only wanted the color in one spot near the top. Then, I took this beautiful vine frame die cut that I cut using my Cricut and I cut a piece of vellum to fit. I glued the vellum to the back of the frame using Aleene's Tack It glue. For the "Prayers" die, I first took a strip of white cardstock and sprayed it with Tattered Angels' glimmer mists, The colors I used were Mint Julip, Wedding Pink, and I also added a few splatters of their Chalkboard paint in Chalk White. When that was dry, I die cut the word "prayers" and adhered it over the vellum using Aleene's again. Then I took the whole vellum piece and put some tiny foam adhesive pieces on the back to adhere it to the base. That completed the card! It was so simple so I ended up making two. I may even make a few more to complete a set of them. 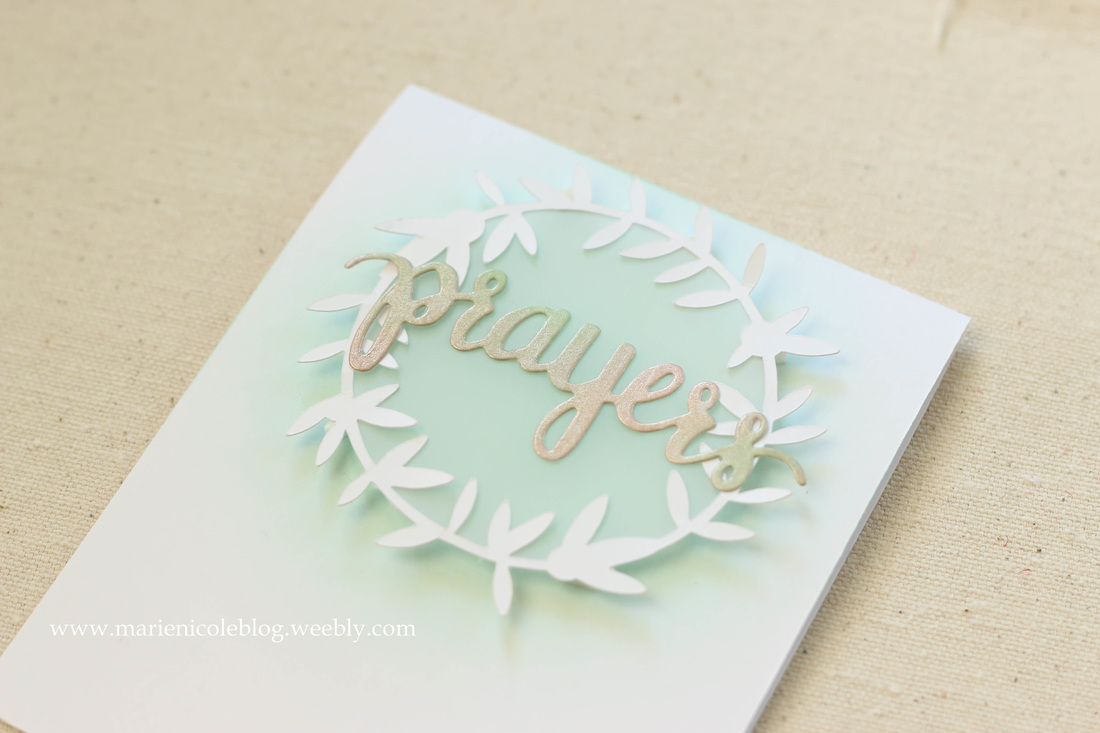
Thank you so much for taking the time to stop by!
If you are interested in the products I used, I have put together some links to them below!
I'm also linking this up with Simon Says Stamp's Monday challenge!
The challenge is to Leap Into the Unknown, and since this is my first time working with vellum, I'd say it fits!
3 Comments
 Hello, crafty friends! I'm Hayden. I'm almost 14 months old and I enjoy learning to walk (I can go quite the distance now!), looking out the window at airplanes, and French fries. I'm also very energetic and curious. I've been trying to get my hands on Mommy's craft supplies for a while now and today she let me. I would like to share my first painting project with you. 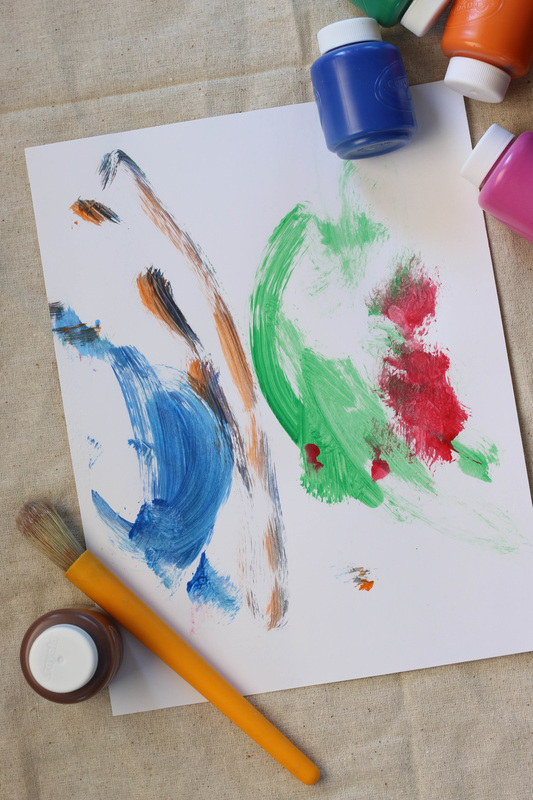 First, I took some green and swooshed it on. Next came red, and I was feeling spunky so I decided to just kinda mash it on under the green swoop. After the red, I smeared some blue. I was getting kinda done with this project around that time, so the orange kinda accidentally got on the paper while I was swinging the paintbrush around. It was a happy accident, though, because I feel like the orange just pulls this whole piece together! 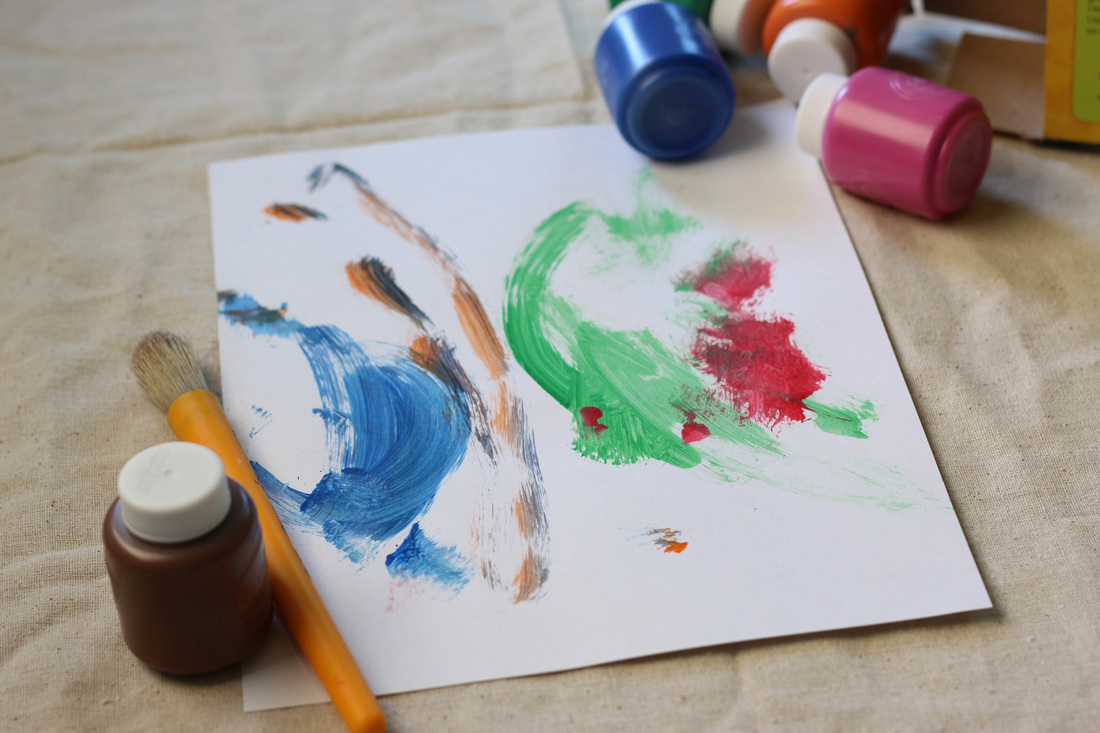 Thanks for stopping by to take a peek at my art today! Maybe Ill share more with you in the future. I also make a video of the process that Ill link to below. Have a great day and happy crafting! 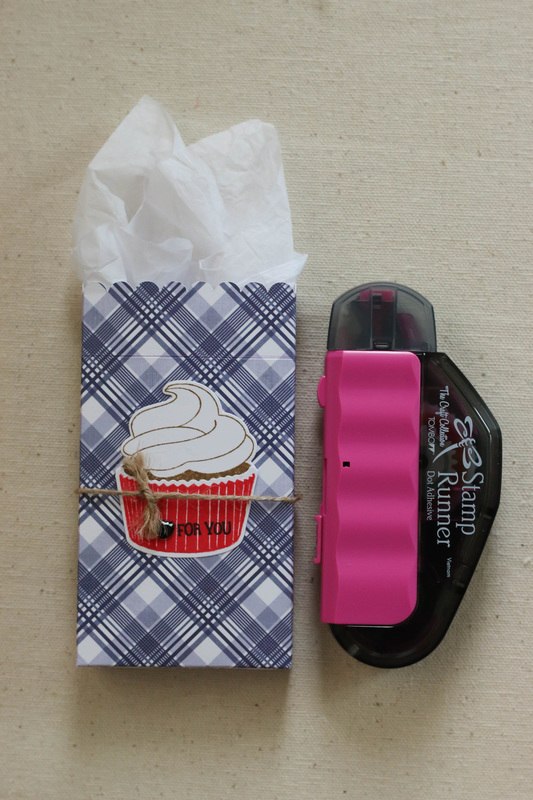
I was so excited when I received this Stamp Runner from Tombow. I use a lot of adhesives in my crafting and this one works great! I couldn't wait to get started with it so I made a quick little gift box while Hayden was napping.
I first cut the gift box with my Cricut. My Cricut also did the scoring for me so by the time it was cut I was ready to assemble it! I added my adhesive to the sides that needed it, and just folded it together. For the little cupcake on front, I stamped it using Avery Elle's Cupcakes stamp set. The base is Candied Apple Distress Ink, and the frosting is Gathered Twigs. I added a little rhinestone heart next to the "for you" sentiment and also some twine from Canvas Corp. 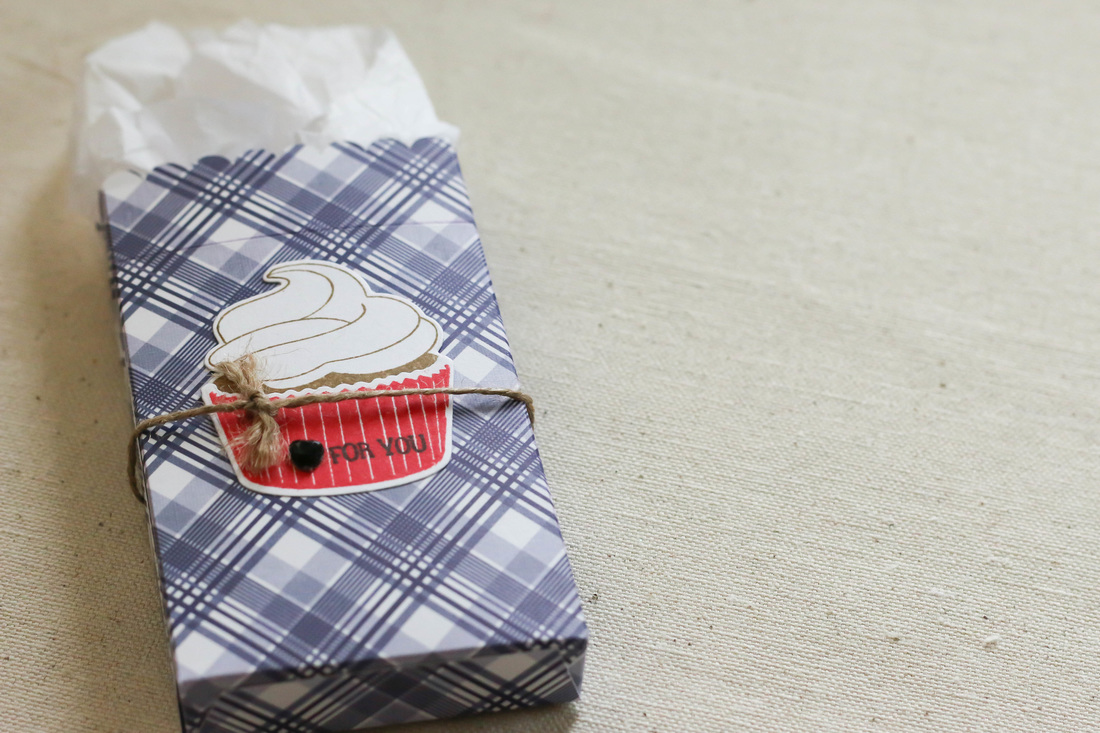
Its the perfect size box to hold a gift card and a candy bar or two.
I made a video of the process as well. Enjoy! Check out some fun products I used!
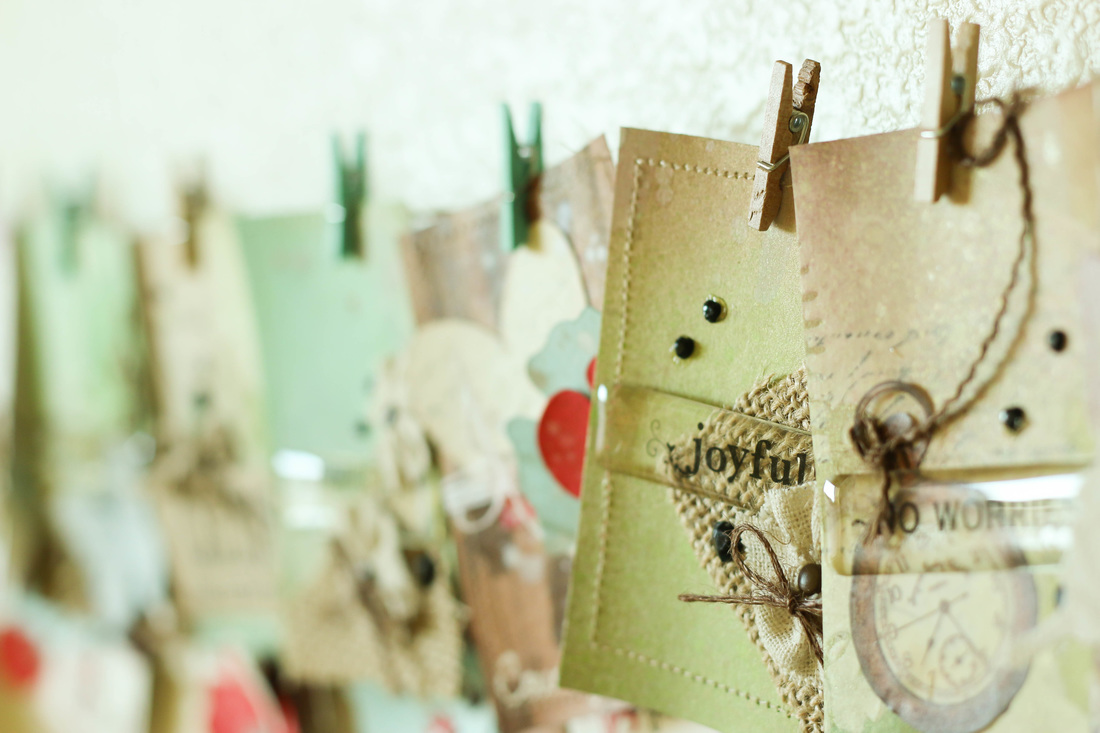 So, in 2016 I have been selected to be part of Canvas Corp Brands' Creative Crew! I'm telling you, I am already having a blast with this! There's so many creative, inspiring people I get to connect with, and some great, high quality products I get to play with! One way that I was able to connect with the other Crew members was taking part in this fun ACT swap. Now, Ill be honest. I had never done ATCs before. I didn't even know what ATC stood for (it means Artist Trading Card). The idea behind it is to create a 2 1/2x 3 1/2 in card that you decorate/craft/create on and then swap with other artists. How fun! I'm looking forward to getting to know the other members through their art. We decided that we would each create 12 cards and then send them out to 12 people. I was able to send out my 12 cards to people in many different states, as well as overseas to places like Greece, Austria, and Norway! The pictures I am posting here are the cards I created for my fellow Crew members. I made them each unique, but they all have a similar theme they follow. I also made them in kind of pairs. Wouldn't it be fun to see who has the "match" to your pair? 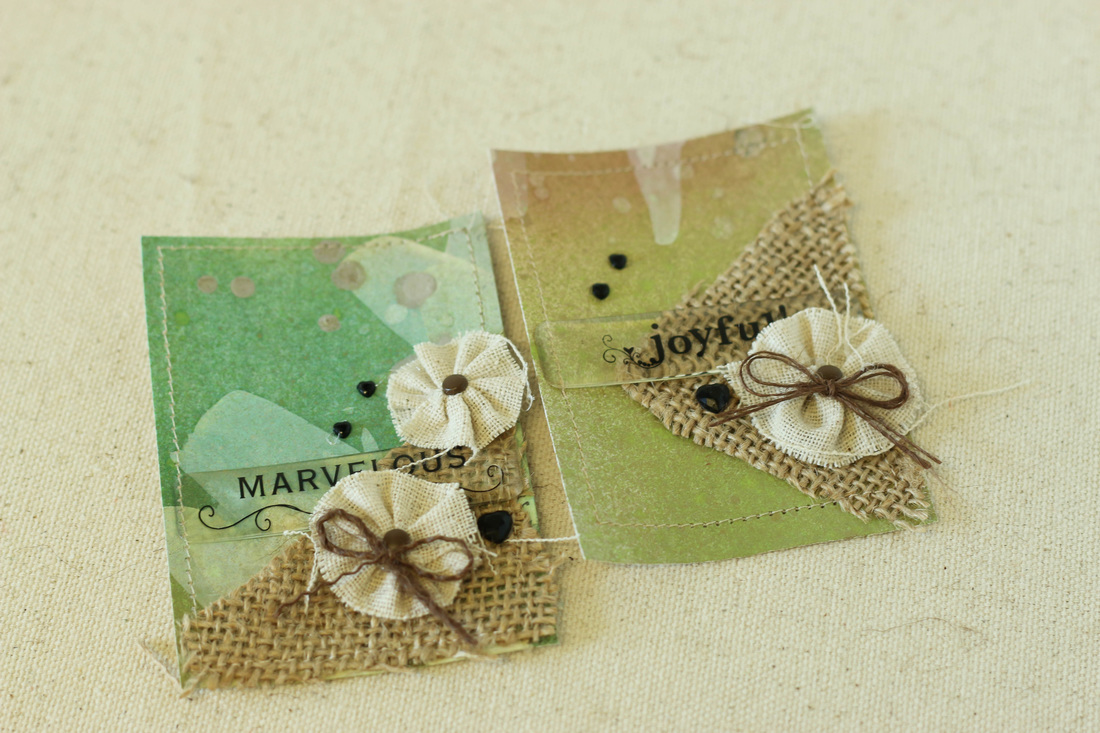 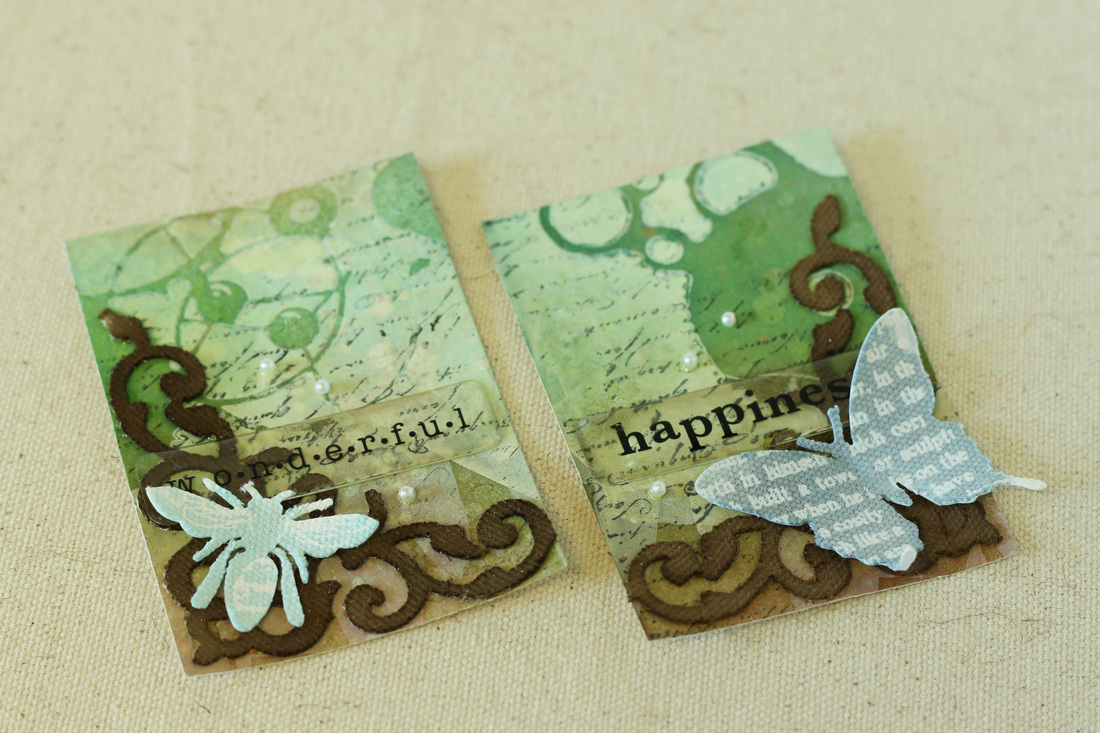 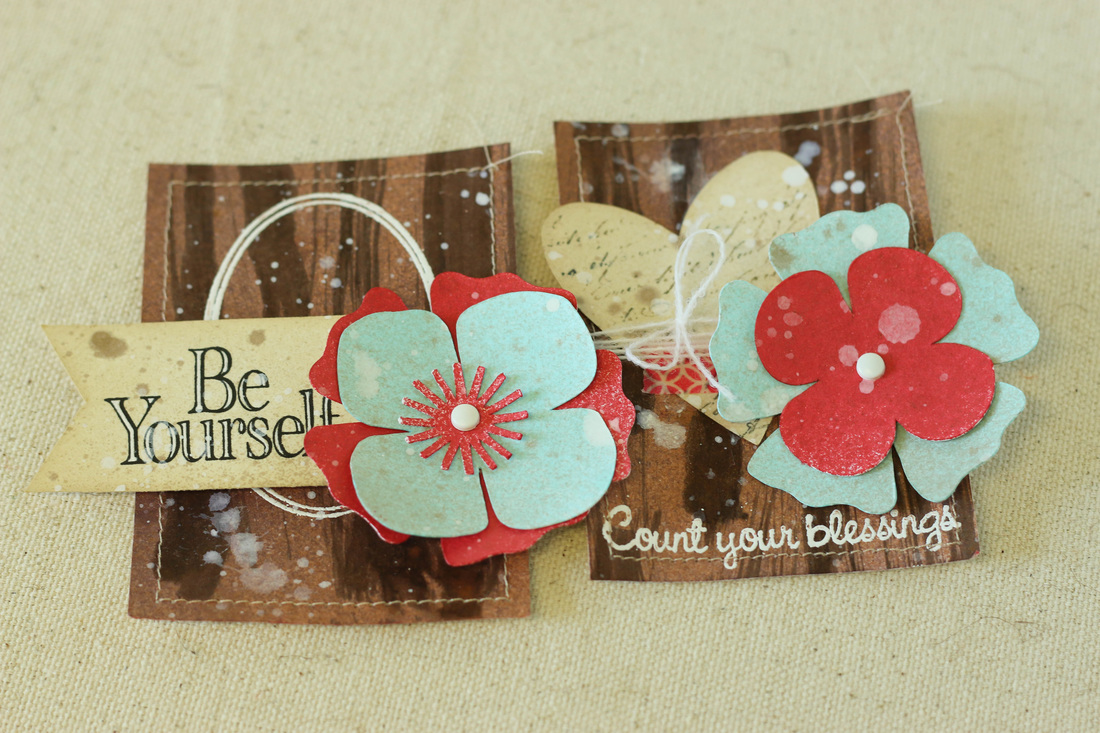 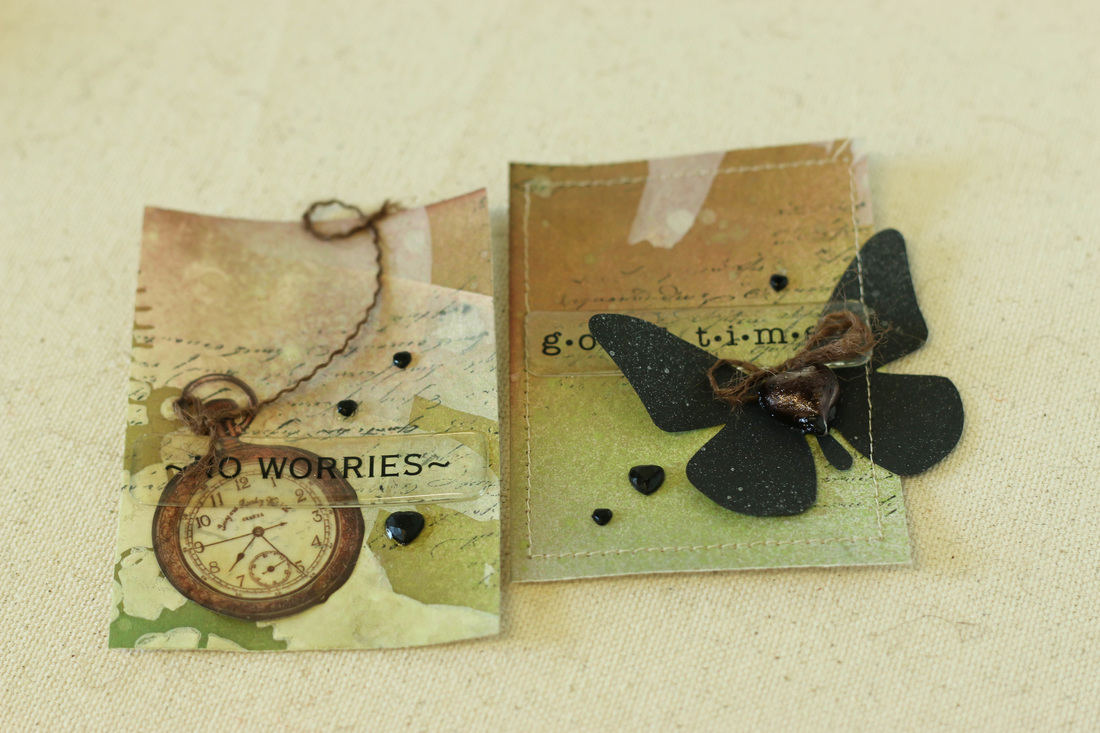 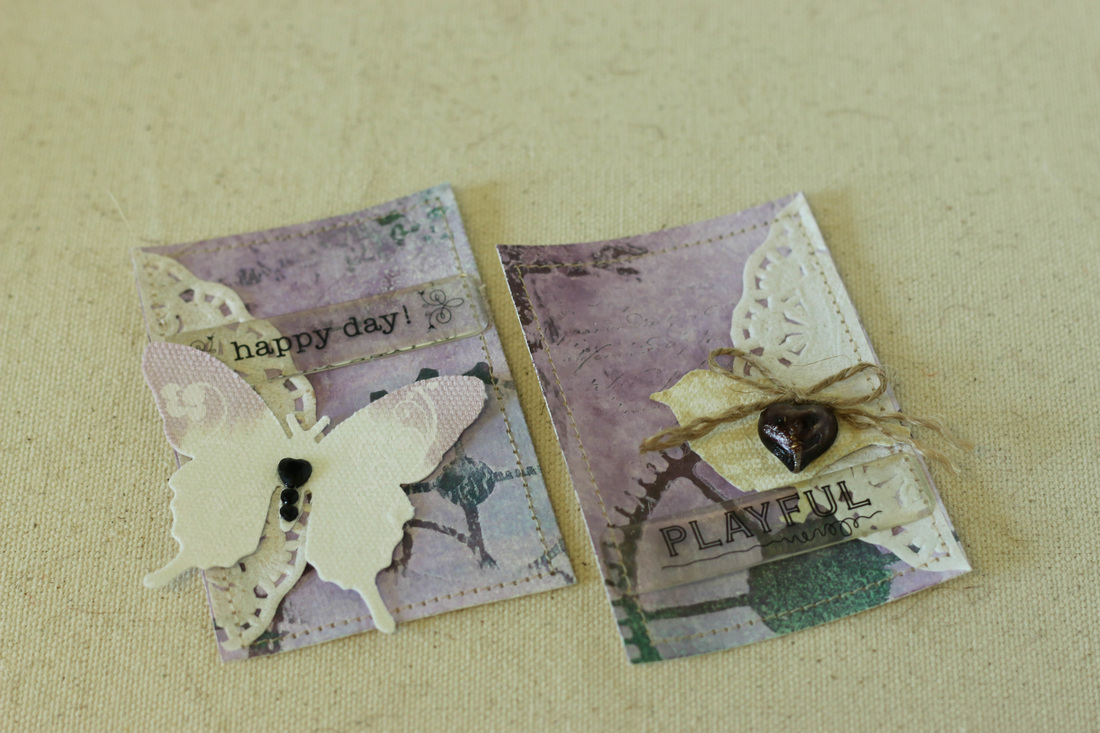 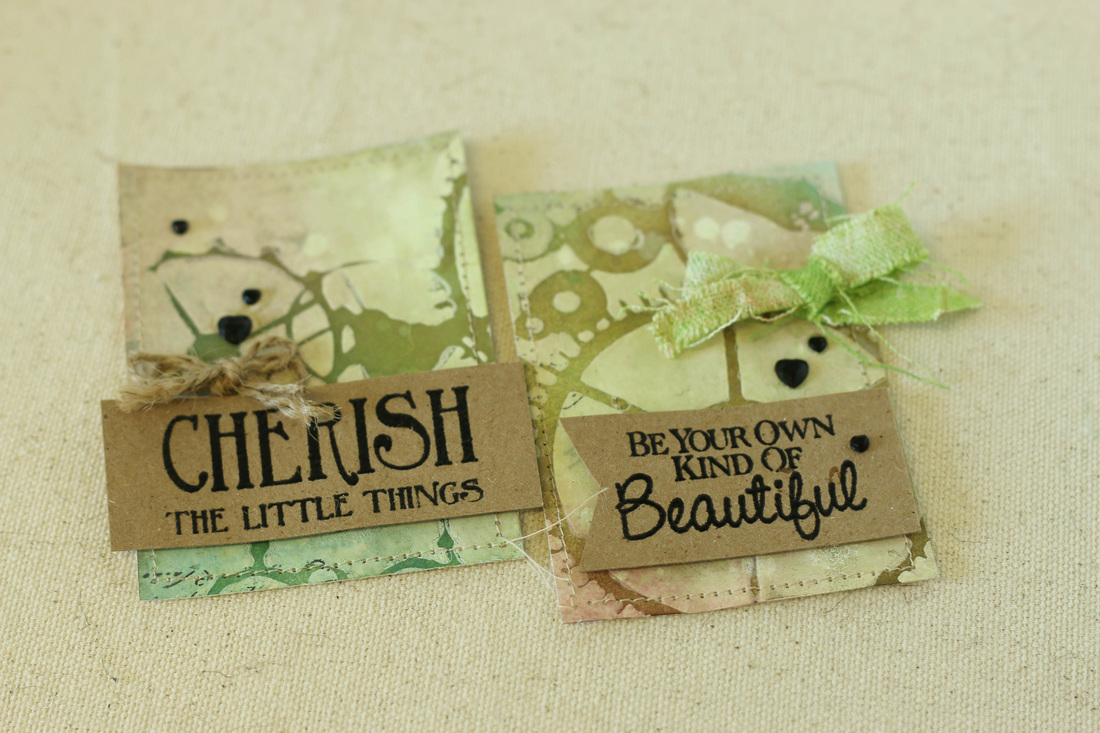 For most of the cards, I took a plain white piece of cardstock and then used some gesso over my TCW's Mini Gears stencil. Then, I used a mix of Distress Inks and Tattered Angels' Glimmer Mists to give it color. I then cut my paper into ATC size cards. One 8.5x11 piece of cardstock wont make a full 12 cards though, so for the last two I used Tattered Angels' Naturally Aged Mahogany kit to create a faux wood background. Then, I just added the embellishments using bits from Canvas Corp and from my own personal stash. For most of the cards, I also ran them through my sewing machine to give them a stitched border. I was so excited to get these all in the mail! Hoping that each one makes it to its destination safely! 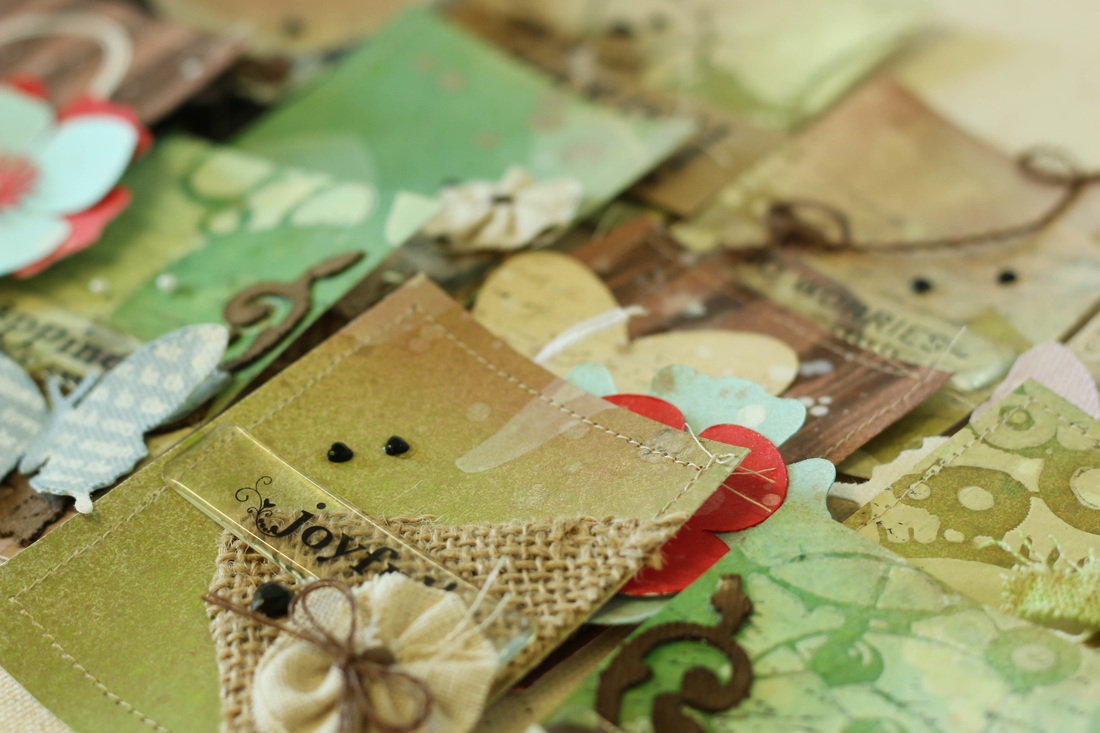 
We are so excited to be able to spend Valentine's Day with my family this year. Living states away usually means we don't get to spend special days together, but it just so happens that we will be visiting during this fun holiday!
Most of my family will be able to get together (and we will be sorely missing the ones that can't be there), so I decided it would be fun to make some treat boxes for the kids. I started by die cutting these pillow boxes with Sizzix's pillow box die. Then, I decorated each one accordingly. 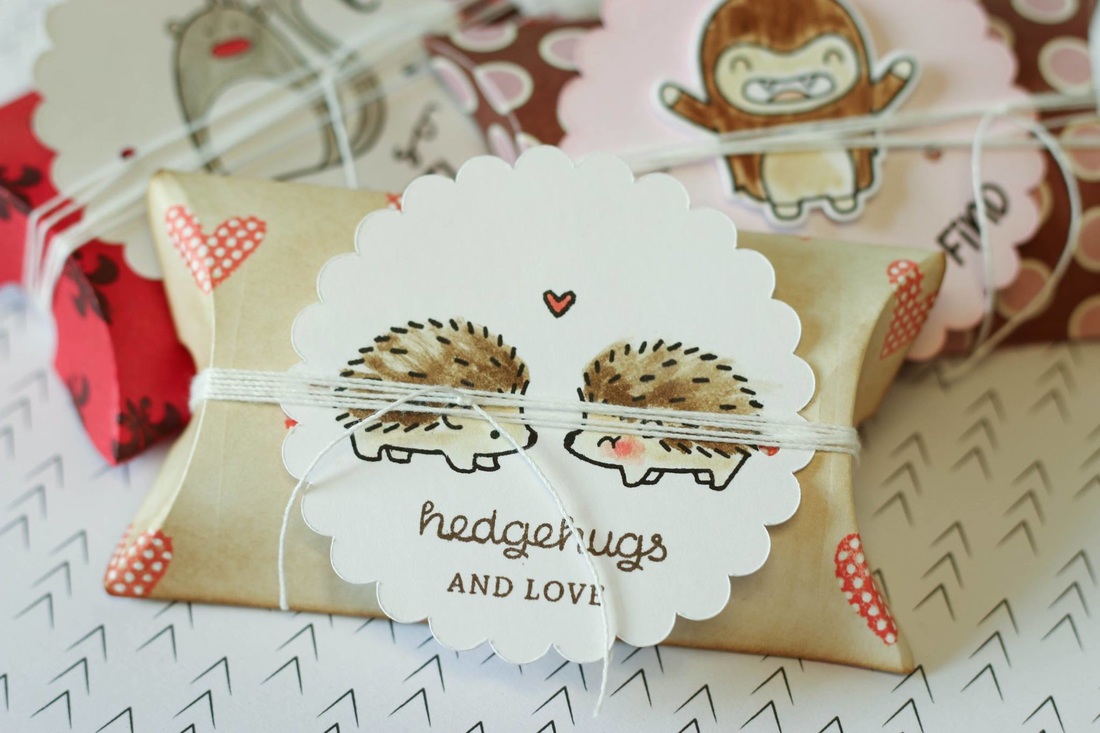
For the "hedgehugs" boxes, I stamped some hearts on the background using Abandoned Coral Distress Ink. Then, I blended in the background using some Antique Linen and Gathered Twigs. I added some detail to the hearts with my white gel pen. For the sentiment, I cut some scalloped circles and stamped Lawn Fawn's Sending Hedgehugs stamp set on it. I used some more Distress Inks to color in the hedgehogs.
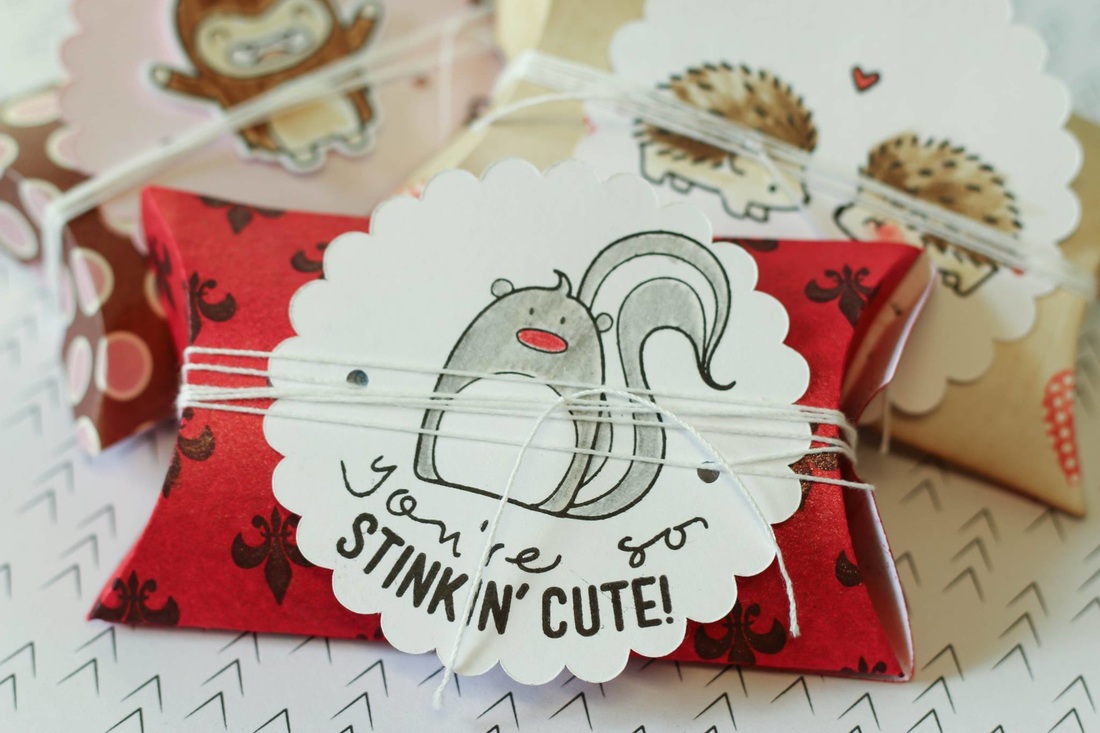
For the skunk boxes, I colored the backgrounds using Tattered Angels' Lobster Glimmer Mist and then stamped a Fleur de Lis using Canvas Corp's Be Beautiful stamp set. Then, the sentiment was stamped with Simon Says Stamp's Stinkin' Cute stamp set and colored with watercolor pencils.
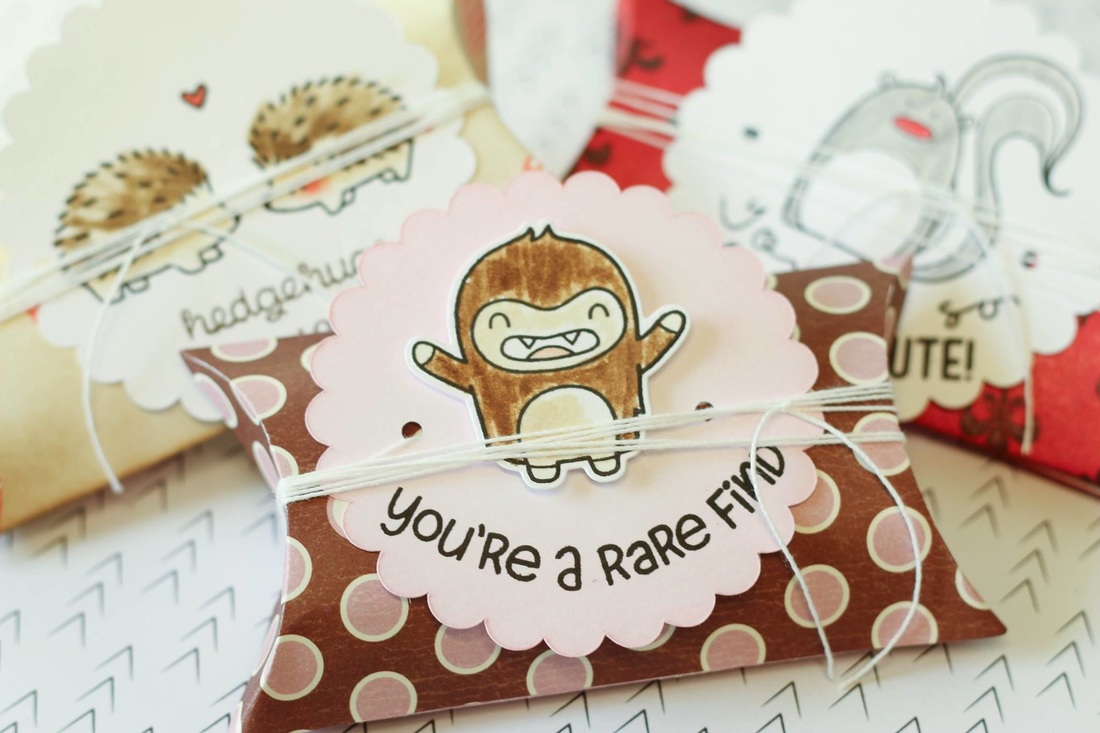
These cute Yeti boxes were cut from some patterned paper Ive had in my stash forever. I used Distress Inks to color in Lawn Fawn's Yeti, Set, Go! stamp set to coordinate. To finish all the boxes and to securely tie them shut, I punched two holes on each side of the scalloped circles and ran some white string around a number of times, and then just knotted it in front.
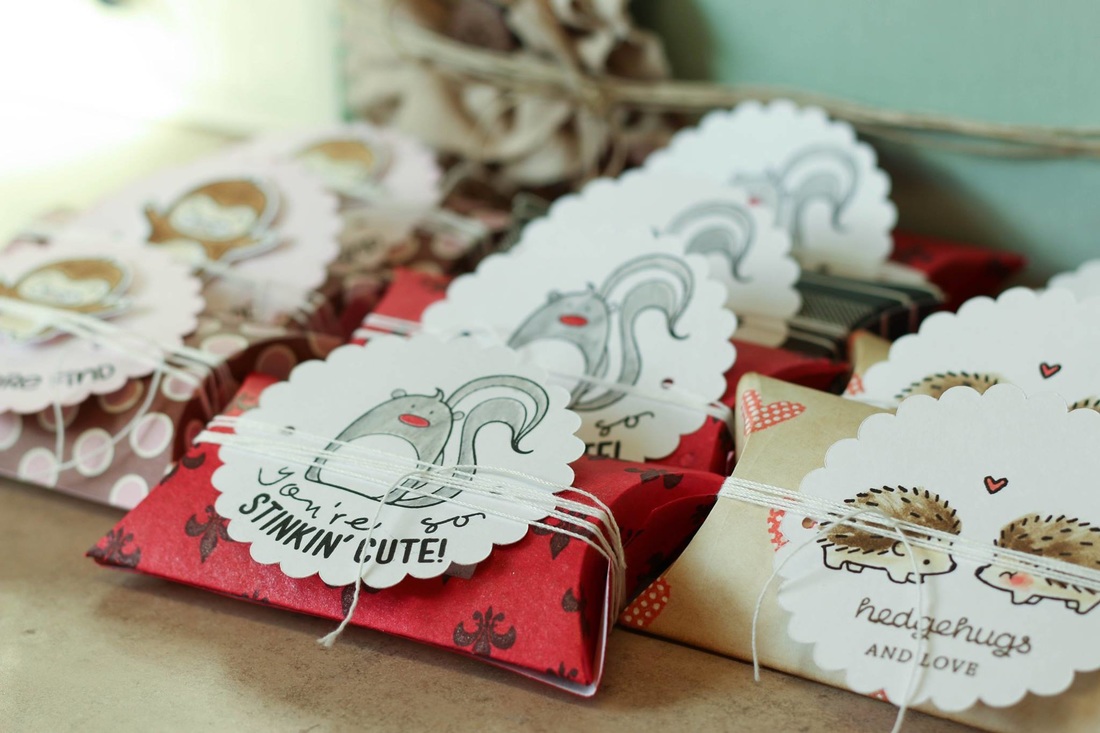
I ended up making 10 of these for the 10 kids that will be present for our Valentine's Day party. Eight of them are filled with Hershey Kisses, and two have some girly baby headbands for the younger girls who can't have candy yet.
Just can't wait to pass them out! Check out some fun products I used!
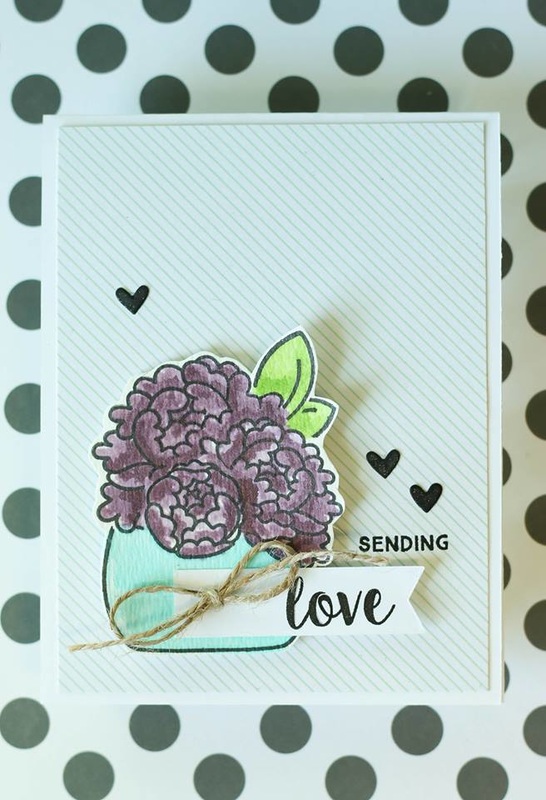
Tombow recently sent me some fun products to play with. One of them, their Tombow Mono Removable Adhesive, seemed like it would be perfect to try to do some masking with.
I wanted to create a single layer image of Avery Elle's Peonies in their vase. I die cut the shapes out of plain white cardstock, and applied them over the coordinating stamps with Tombow's adhesive. It worked great! Not only did it hold the die cut pieces in place, it also did not leave any stickiness behind. The flowers were colored in with Tattered Angels' Glimmer Mists, and then I fussy cut them and mounted them over some patterned paper with some craft foam. To finish the card, I added some black hearts and brushed some Wink of Stella on top of them. Watch the video below to see the whole process! 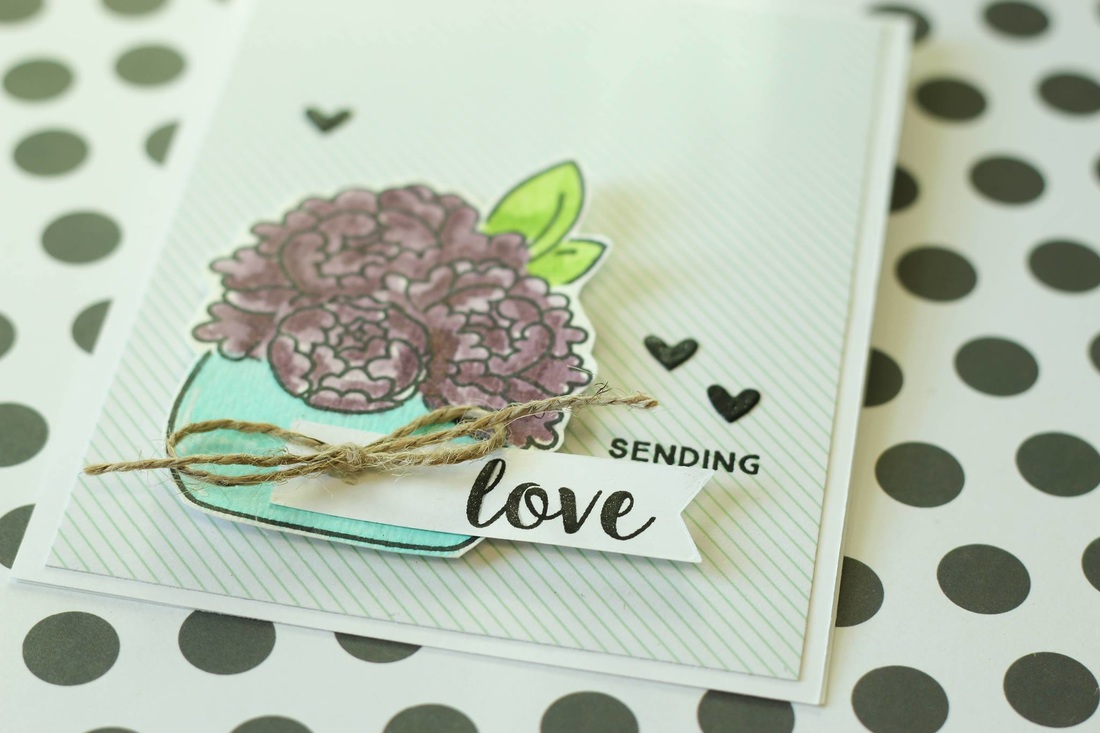
Check out some fun products I used!
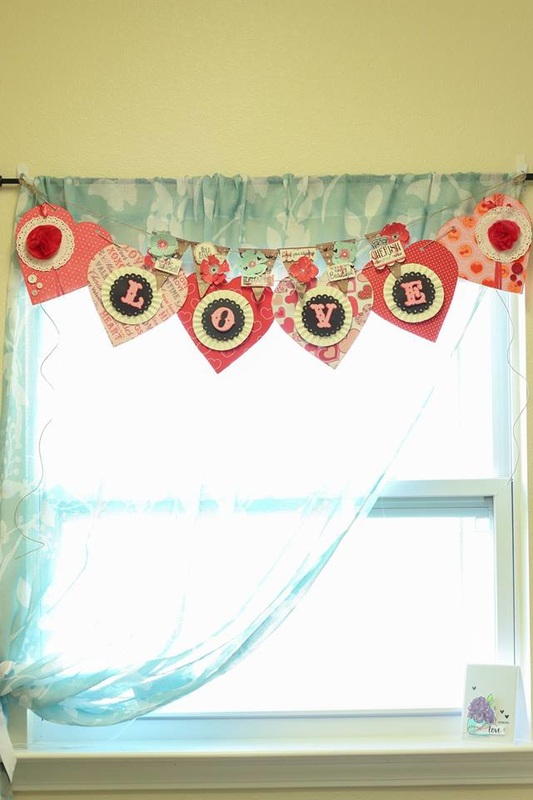 This banner isn't exactly new to me. I made it several years ago, but I like to pull it out of my storage every year for Valentine's Day. 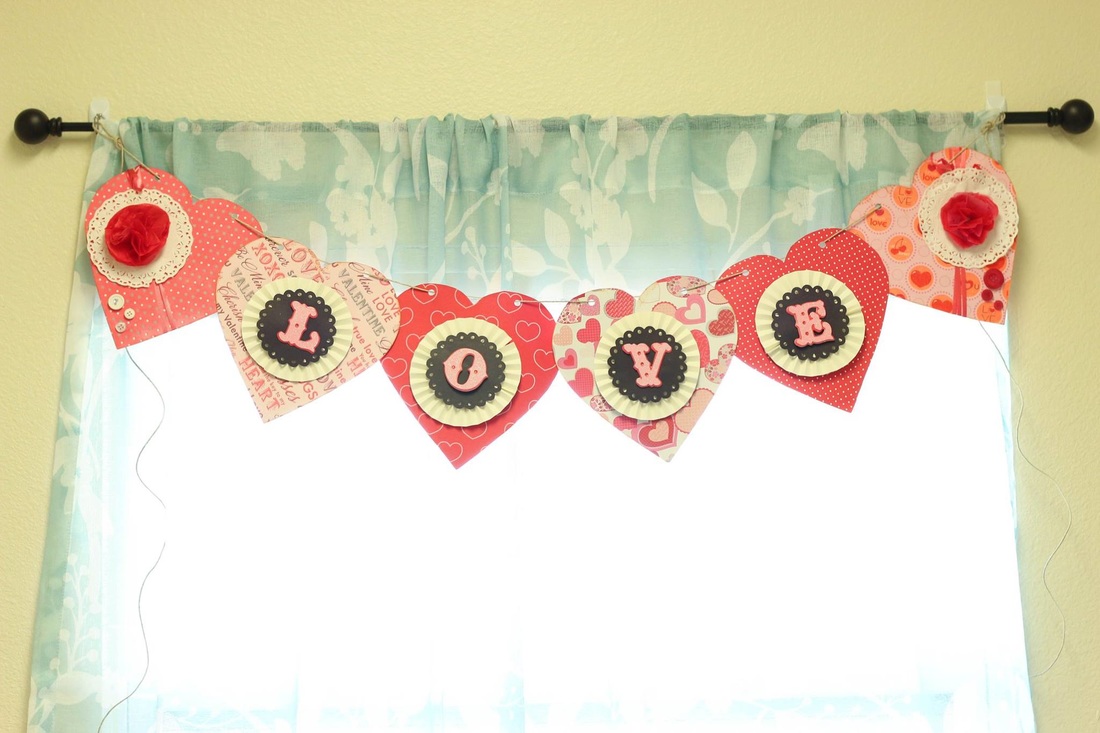 I don't remember all the products that I used, but I do know that the hearts were cut from some heavy posterboard, and that I used some thin scrapbooking paper over the top. 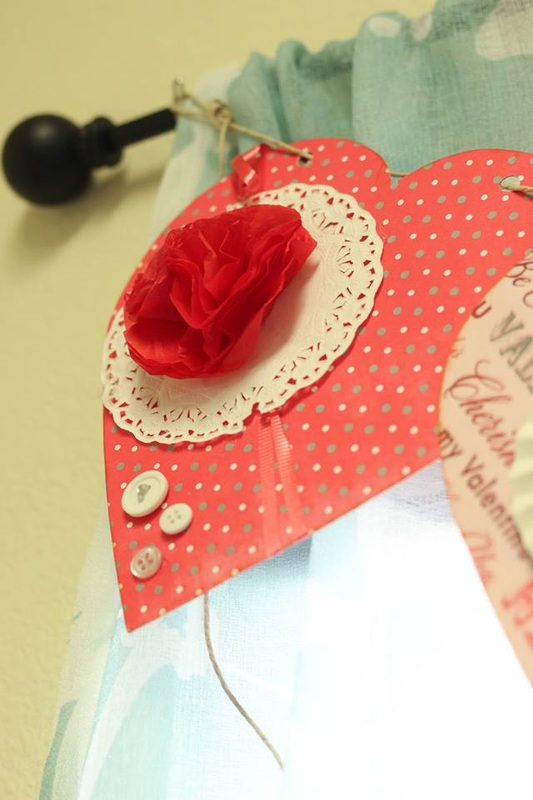 The hearts on the ends I embellished using some buttons, paper doilies, and crepe paper layered and fluffed into flowers. 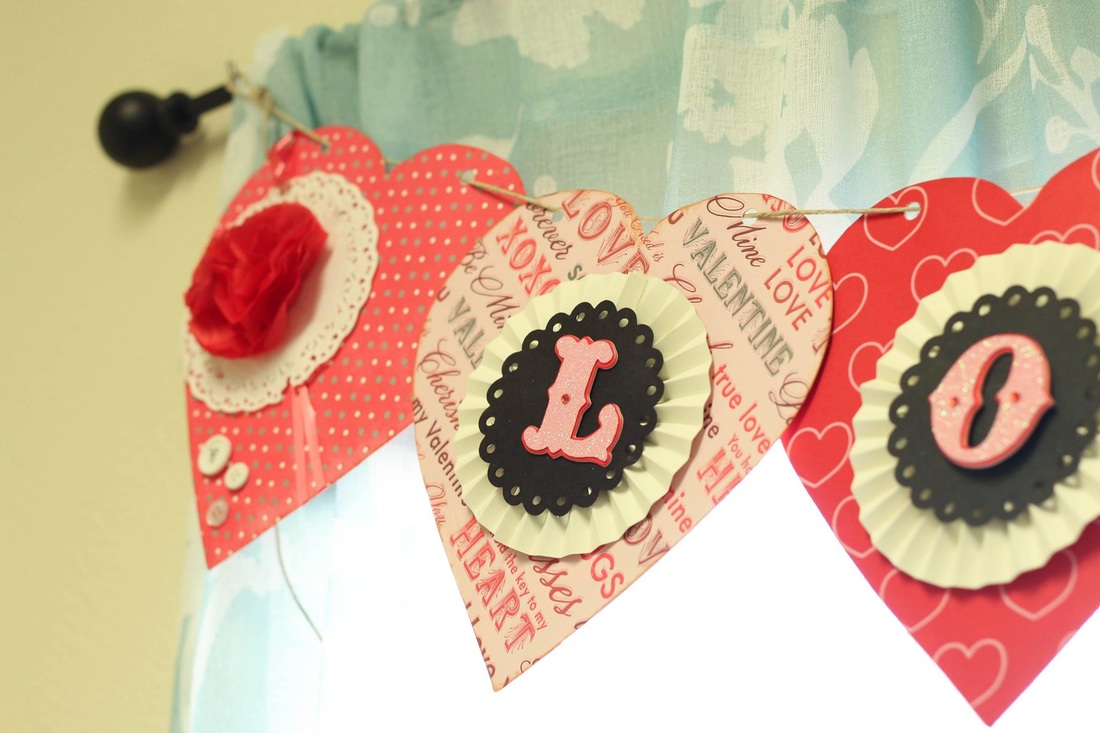 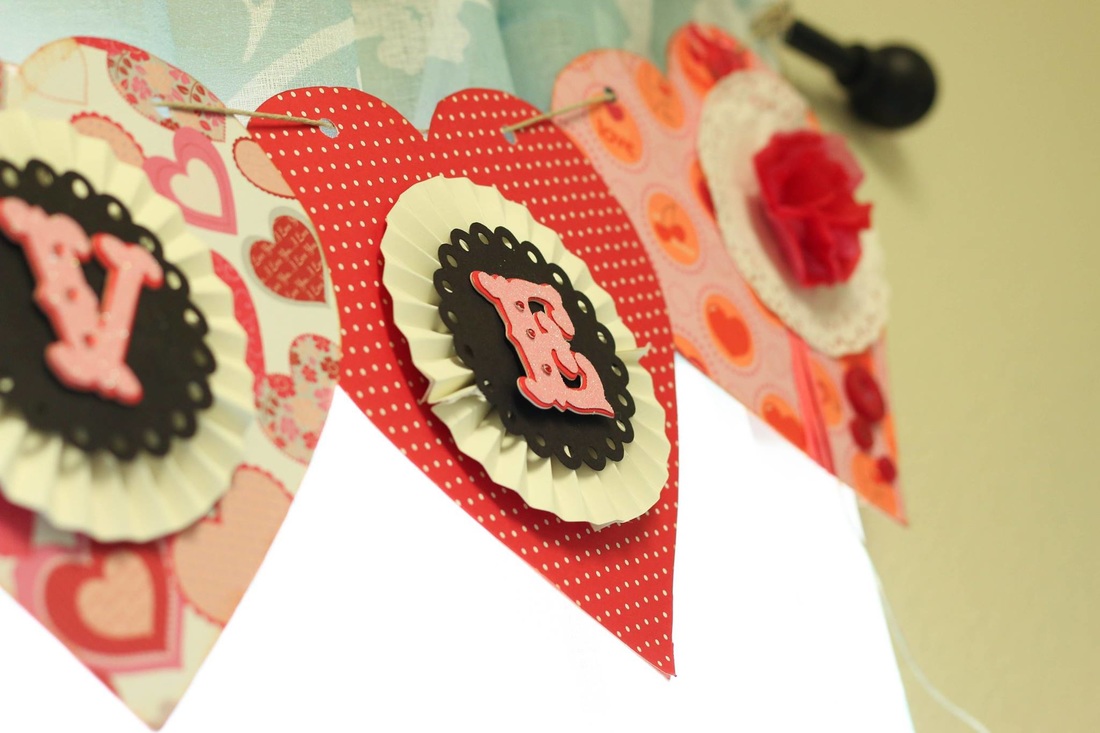 On the middle hearts that spell "love", I made some paper rosettes but scoring and folding them, and then gluing the ends together. After its glued you gently push it flat. I then glued some scalloped circles on top of the rosettes and then placed some fun letter stickers to spell out the word love.
Then I just strung it up with some twine! I've placed it in various places around my home but this year I think it looks great hanging above my craft room window. Happy Valentine's Day! Im linking this project up with: Simon Says Stamp's Wednesday Challenge! 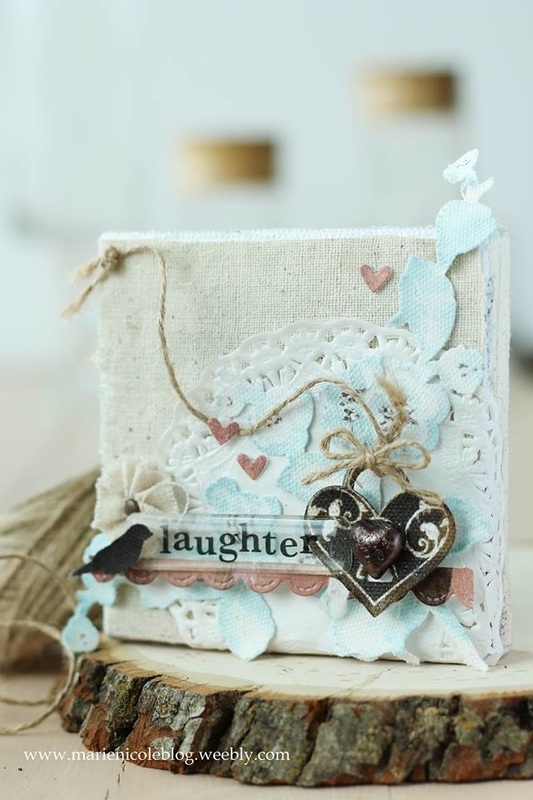
Since being selected as a member of Canvas Corp Brands' Creative Crew, I have been able to connect with so many wonderful, creative people. I've also been able to play with some great high quality products!
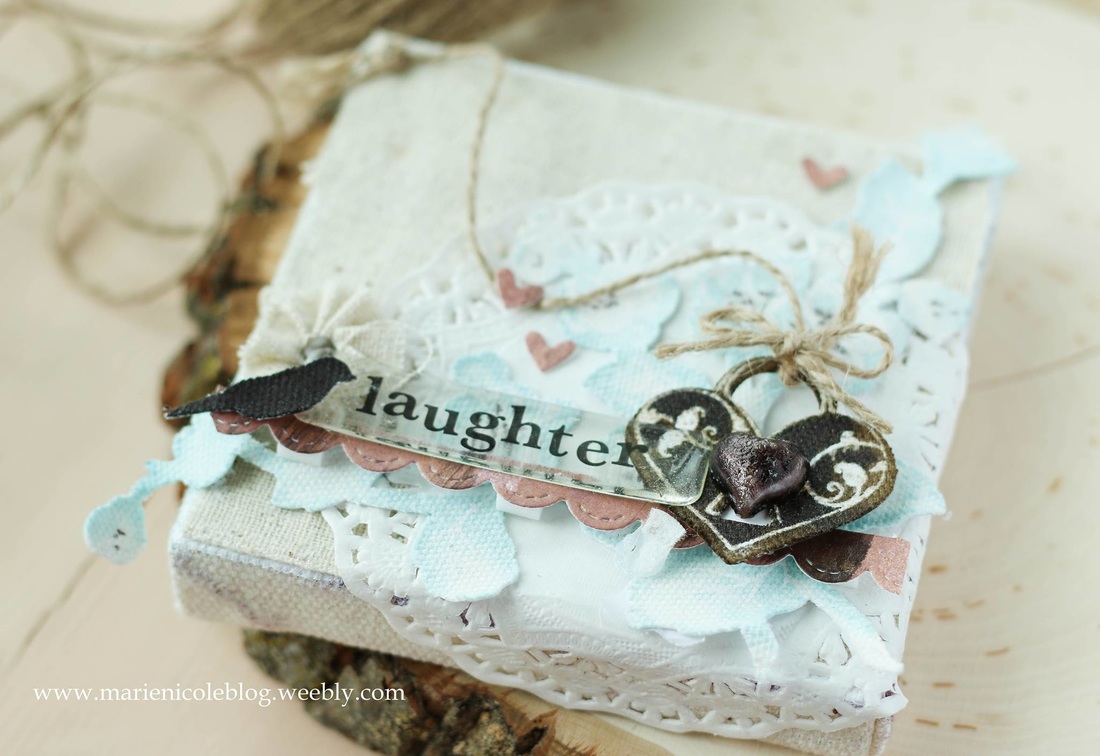
One of the projects for the Creative Crew was to decorate a little 4x4 canvas any way I desired in order to reflect my own personal style. I used a little scrap of fabric for the background, and then just build different embellishments on top. Over a paper doily I placed a canvas die cut that I colored with Patina Glimmer Mist. Then, I cut some scalloped borders and hearts with my sizzix, and used some Java Glaze to color the heart locket and little bird. I also made a few tiny ruffled flowers. I added the little "laughter" sentiment just as a personal reminder to always try to have a positive outlook on things. Its a pretty simple canvas in the end, but that's totally my style. 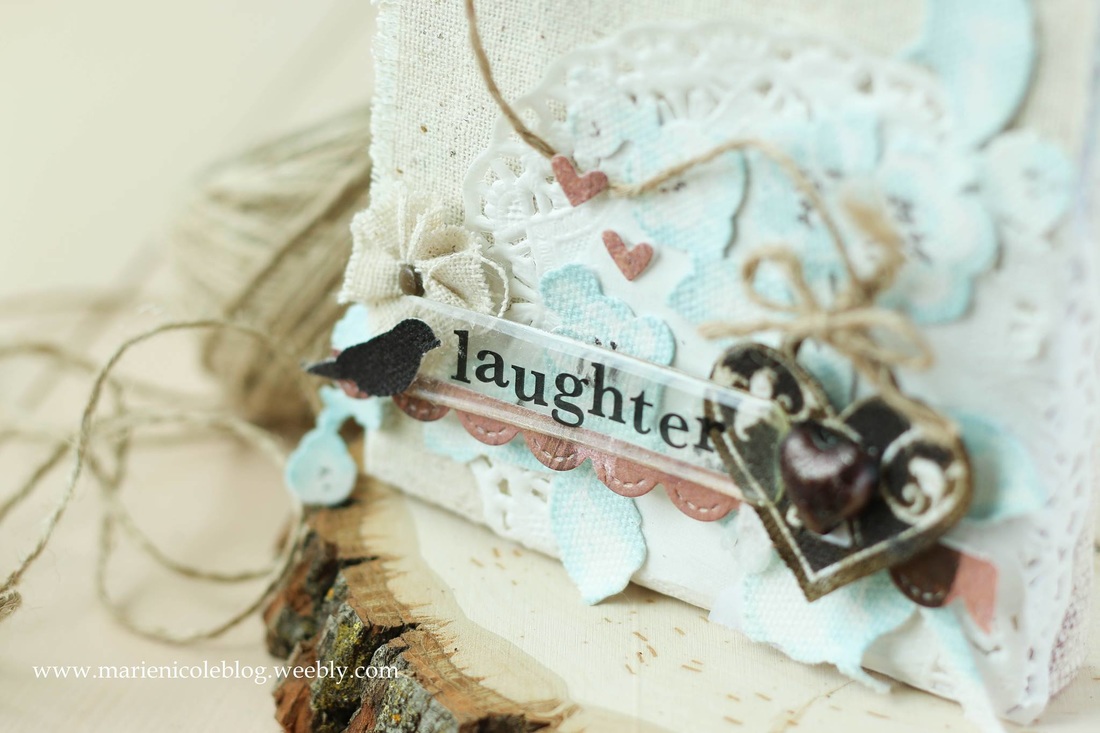
If you would like to see the other canvases the Creative Crew have been working on, just follow THIS LINK to check it out! Many of the Crew have their own blogs as well as social media accounts. There is so much inspiring talent there, you will not be disappointed!
Here's some fun products I used!
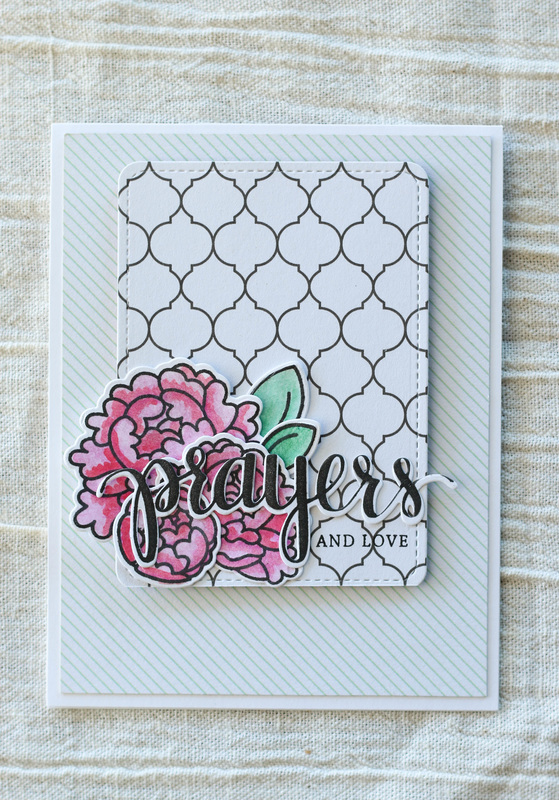
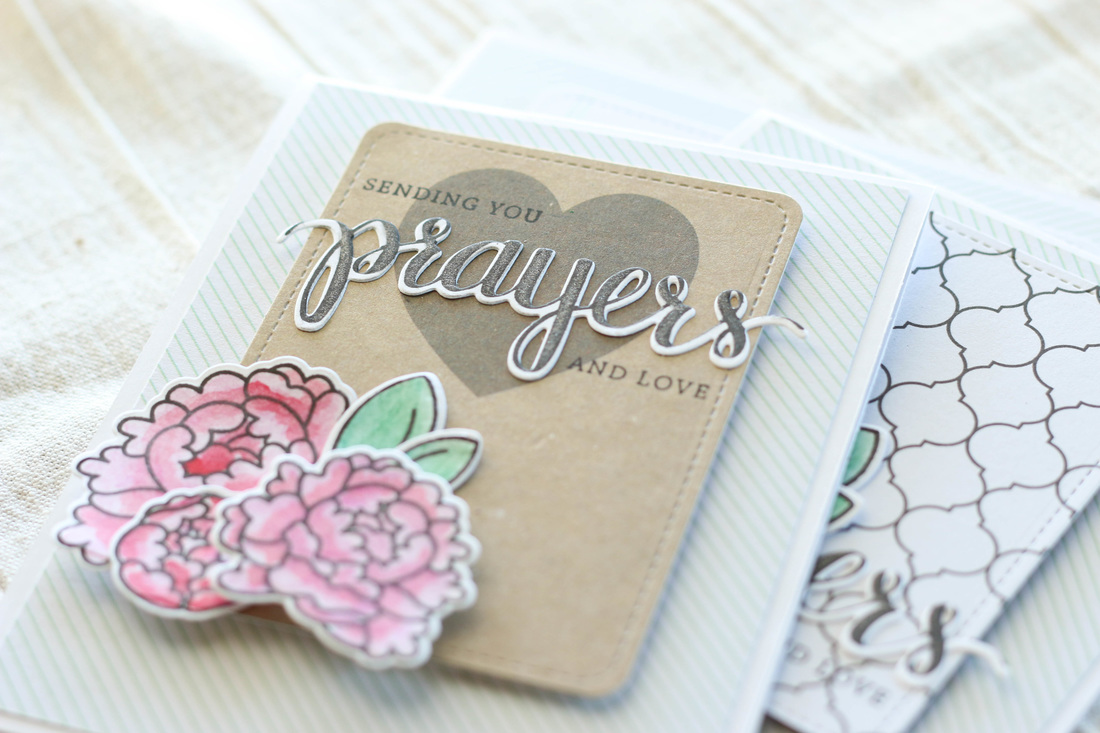
I've been busy working on some cards to send out to the Lasting Hearts Card Drive. I just got them in the mail this morning, and this is the last set that I managed to put together.

I started with stamping out all the peonies and leaves. These flowers are from Avery Elle's stamp set, Peonies. Its an absolutely gorgeous set. After they were all stamped out, I colored them with my watercolor pencils, and then blended the colors using my waterbrush. I then used the coordinating dies and ran them through my Sizzix to die cut all the little pieces.
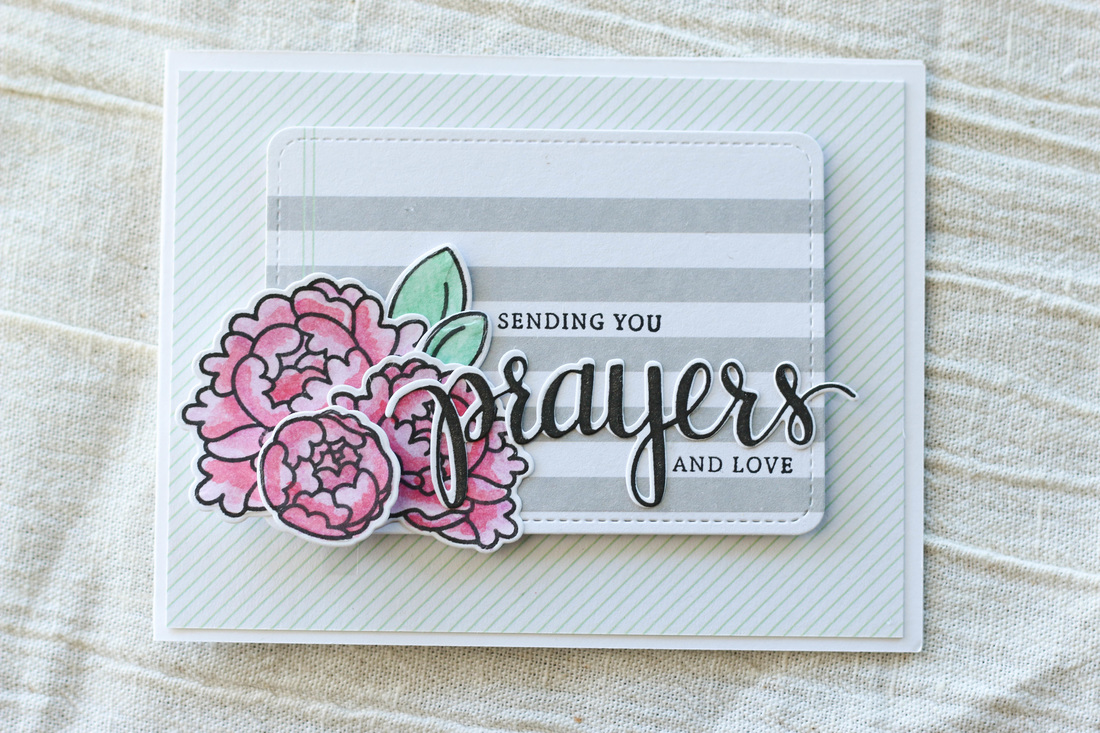
My next step was to stamp and die cut the word "Prayers" with my Prayers stamp set from Simon Says Stamp. After they were cut, I added some Wink of Stella to give it a little shimmer.
Then, I cut out three note cards using my Lawn Fawn Stitched Journaling Card die set. I adhered the cards down on some green striped background paper using some craft foam to help give some dimension. Then I glued on the peonies, leaves, and "Prayers" dies. Lastly, I used some of the mix and match sentiments from the "Prayers" stamp set to add a few more words around the die. 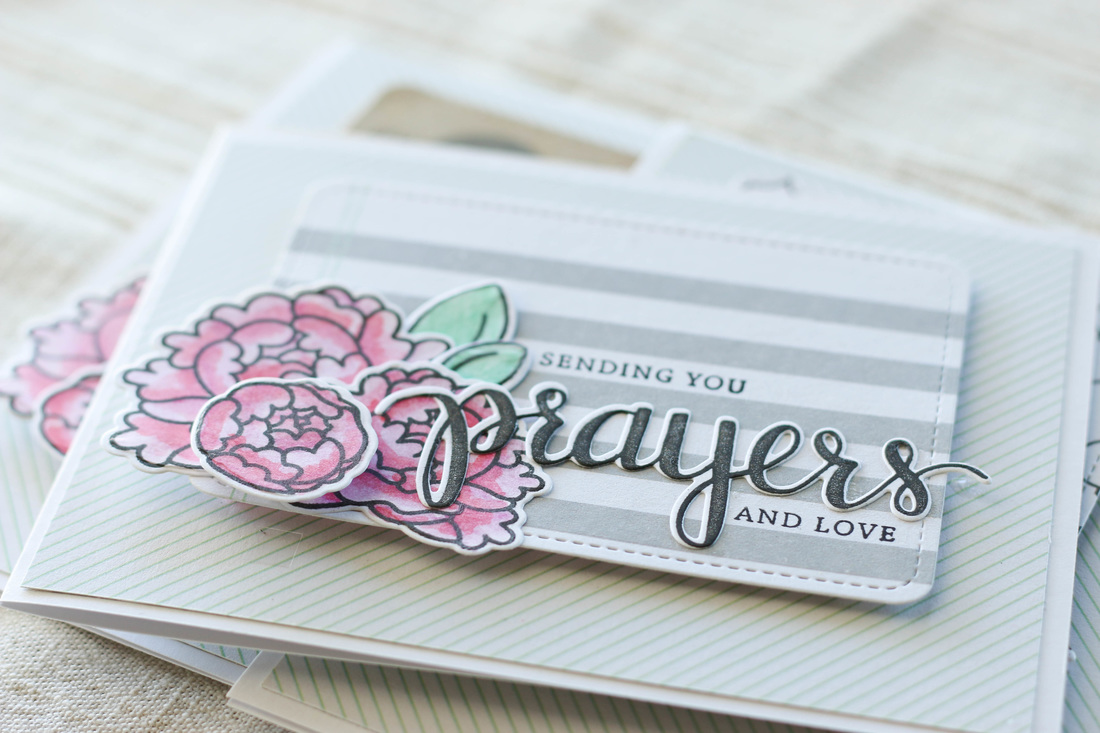
I find sometimes that keeping my cards simple really brings the focus to the sentiment, which is what I was going for here. These cards are going to such a sweet cause and I really want them to be an encouragement to the recipients.
Check out some fun products I used!
I am also linking this project up to:
Simon Says Stamp's Wednesday Challenge! Simon Says Stamps Monday Challenge! |

Pin it!

AuthorSo glad you found me! This blog is my little space where I can share bits about my life and my latest crafting projects (mostly handmade cards). My goal is to share, inspire, and to be a positive presence in the creative community. 

Find me on Instagram!Archives
January 2018
Categories
All
Link Love
 

|


 RSS Feed
