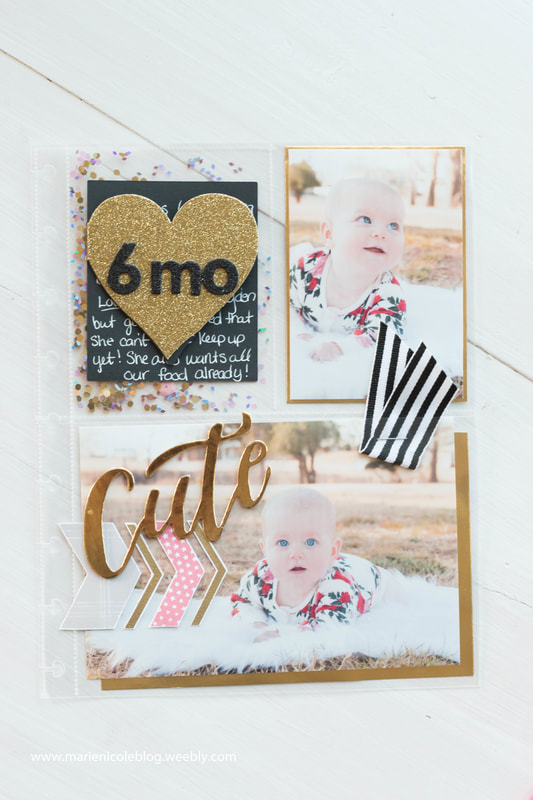
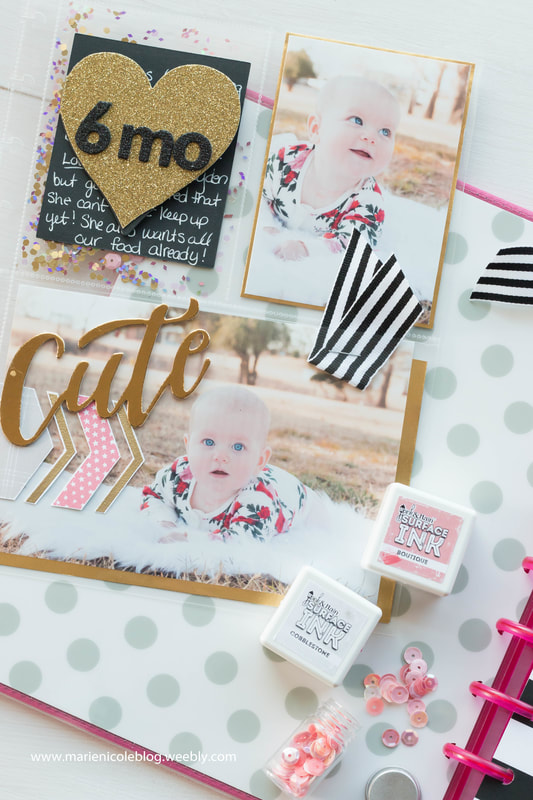
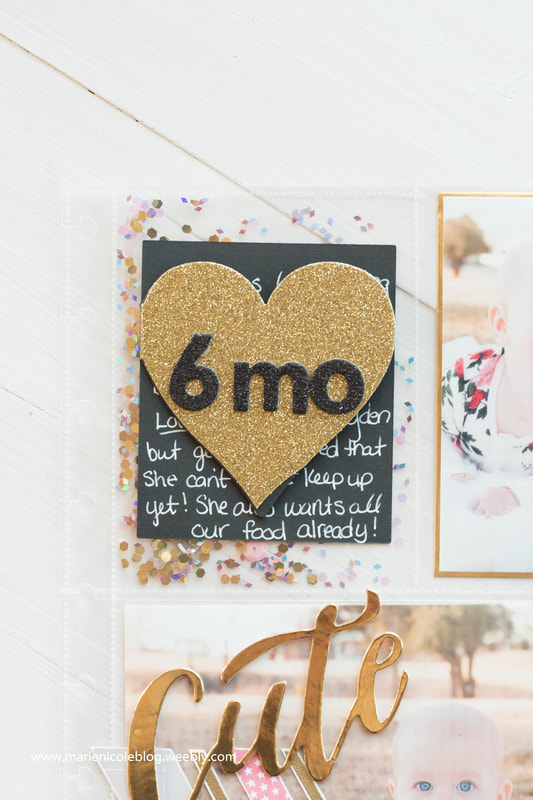
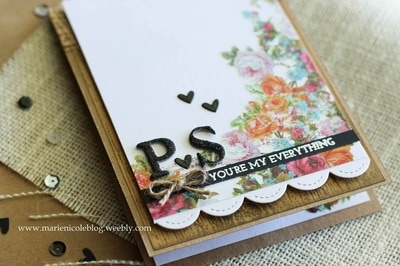
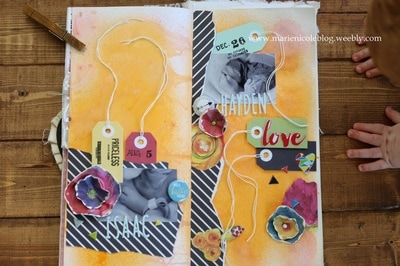
 My baby girl just turned 6 mo! I did a quick 5 minute momtographer photo shoot with her and loved how the photos turned out, so I decided to dedicate a photo page to her cute, chubby face. I kept it simple by just using several colors and only a few photos. Sometimes, less is more!
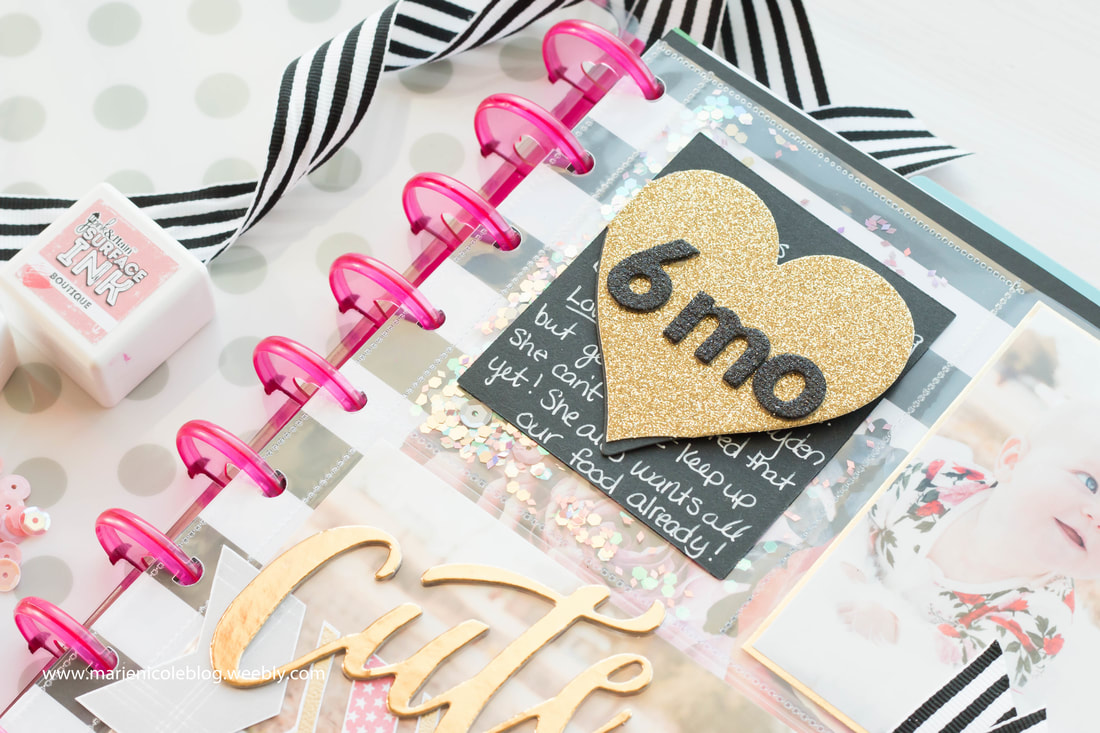
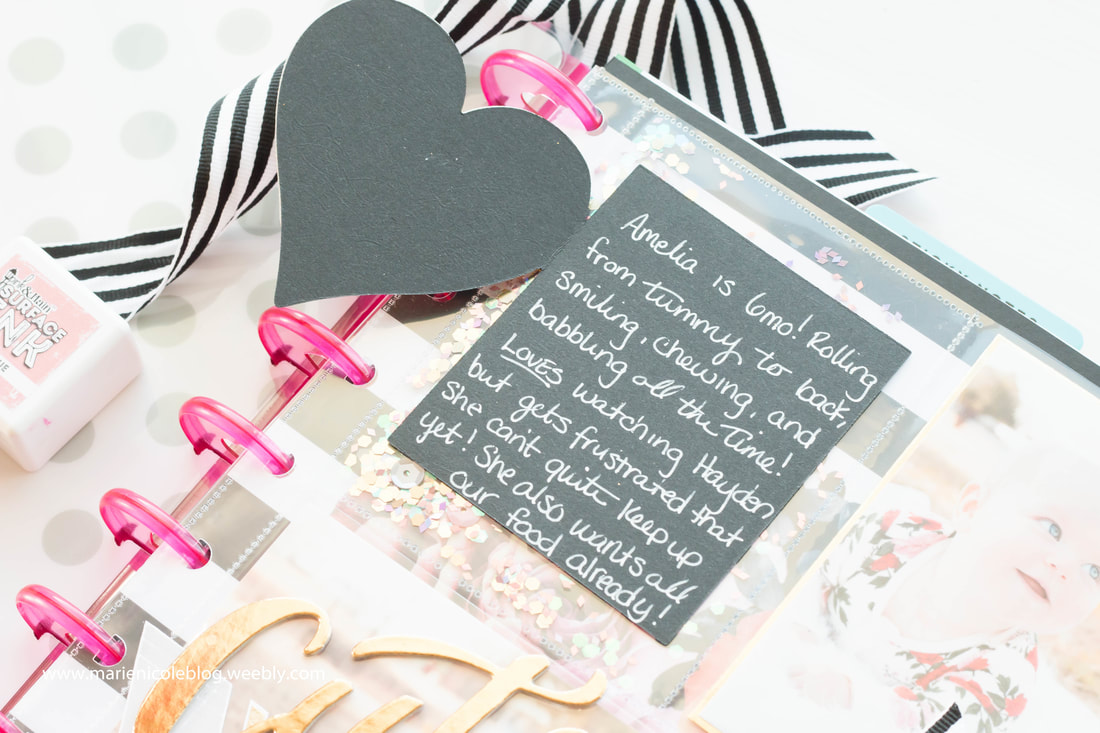
I also wanted to use the new inks and stamp set that I received from PINK AND MAIN. These inks are the same formulation as BRUTUS MONROE SURFACE INKS, but in Pink and Main colors! The colors are so vibrant and I LOVE the hues! I stamped out some of the arrows and then fussy cut them out. I also stamped the skinny arrows in some EMBOSSING INK and GILDED EMBOSSING POWDER to add a little shine. I adhered these arrows to the outside of the plastic pocket page, while the photo is safely tucked inside. This way, I don't actually have to glue anything onto my photo! 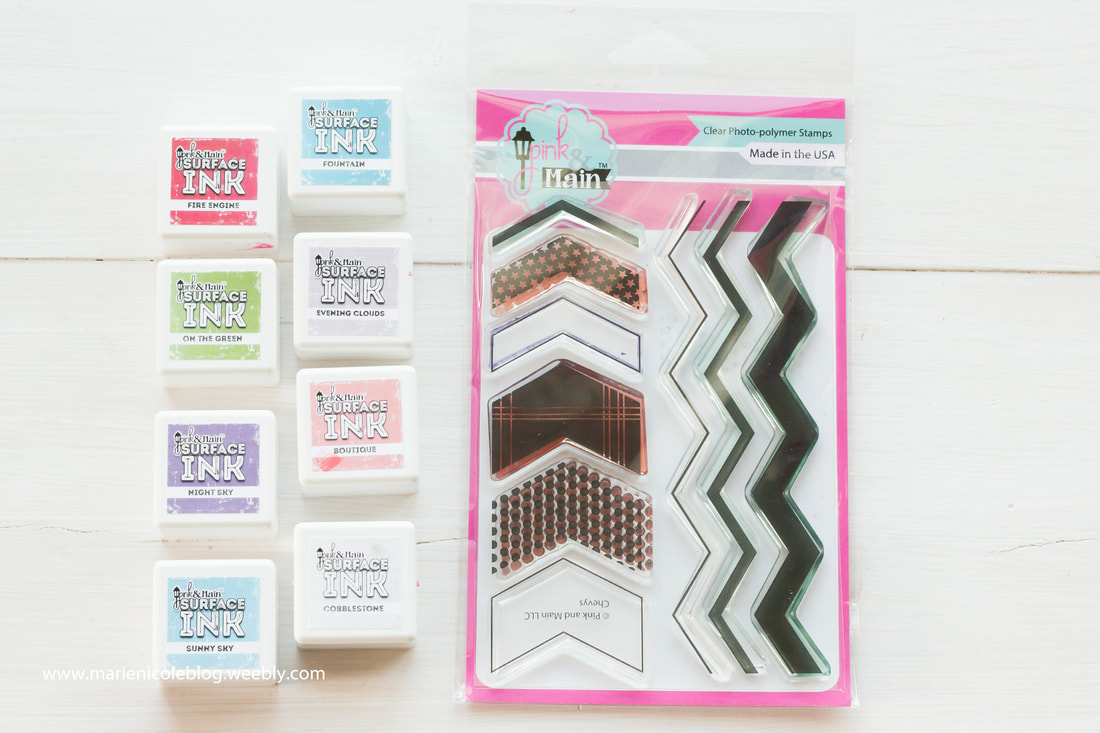 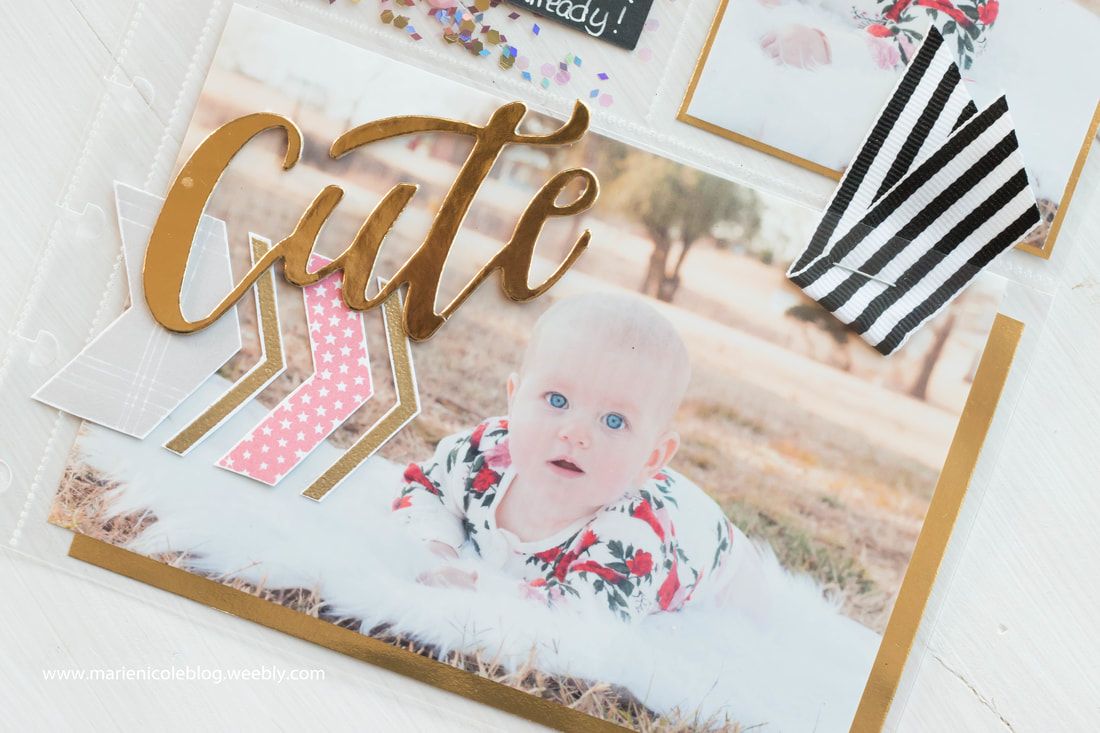 I also made the top left pocket a shaker pocket by filling it with sequins and glitter, and then sealing it up using my FUSE tool. I have LOVED my fuse tool for creating pocket pages and shakers. As long as you give it enough time to warm up before using it, sealing up your pockets is quick and easy! Also, I adhered a little note card that you can flip open to the outside of the shaker pocket. I wrote in a few memories on the card about my chunk-a-muffin's current milestones.
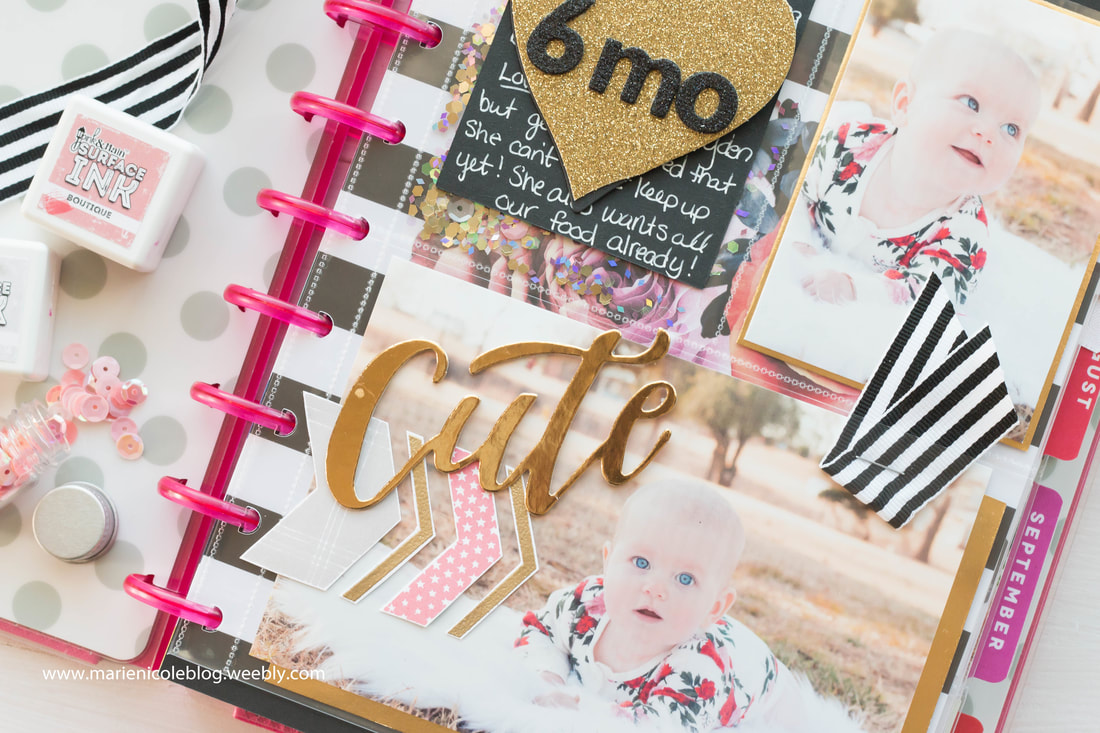 I also matted my photos using a little GILDED RINEA FOIL from Brutus Monroe. It worked beautifully with my color choices and just tied the whole page together! This foil is beautiful as-is, but can also be die cut and stamped on. I added some last touches with some ribbon and cardstock stickers and then placed this page into my planner! 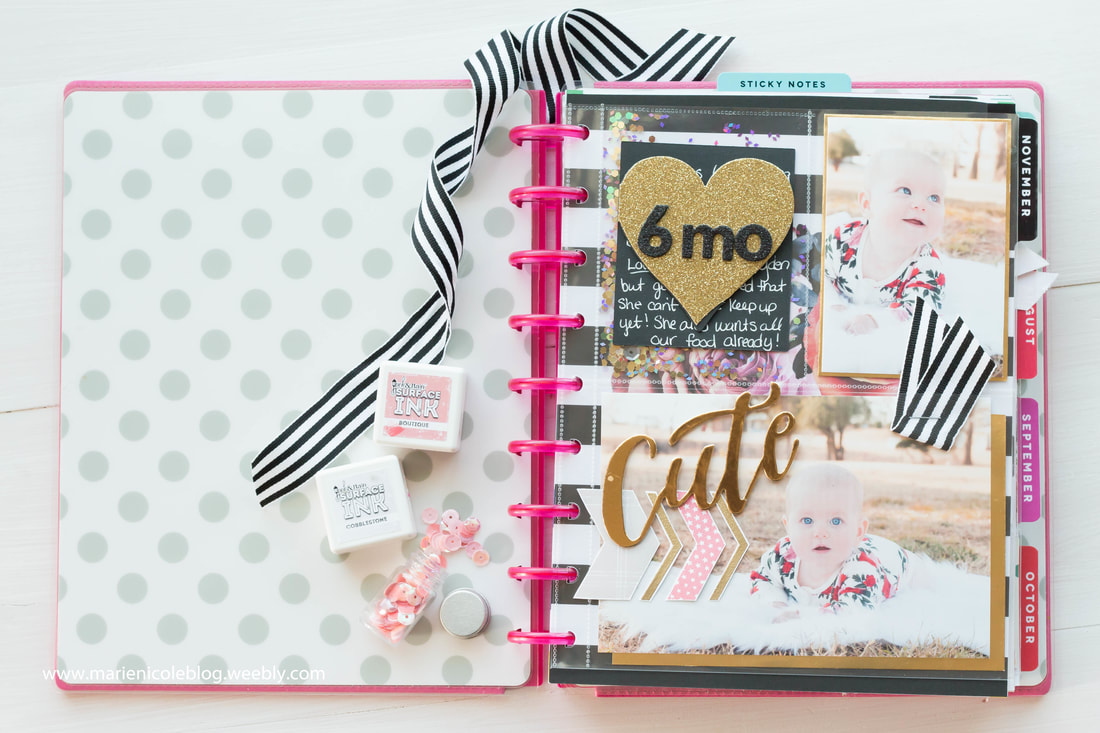 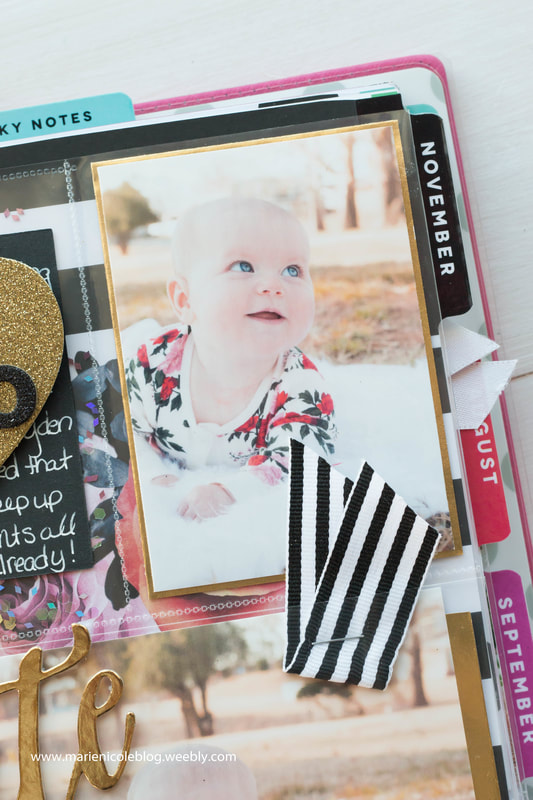 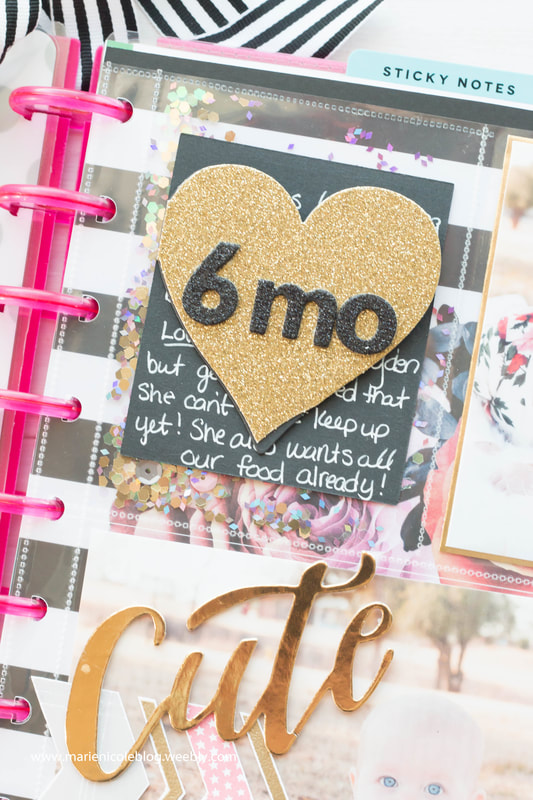  Thanks for stopping by today! I hope you've been inspired in your own crafting. Until next time, Marie Nicole More from Marie Nicole...
0 Comments
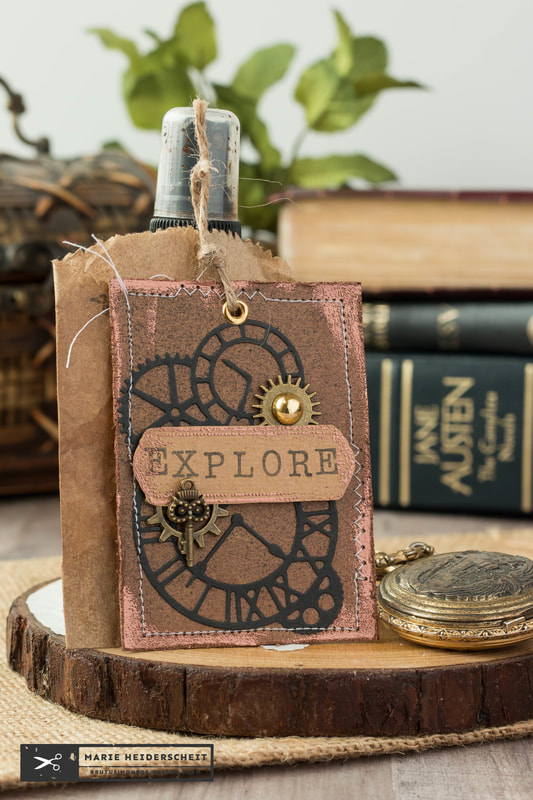
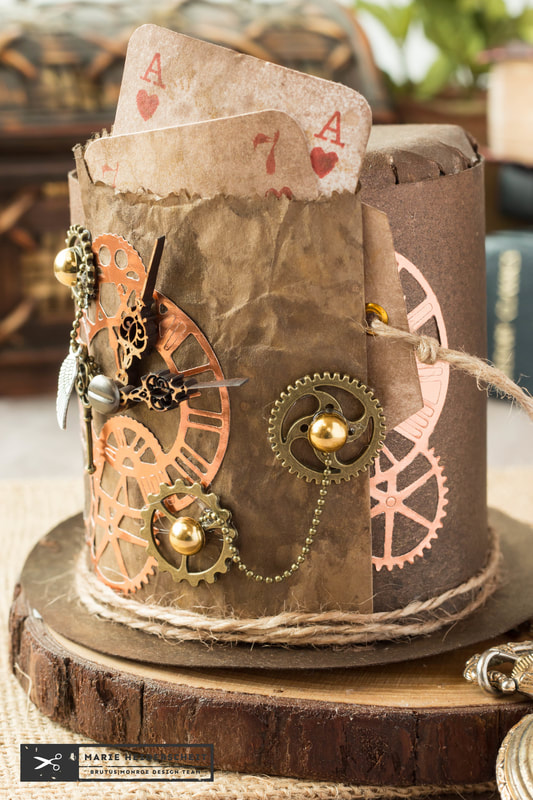 BRUTUS MONROE has a monthly INSPIRATION BOX SUBSCRIPTION and this month's box is a Steampunk themed box! I have always loved the look of Steampunk, so I was very excited to get my hands on this box! I just knew I wanted to punk out a little paper top hat! I started by browsing the web for a template for a top hat. I found THIS ONE from Craftaholics Anonymous. They have a FREE PDF download or SVG. I grabbed the PDF, printed it, and used the template to build the hat out of some CANVAS CORP KRAFT PAPER. After the hat was assembled, I spritzed it with some GLIMMER MIST to give it a vintage, worn look. I used the colors, VINTAGE BRASS, TATTERED LEATHER, and BLACK.
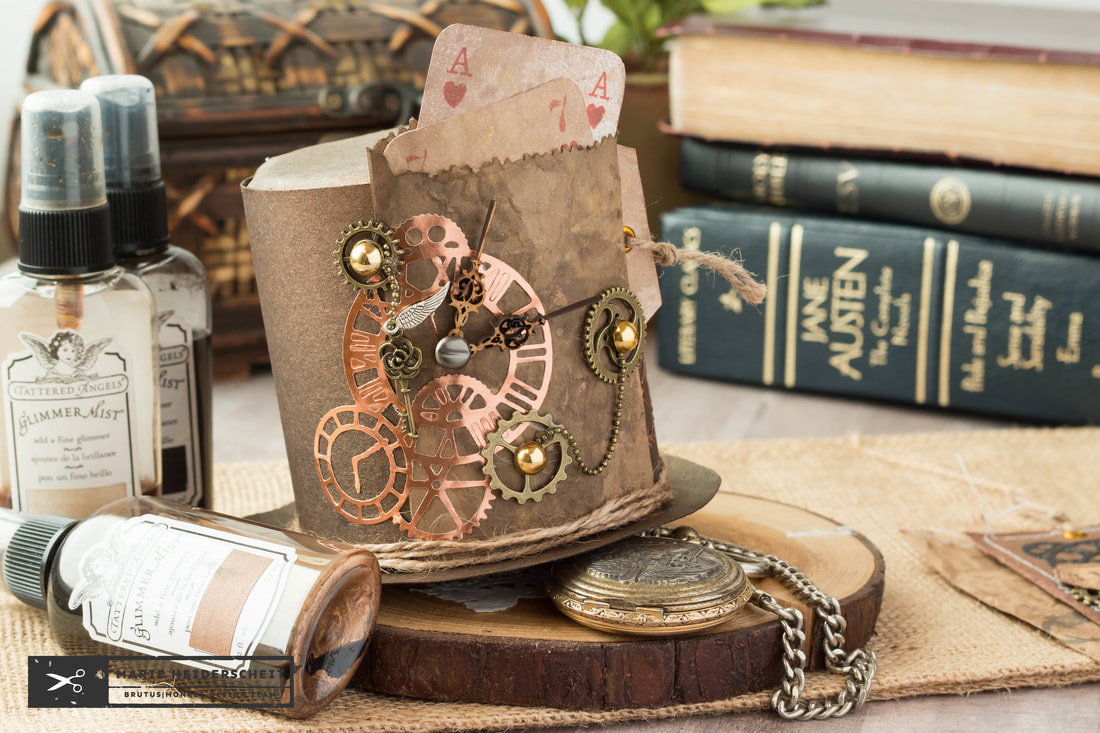 Then, I grabbed all the lovely embellishments from the Brutus Monroe Inspiration Box. They included some brass gears, chain, flat back pearls, paper bags, and a fun gears die. I used the die with some PENNY RINEA FOIL to cut out some shiny gears. I ran the foil gears through my Xyron sticker maker so I could adhere the detailed die cut easily. Then, I added the metal gears and different bits here and there. I also added some twine and a few hanadcrafted playing cards for some finishing touches. This turned out to be a super fun project that is way out of the norm for me! I usually do simple and pretty cards, but after making a load of Christmas cards, I needed to change it up a bit! Even after I finished this project, I had a good amount of supplies left from the Inspiration Box, so I went ahead and created a few ATCs, as well!  I used the same colors of Glimmer Mists on some of the paper in the box. Then, I ran some EMBOSSING INK and PENNY EMBOSSING POWDER around the edges to add some metallic shine. After adding more die cut gears, I also sewed around the edges. I love how it almost looks like a scrap of leather!
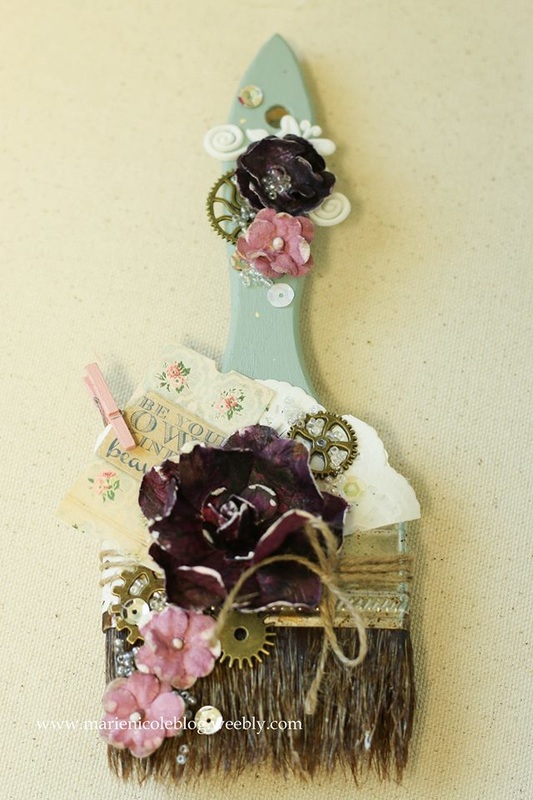
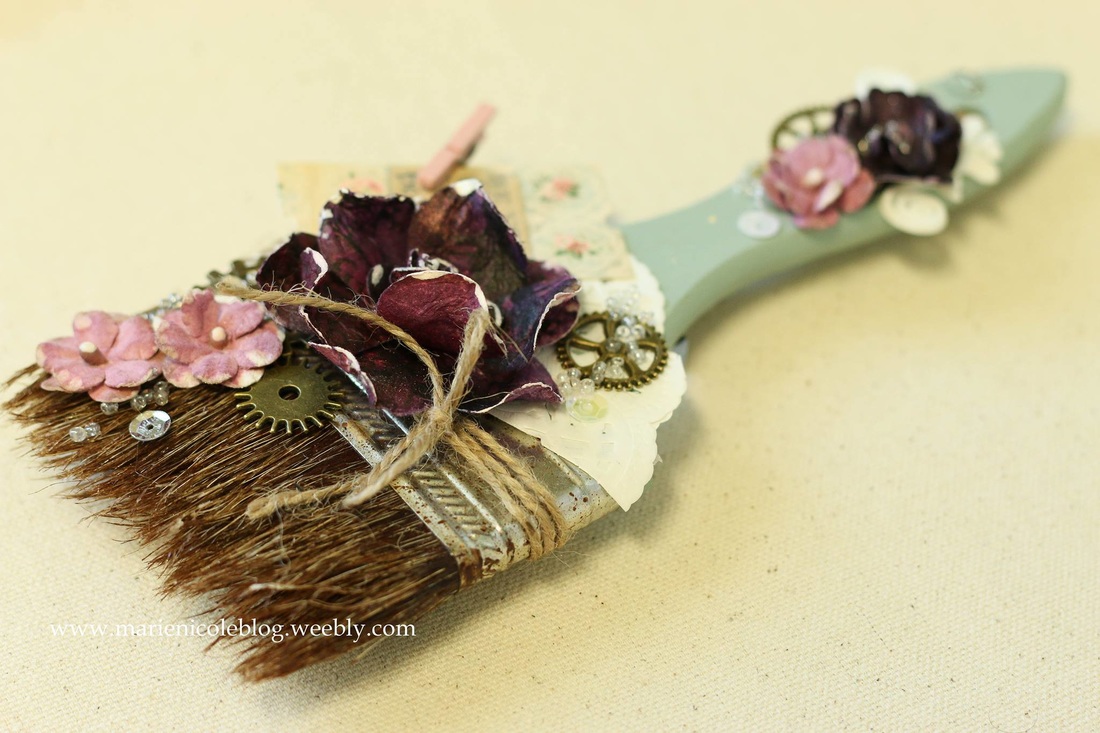
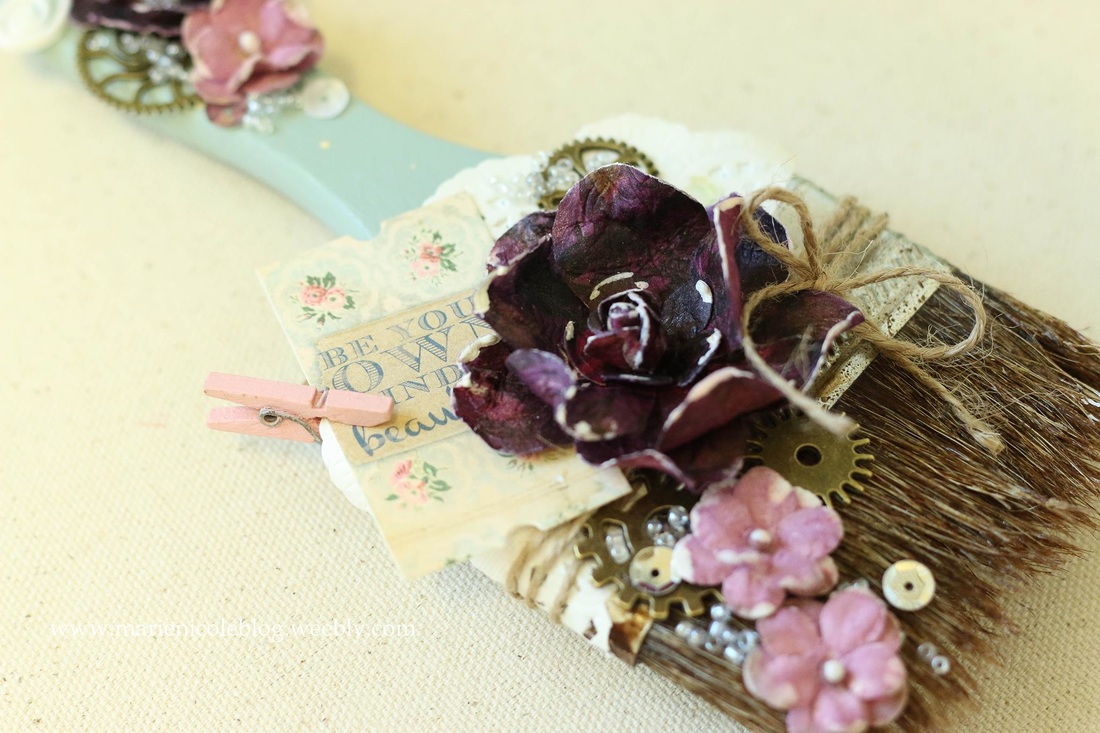
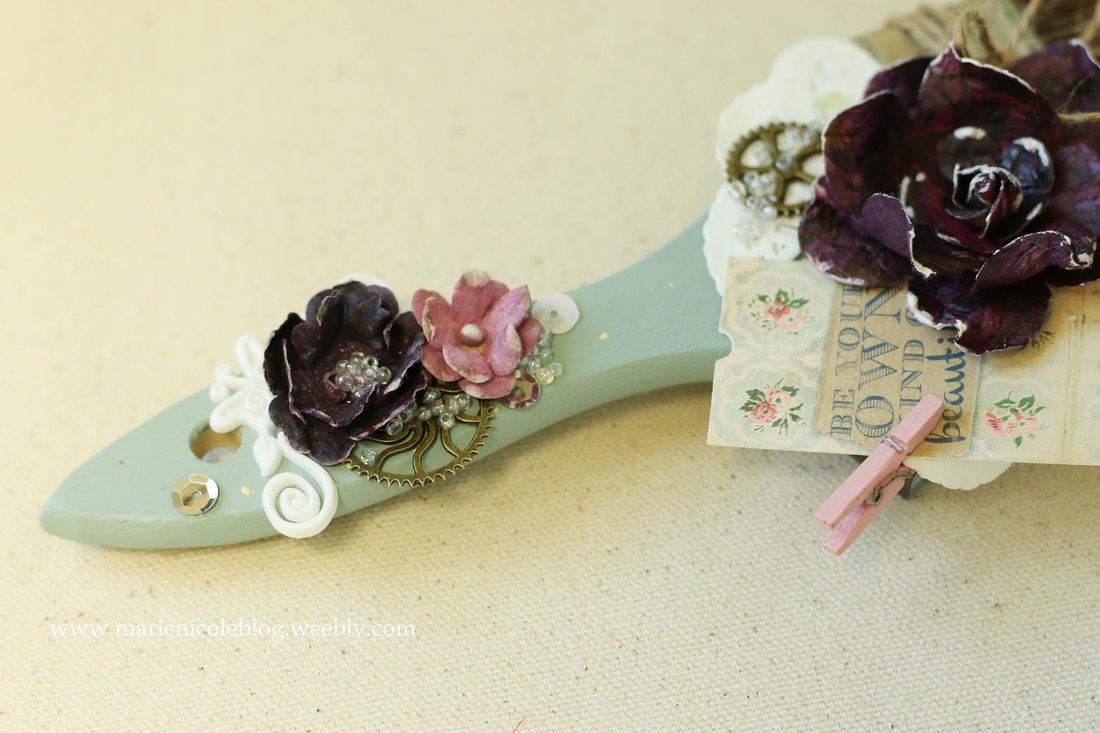
Since the little paper bags in the box were just the right size for ATCs, I wanted to decorate them to match so I could tuck the ATCs inside. I sprayed them with Glimmer Mist as well, and then stamped on them with a new, not-yet-released stamp set from Brutus Monroe! This set will be available December 30th, so keep an eye out for it! 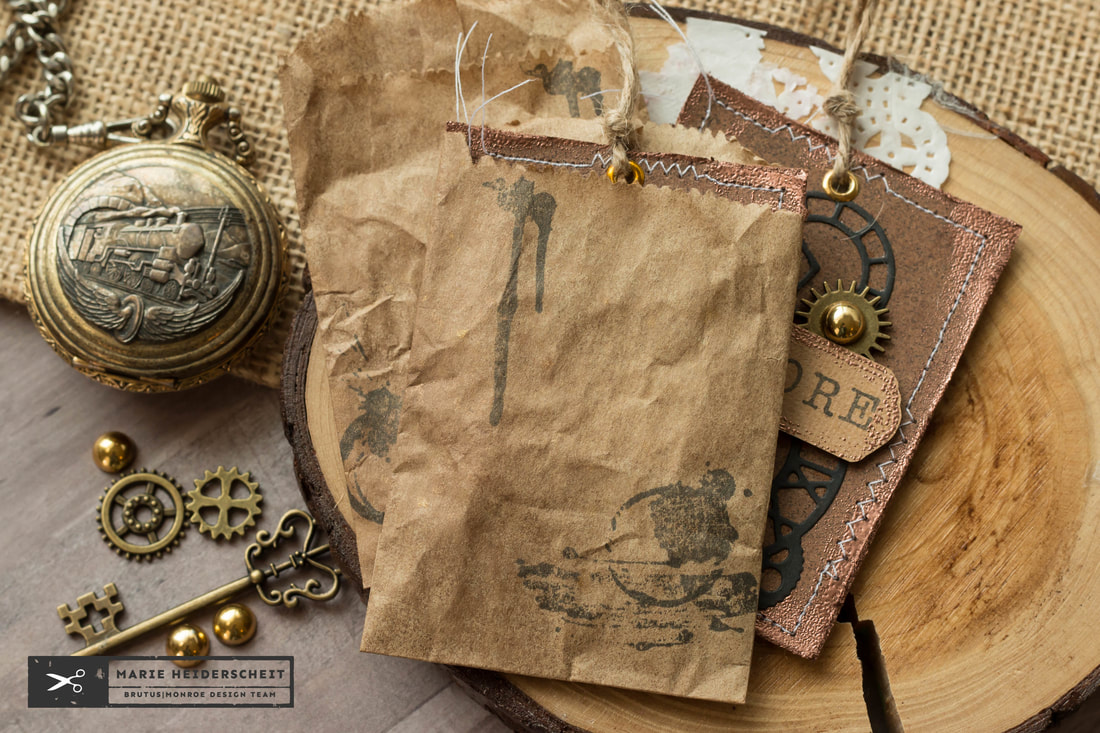 A few eyelets on top and some scraps of twine, and these ATCs were finished! I also have a handful of embellishments left from the INSPIRATION BOX, as well as papers, layering pieces, and of course, the 6x8 stamp set that is full of fun gears images and a full steampunk style alphabet! This box was such a fantastic value! Please check out the INSPIRATION BOX SUBSCRIPTION over at Brutus Monroe if you are interested in getting future boxes! Thanks for stopping by, and happy crafting! More from Marie Nicole...This year at Creativation, 7 Gypsies revealed an exciting new line of products called Architextures. These pieces are little embellishments and goodies that you can craft with, and they are vintage-inspired to look and feel like the real thing! They have so many pieces to choose from, including a little mason jar that looks 3D and you can actually see through like glass. 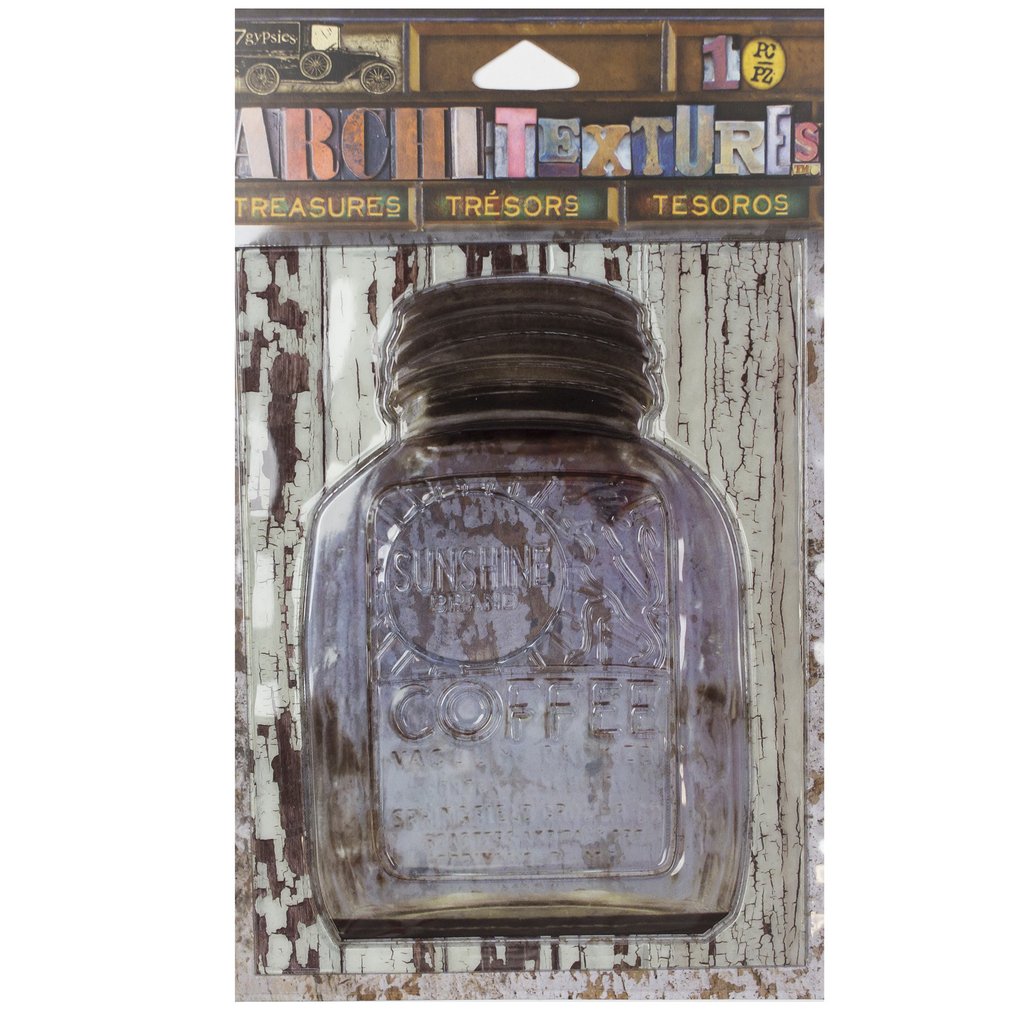 This mason jar is just one piece in a collection of hundreds that are so inspiring to play with! The other cool thing about it is that the packaging has been designed so that it can also be used in your craft projects. I think this is just brilliant! Another piece that I was able to work with while at Creativation is this fun dressform. This piece is 3D, feels soft just like a regular dressform would, and is so much fun to dress up and embellish! I pieced together some packaging and some embellishments to make a little dress on this piece. CLICK HERE if you would like to see the post for this dressform! 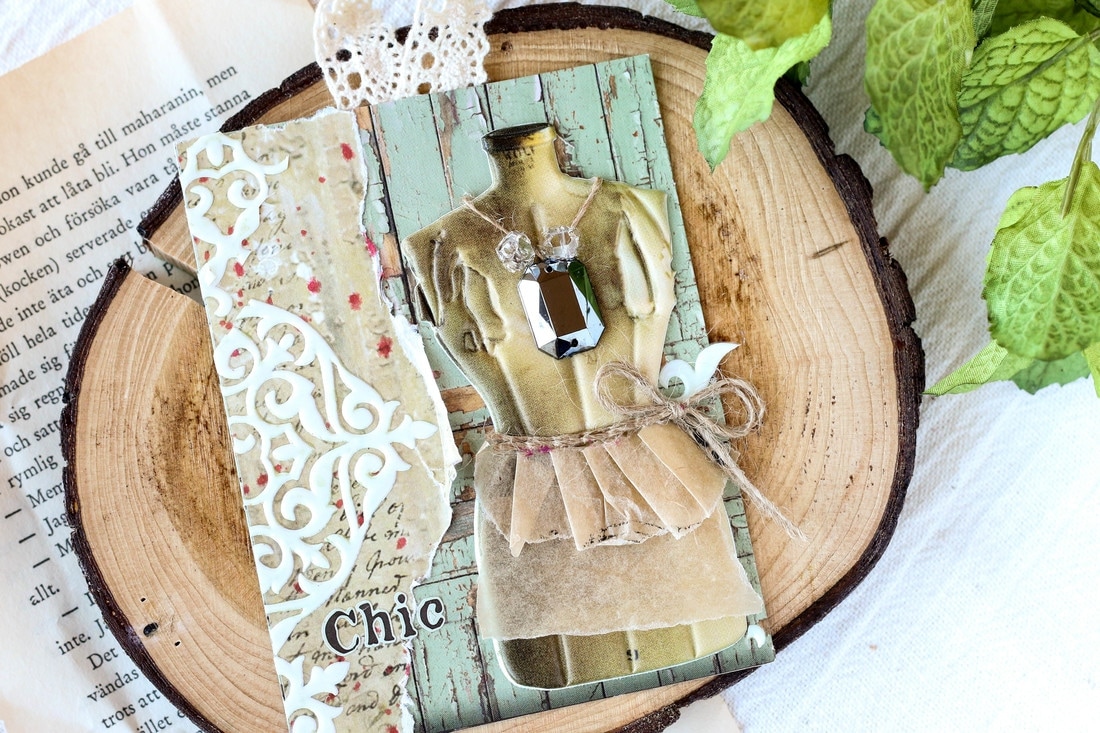 I managed to get my hands on a few Architexture pieces that are found at Michael's stores. There are so many fun ones there but I found these little silver crosses that look like a pendant or necklace piece, and decided to use them on an altered paintbrush. 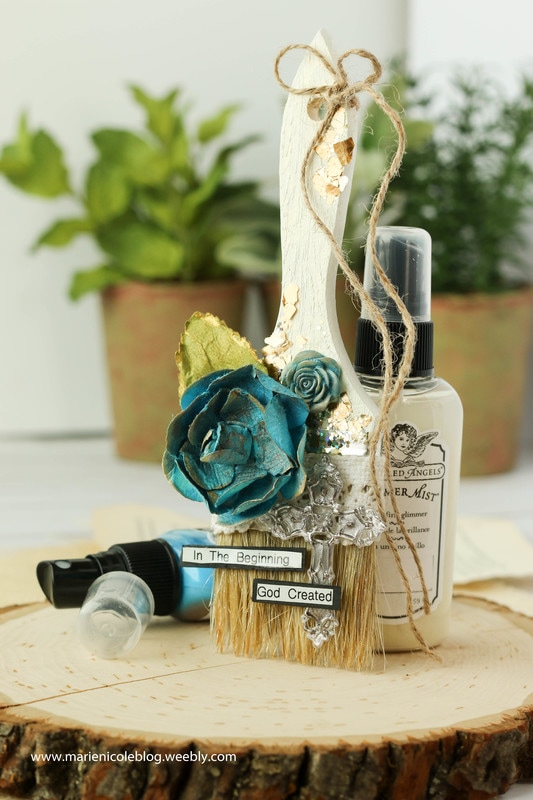 I have done one Altered Paintbrush in the past. I loved how it turned out so I actually went to Lowes and picked up a few of those $1 wooden paintbrushes for the purpose of altering them. I started by applying a coat of Tattered Angels Crystal DIY and Decor paint. This is a white paint that covers almost any surface very well. Once that layer of paint was dry, I misted over it with some Iridescent Gold Glimmer Mist. I thought the paintbrush just needed a little shimmer! I then applied some tacky glue to a few areas on the handle, and stuck some gold glitter flakes to that. I also added some bits of ribbon, a few flower embellishments that I colored with more Iridescent Gold and also some True Turquoise Glimmer Mist, and then moved on to applying the Architextures Cross. 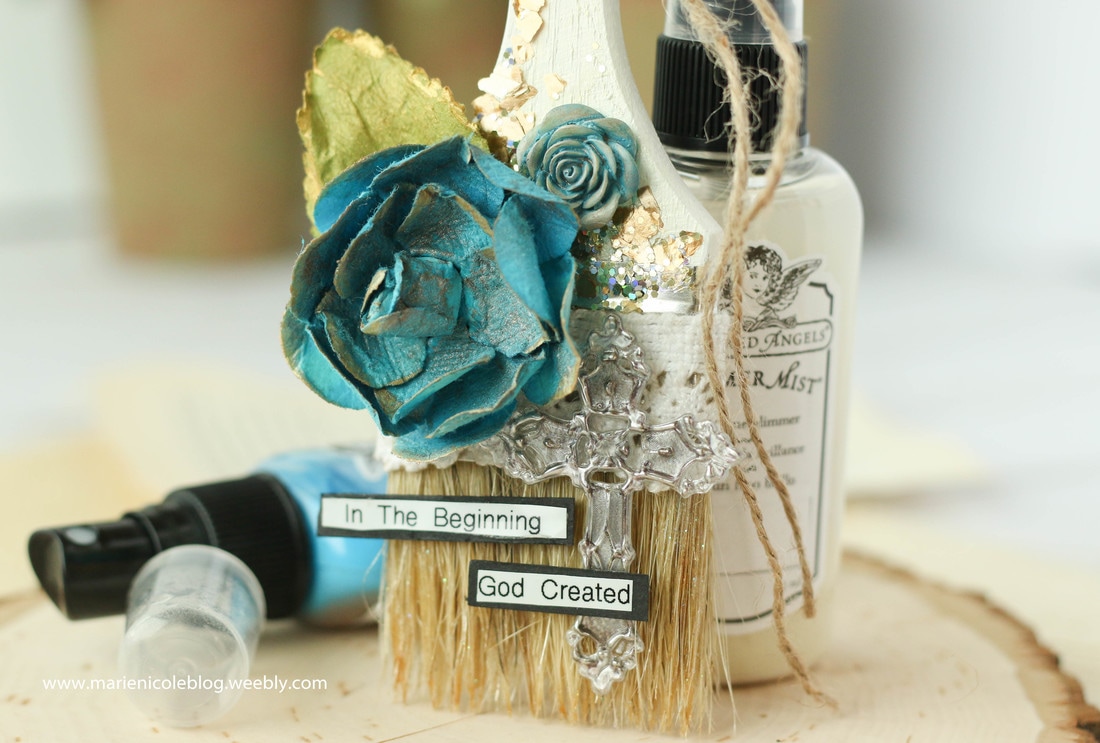 Although the cross is self-adhesive, I wanted to pop it up a bit so I used some small bits of foam adhesive to adhere it down to the paintbrush. Then, using my labeler, I typed out the verse, "In the beginning, God created..." and adhered the words to small strips of black cardstock. I applied the verse with foam adhesive, as well. 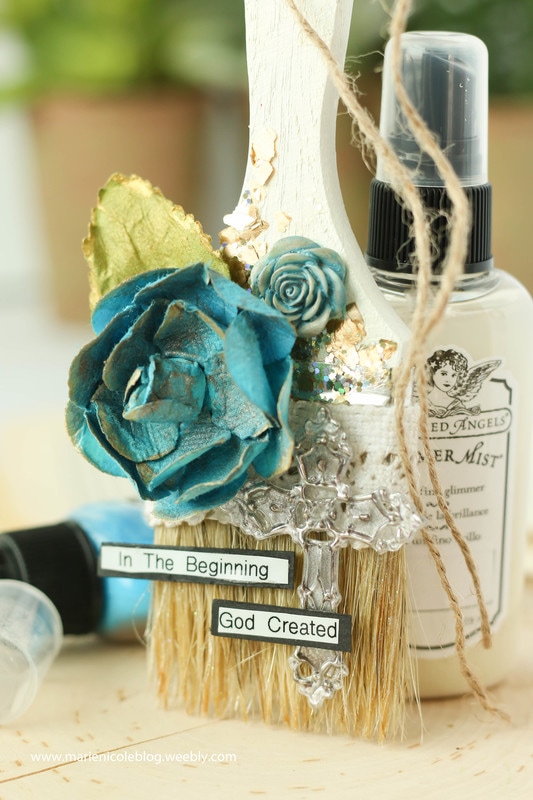 To put some finishing touches on the paintbrush, I added some Chandelier Glimmer Glam to the bristles, and also tied some Jute Cord around the handle, letting it fall down to the side. Very simple embellishing job on this paintbrush, but I love the overall message of it! I have it in my craft room and it reminds me who our Original Artist and Creator is. 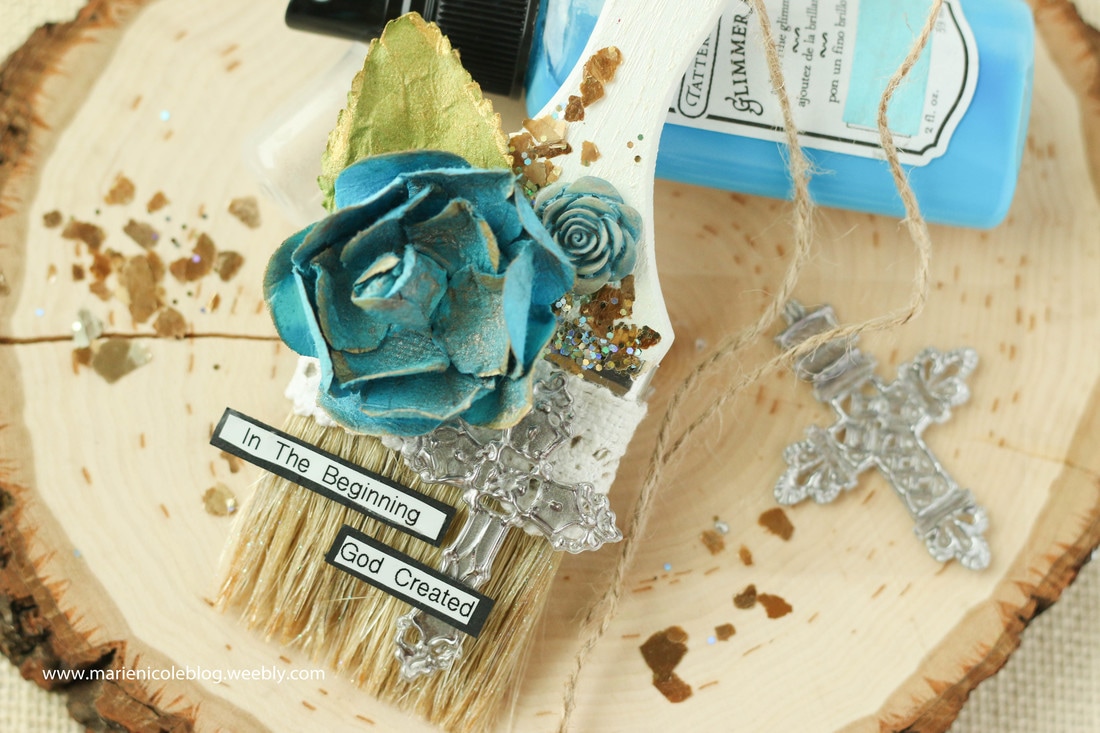 If you are interested in seeing more 7 Gypsies Architextures, check out the Canvas Corp Brands Store or visit your local Michaels to see what they have there! Thanks for stopping by, and Happy Crafting! More from Marie Nicole...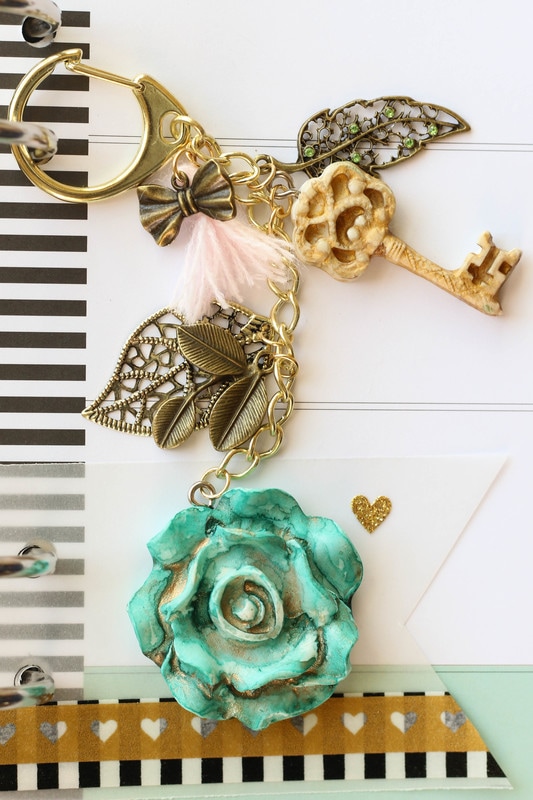
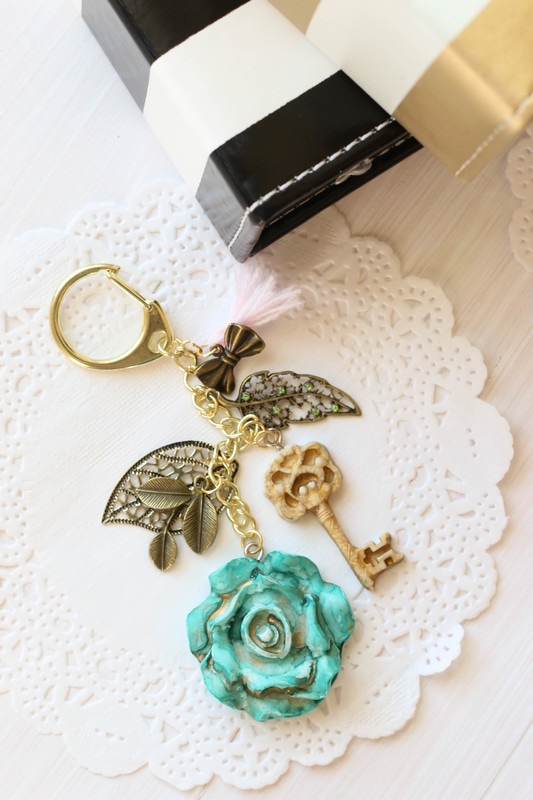
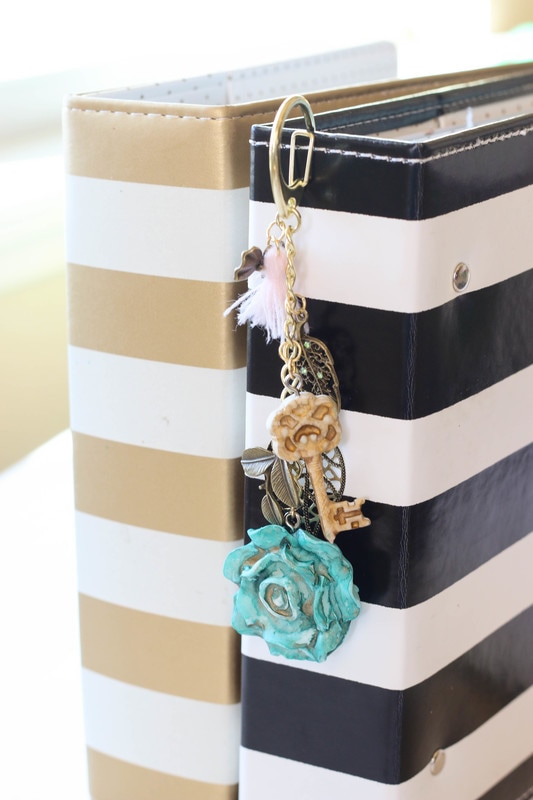
While at Creativation this year, I was blessed to be able to meet Sandra Evertson, the talent behind Relics and Artifacts. She creates these amazingly gorgeous matte craft blanks from treasures she has collected around the world. I would definitely encourage you to check out her store. There are so many unique pieces there! Sandra was so kind to offer to a few of us Canvas Corp designers the opportunity to work with some of her pieces. This is a new area of crafting for me, I have not worked with these blanks in the past. Keeping it simple seemed like the best option for me. Since I have a memory planner that I like to decorate and journal in, making a charm for it was just the natural use for this gorgeous little flower that I received. The flower was painted with a little Tattered Angels Verdigris Glimmer Mist. The greenish-blue along with the gold shimmer took to the blank just beautifully. It almost has a watercolor look to it when dry. The key piece was painted with some Vintage Brass Glimmer Mist, which also has gold shimmer in it. Since Glimmer Mist is somewhat transparent, I did add several layers of the color between drying it with my heat tool until I had the look I wanted. 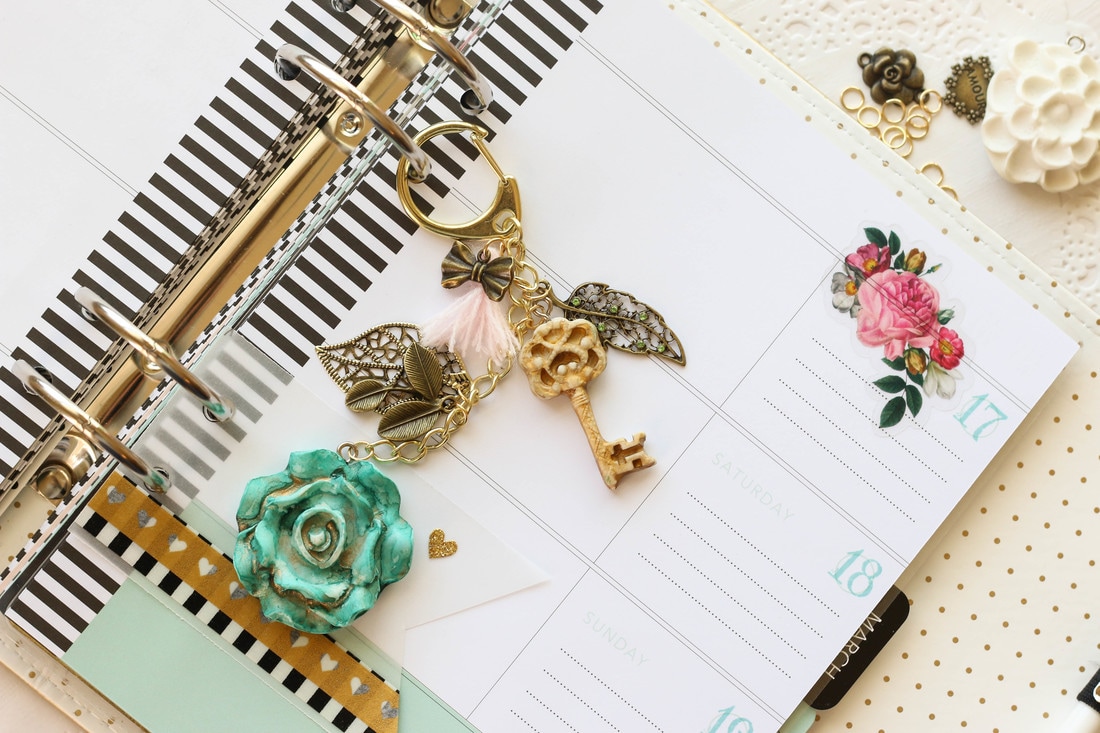
After the pieces were dry, they were attached to a large lobster clasp and chain using some small gold jump rings. Then, to add some more interest to the charm, I used some little brass charm pieces that were picked up at a thrift store. The little pink tassel at the top of the charm was created by wrapping some thin yarn around a piece of cardstock, then tying it and cutting the loops. Very simple, but it adds a little soft texture in contrast with all the metal brass charms. The fact that this charm is handmade and totally unique to me makes it all the more special. The vintage feel of the colors and brass charms also adds to its personality! 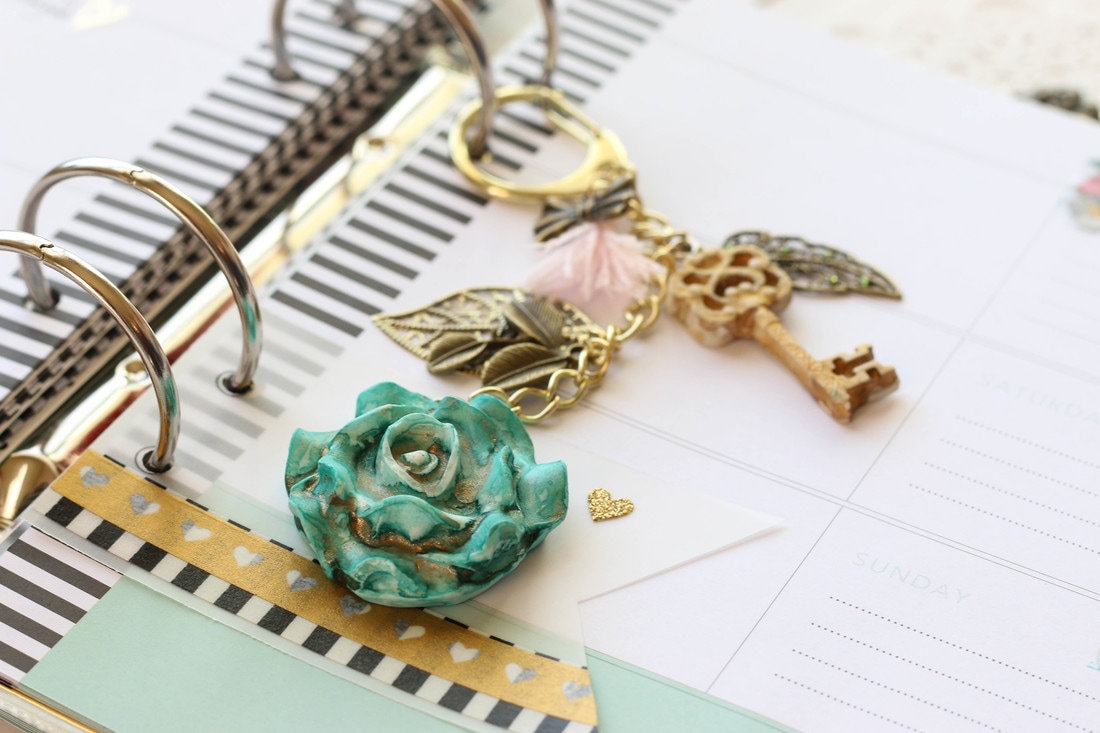
There are still a number of flower blanks left, as well as some butterfly pieces that I have ideas for. Hopefully I can share them with you in the near future! 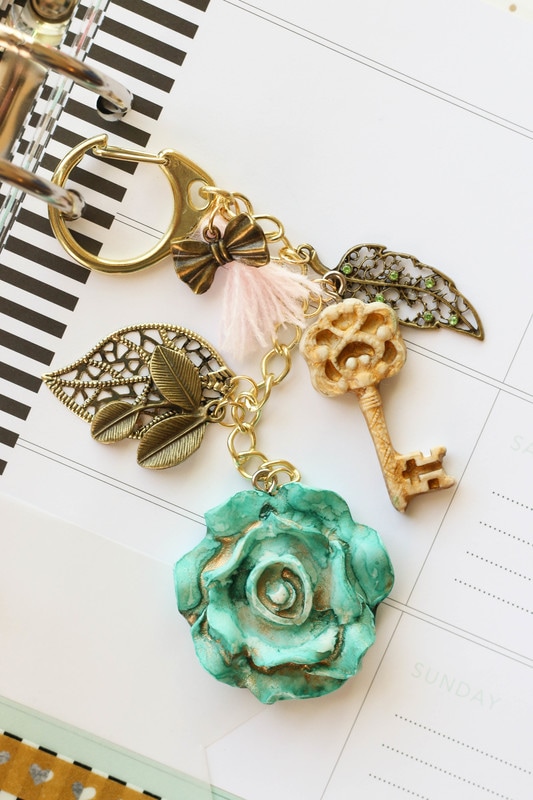
More from Marie Nicole...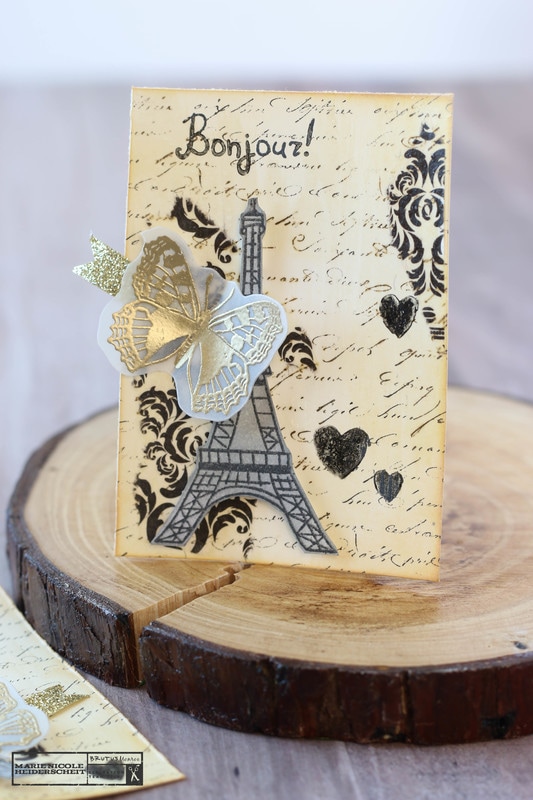
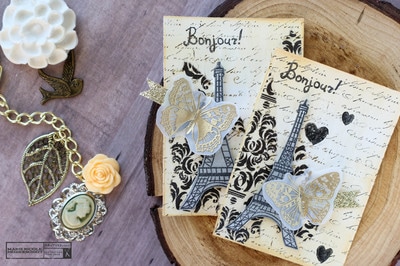
ATCs can be a fun way to create a lot of projects for your crafty friends at once. A typical ATC is 2.5x3.5 inches. They are little cards that you can decorate, either all the same or each one unique, and then send or give to friends. For these ATCs, the Brutus Monroe stamp set, From Paris with Love, was used to give more of a vintage Paris feel. The base for these is some Canvas Corp Ivory Cardstock cut down to size. Then, some Damask Tissuestock was adhered down using Tattered Angels Clear Glimmer Glam. Over the tissuestock, I used a French Script background stamp that was inked up with some Raven Detail Ink. 
The sentiment and the Eiffel tower image are both from the Brutus Monroe stamp set. I stamped the Eiffel tower using my new, all-time favorite tool the Misti, then fussy cut it out and then colored it with some Hickory Smoke Distress Ink. To add some glitz and glam, some glitter washi tape and a gold embossed vellum butterfly added just the right finishing touch. These were so fun to create and send away to the rest of the Brutus Monroe Inspiration Team. There are so many more fun images on this stamp set and I can't wait to get my hands on them and create some more! I'll also be linking this up with: Simon Says Stamp's Monday Challenge!
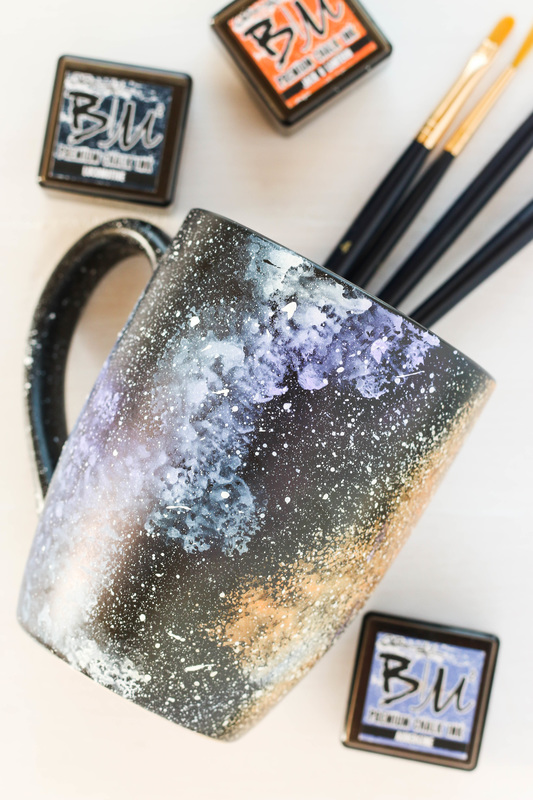
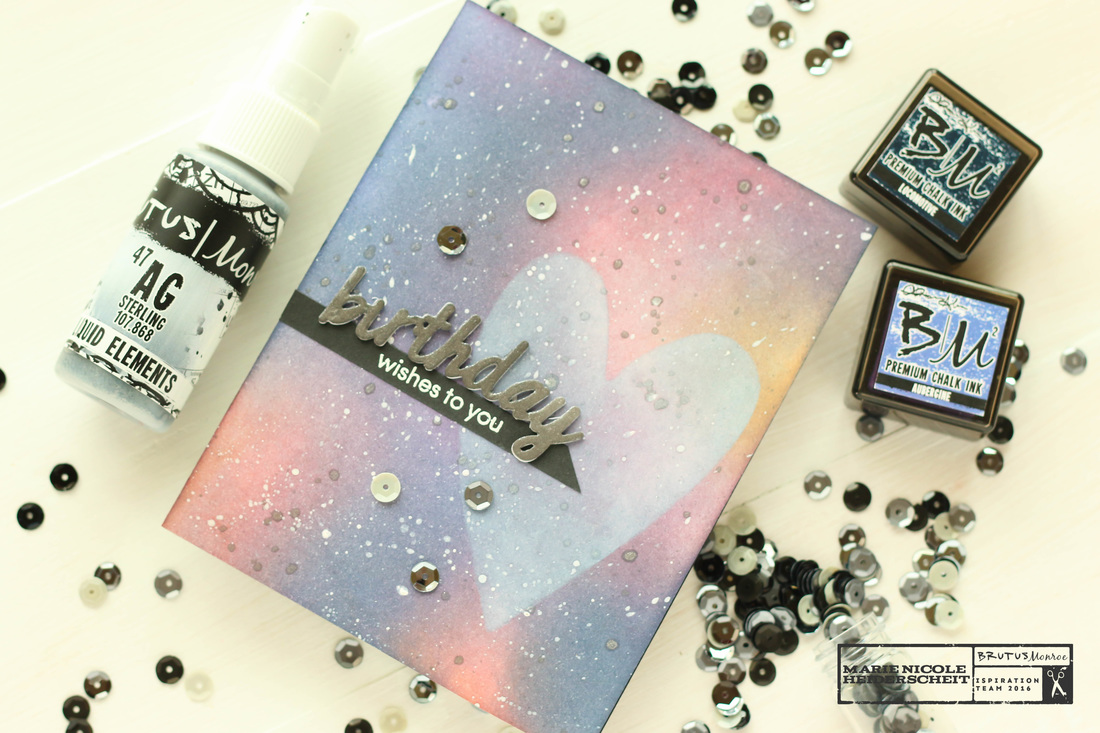
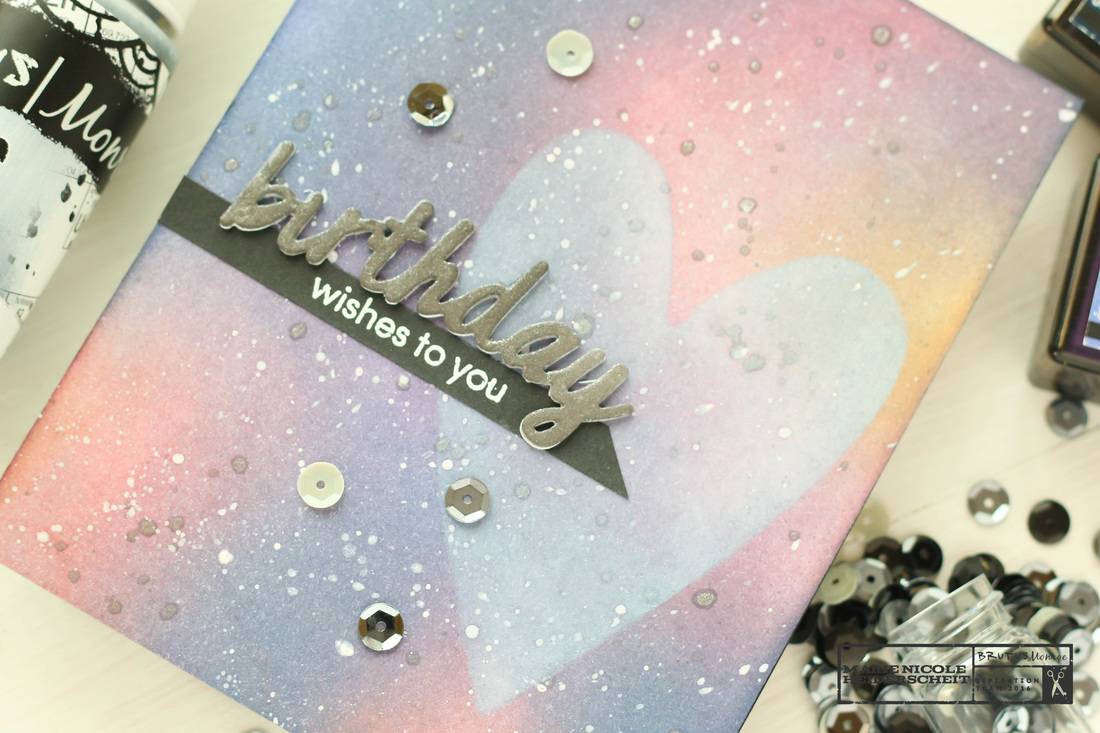
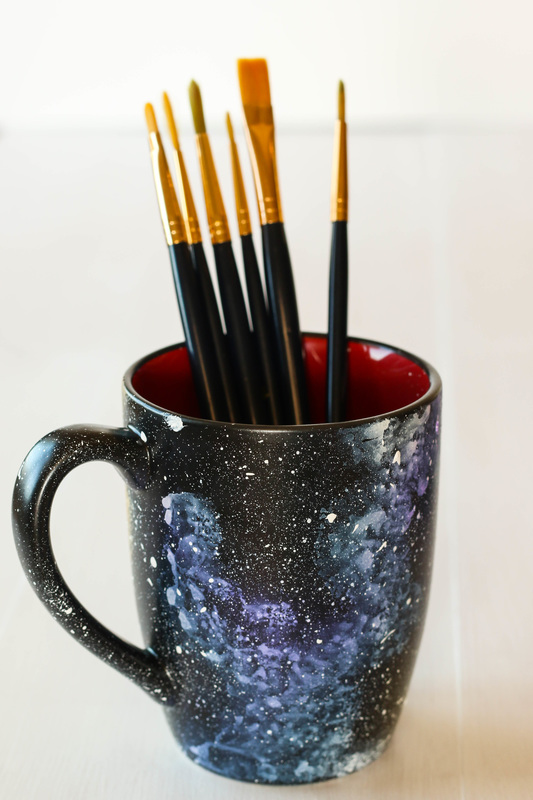
More from Marie Nicole...I've been on a little bit of a galaxy background obsession. Most of the time, I apply this technique to paper. I love taking a plain white piece of cardstock and applying all the colors to watch the background come to life. Below is an example of a card I recently did for Brutus Monroe featuring the galaxy background.
 This card was created using a combination of Distress Inks, Brutus Monroe inks, and some Liquid Elements from Brutus Monroe, as well. If you want more details on it, hop over the the Brutus Monroe Blog where I have a description of the process as well as a video. Since I was having so much fun with these backgrounds, I decided to take it a step farther and discover what other surfaces I could apply these galaxies to. I have a black mug in my craft room that I store my heat tool in. I thought it was the perfect blank canvas to do a little galaxy-ing to (yes, I did just turn the word "galaxy" into a verb). I started by applying some Crystal Tattered Angels paint to the black mug. Then, since I am impatient, I sped up the drying process with my heat tool. The next step was to add some color which I did with Brutus Monroe's Chalk Ink. I decided to use this ink because it does become permanent when dry. Distress Inks would wipe off much too easily. After I had some color down, the last step was to add paint splatters to give the impression of stars. I did this using more of the Tattered Angels paint and flicking it on with a paintbrush. Then, I dried the whole surface again with my heat tool. I plan on using this mug in my craft room to house my heat tool, paintbrushes, and any other little craft tools that might need a home. If you plan on using your mug for drinking or eating out of, you might want to go ahead and find a food-safe and dishwasher-safe sealant to apply over the galaxy background. Without the sealant the paint and ink may rub off and would definitely not be something you would want to ingest. 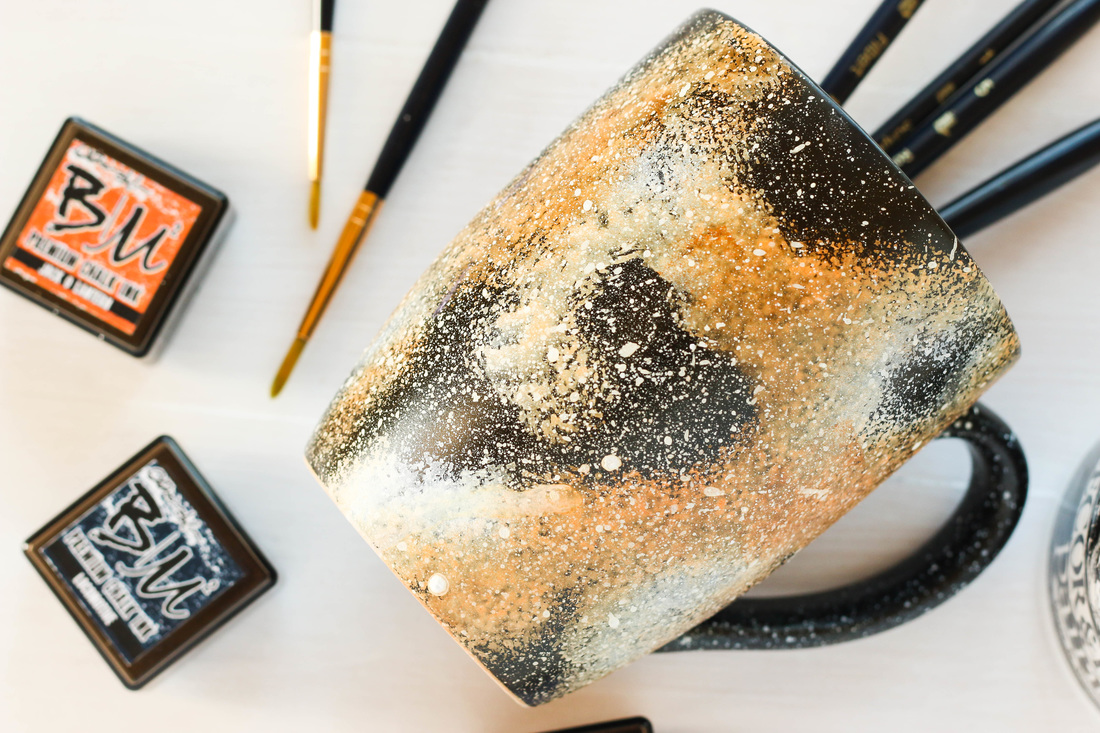
 Thanks for stopping by today and happy crafting!
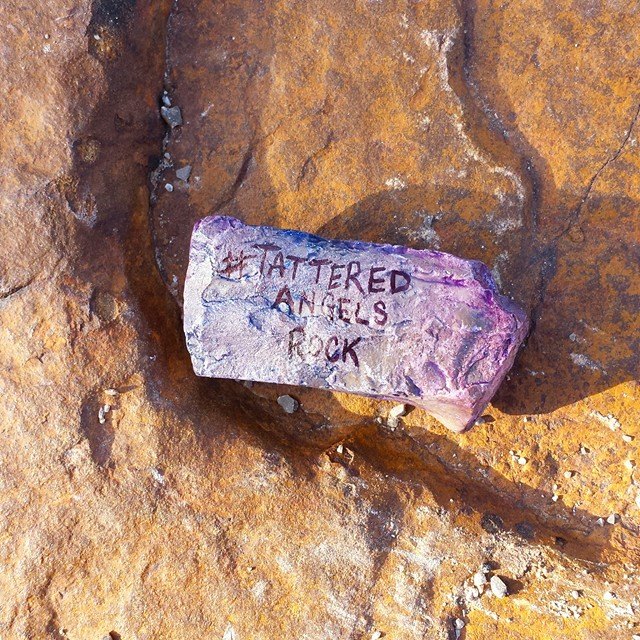
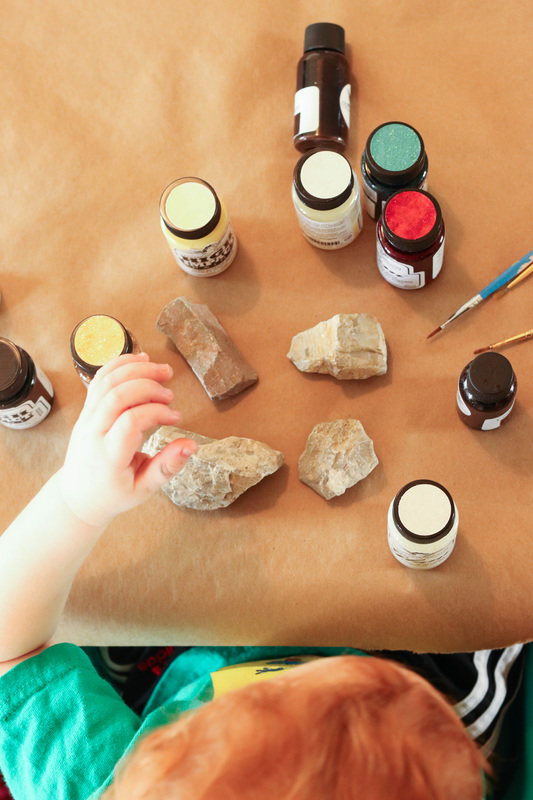
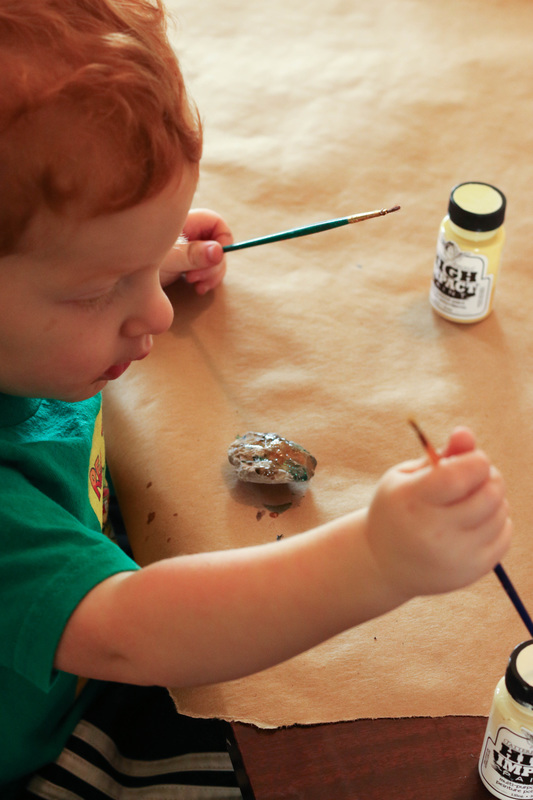
We recently had fun with a little project that Erin Reed from Scraps of Reflection came up with. The guidelines of this project was to find some rocks, paint them with Tattered Angels paints, and then hide them in your community with the hashtag, #TatteredAngelsRocks. Hopefully then the finder will share the rock on social media and we can see where our rock ends up! Maybe they will even get in on the project and decorate some of their own rocks! Well, Hayden and I started our project by going for a walk to look for rocks. I had to help him find appropriate sized rocks because he either wanted pebbles or huge rocks that we couldn't reasonably take home. (Is there no happy medium with a 2yr old? Why does it always have to be one extreme or another?) Anyway, once we had our rocks home, I taped down some kraft paper to the table, set out my Tattered Angels paints, and let Hayden get busy! He LOVED getting into all the paints! We started with Glimmer Glams and High Impact paints because I thought it might be easier for him to use a paintbrush. 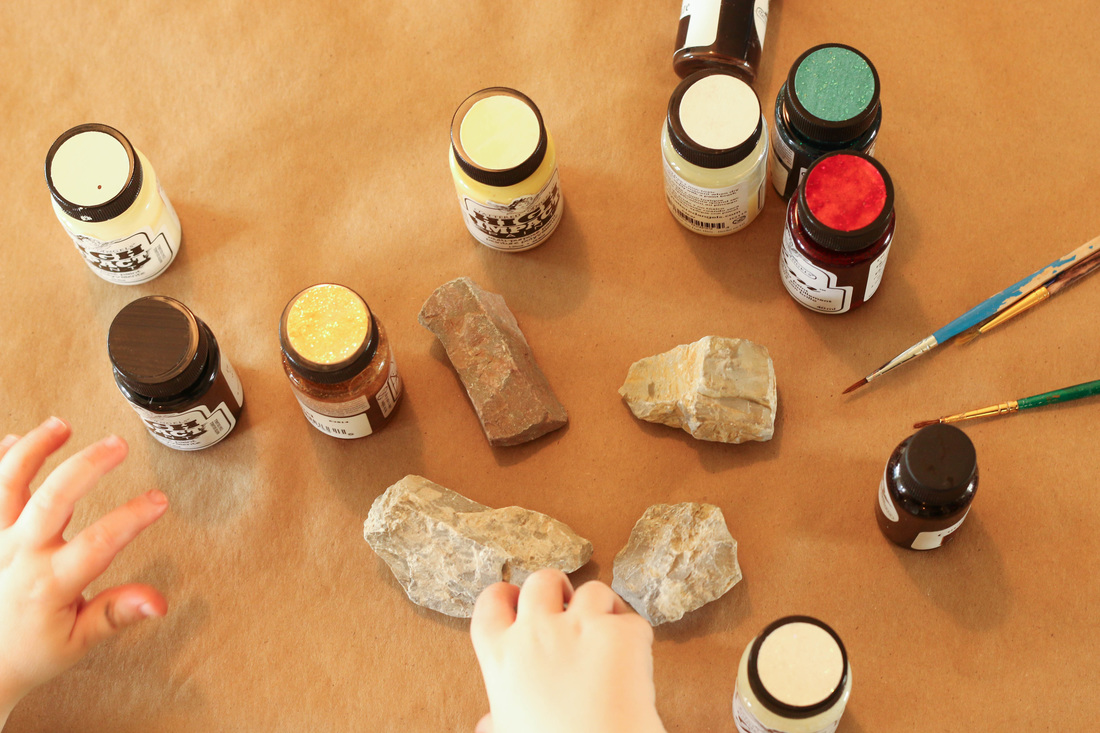
After globbing a good amount of paint on a few of the rocks, I was curious to see how well the Glimmer Mists would work on the surface of the rocks. Turns out they looked amazingly bright and pretty! Once Hayden saw the spray action of the mists he was hooked! No more boring paintbrush for him! We pretty much used different sprays for the rest of our rocks. Then, over the top of the spray we added some more Glimmer Glam to add some extra sparkle! We let our rocks dry completely before writing the hashtag on them and hiding them outside. Here's our finished rocks! 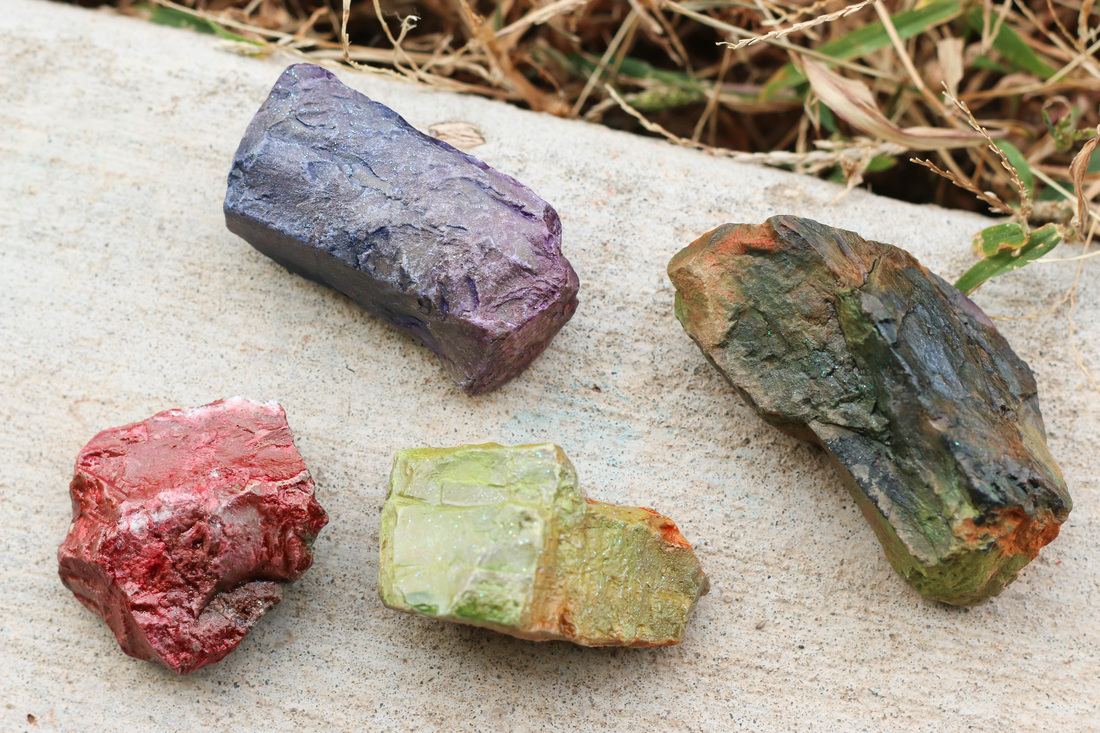
We had so much fun with this project. I can't wait to see if our rocks turn up somewhere on social media with the hashtag. It would be awesome to find out if they've been found or even if the finder wanted to join in and decorate some of their own rocks! Hayden and I might even go out again and decorate more rocks to hide in our community. Its a great way to get out and enjoy some air, get crafty, and connect with the community! Feel free to hop in on this project yourself, too! Just grab some rocks, decorate them, and add the hashtag, #TatteredAngelsRocks. Happy Crafting! 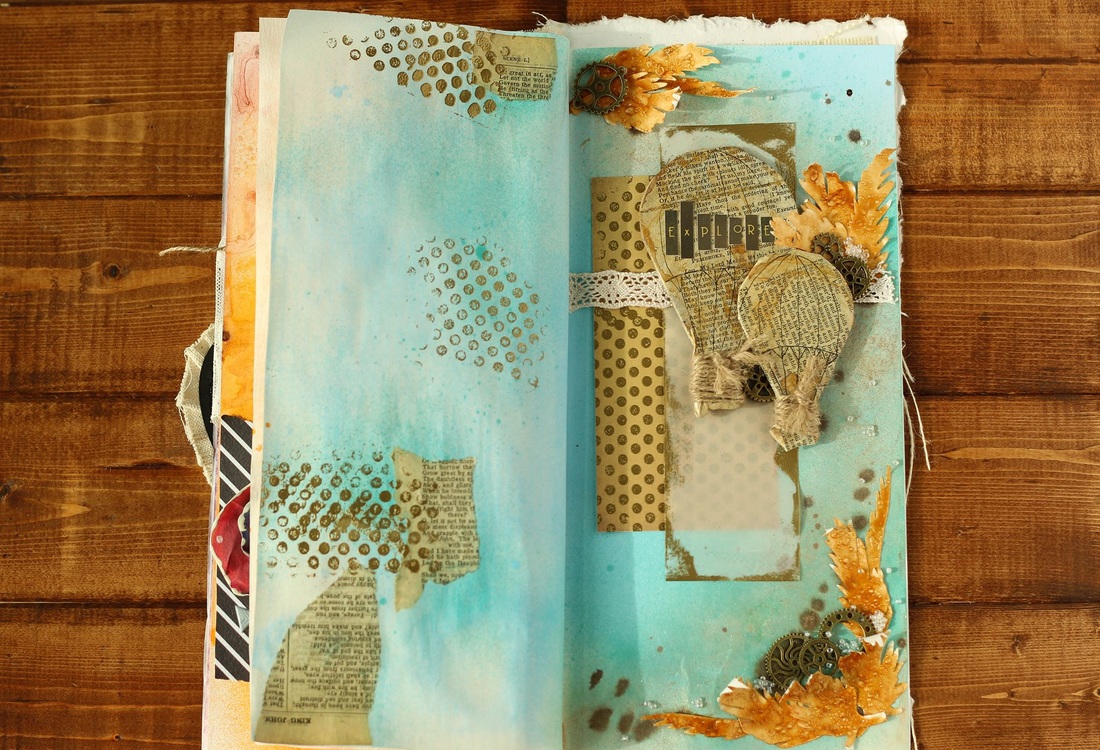
I really havent done a lot of mixed media journaling so I have been surprised at how much I've been enjoying this Recollections Mixed Media Journal. The pages are so fun to build on and work with. For this page I went with a fun, summery travel theme!
I wanted to use my Naturally Aged Weathered Copper Kit from Tattered Angels on this page, so I went ahead with those paints to build the background. Since there was a lot of gold shimmer in the paints, I decided to go with the gold theme, and I love the final result! 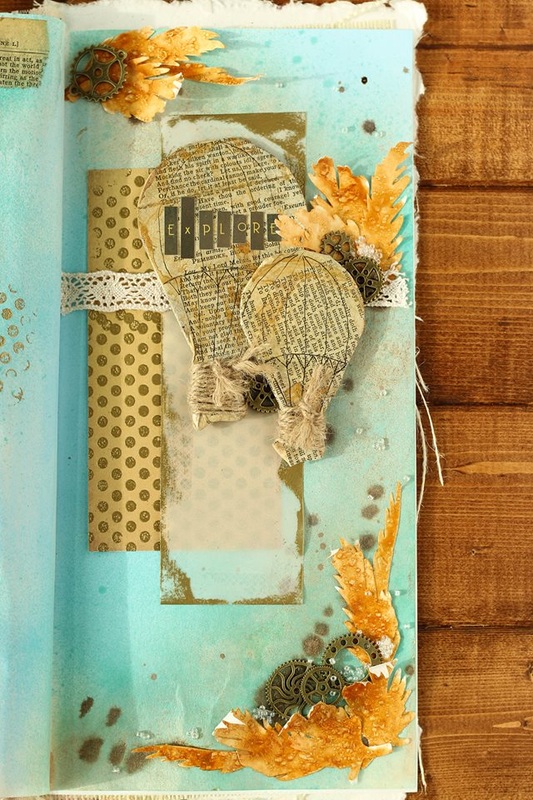
I used my Cricut and cut out a bunch of these paper feathers out of plain white cardstock. Then, I used a heavy layer of Camel Glimmer Glam over the feathers. I also created some bubbly texture on the feathers by holding my heat tool very close to the paint and letting it bubble up. This is a fun feature of the Glam paints- they react to the heat to add some gorgeous texture.
After the feathers were dry I glued them down using my Tombow glue stick. I left some of the edges unglued so they would curl up a little bit. 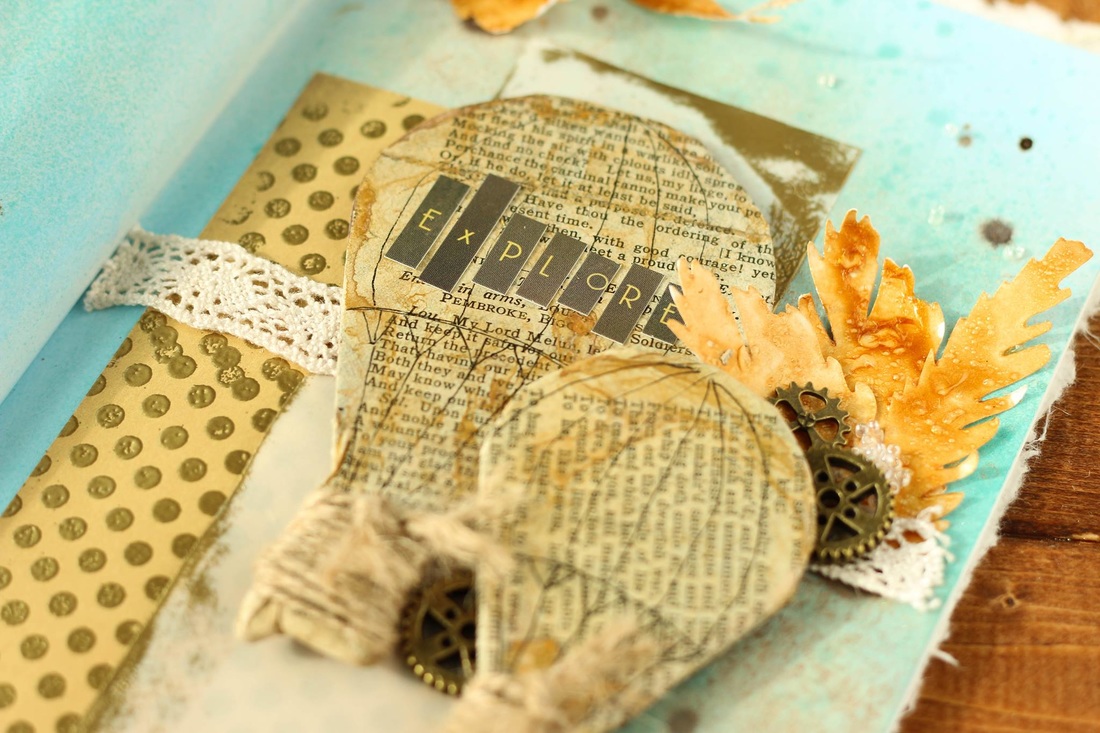
To create the vintage hot air balloons, I used some chipboard balloons from my stash and covered them with an old book page, sticking them down with Clear Glimmer Glam. Then, I sprayed Vintage Brass Glimmer mist over them and dried it, leaving some messy gold splatters on top. I wrapped the bottoms in twine and then drew on some lines to give them more of a hot air balloon look.
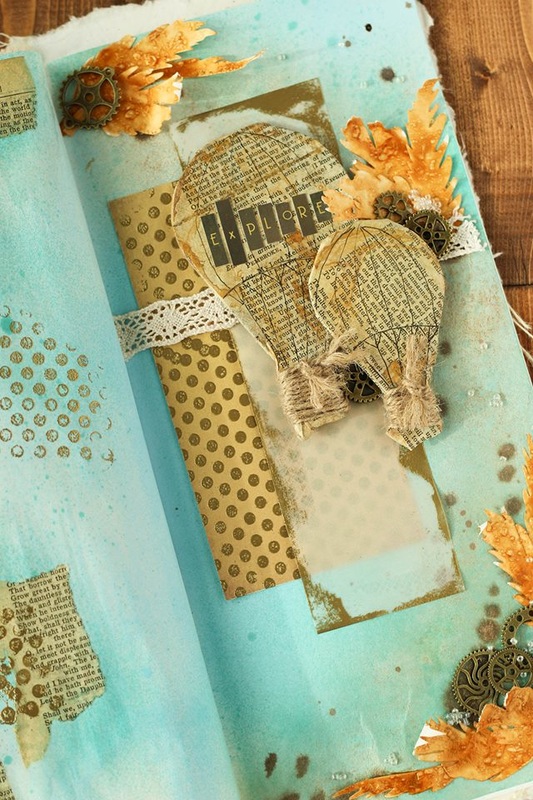
I layered some paper and vellum behind the balloons, and I also did some heat embossing on them with gold embossing powder. For some finishing embellishments, I added some metal gears and some clusters of clear, tiny beads here and there.
If you want to see the process of how all this came together, go ahead and watch the video I put together!
Thanks for stopping by and Happy Crafting!
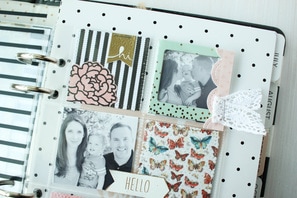
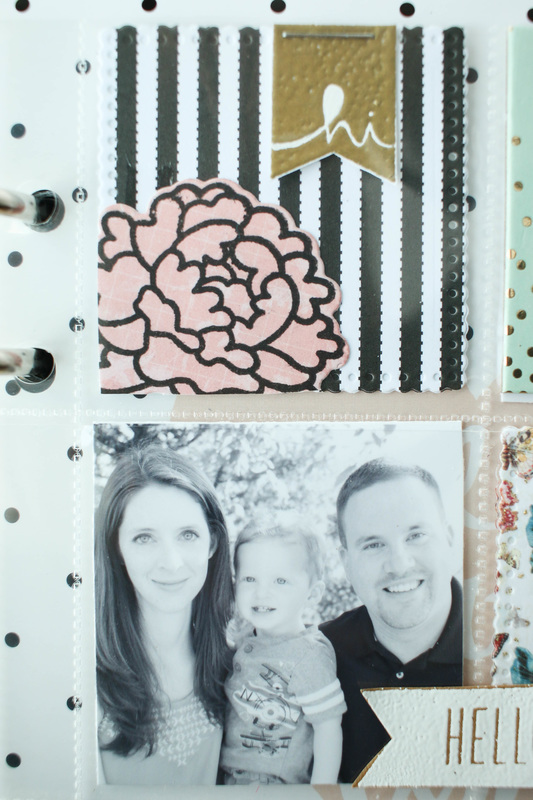
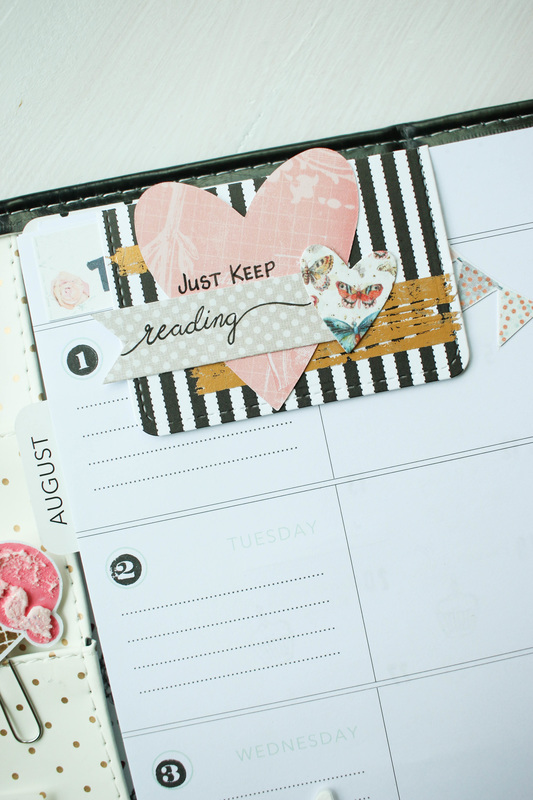
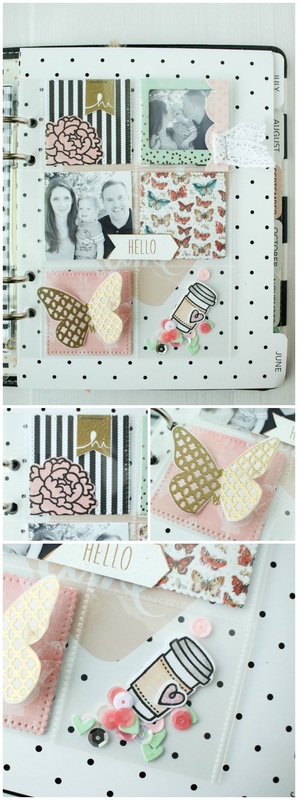
I'm fairly new to the planner world. I only just got my first planner, a Heidi Swapp Memory Planner, two months ago. I am loving it so far! I thought it would be a lot like regular scrapbooking, but turns out the feel is definitely a bit different!
Of course, there are no rules, you just plan, decorate, and share as you like, but here's a few things Ive been crushing on lately... Pocket Pages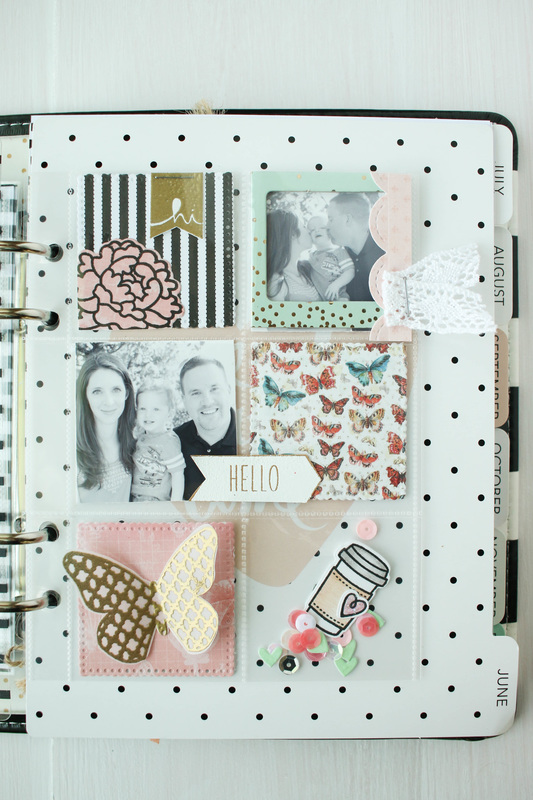
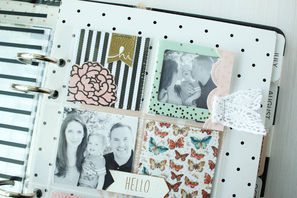
I have not done any Project Life or Pocket Letters, so the little pocket pages that come with the planner is a different format for me! I worked on this one and I was really pleased with how it came out!
I used a bunch of papers from my scrap bin. Most of these papers you see here are from DCWV's Mariposa paper pad, but there are also a few papers from Canvas Corp, as well.
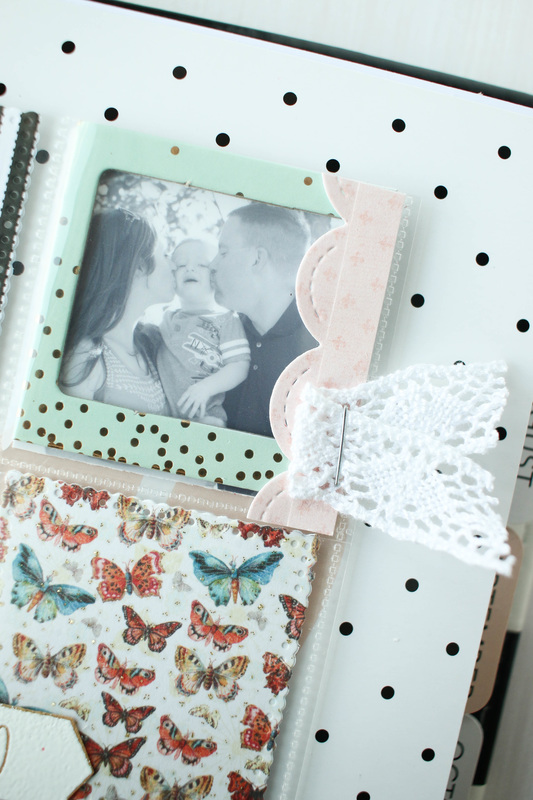
I also printed off some of our family photos in black and white to add to my pockets. I printed them wallet size, and then just cut them down to fit inside the 2x2 pockets. I chose to do them in black and white because I felt like that helped to give the whole page a unified look.
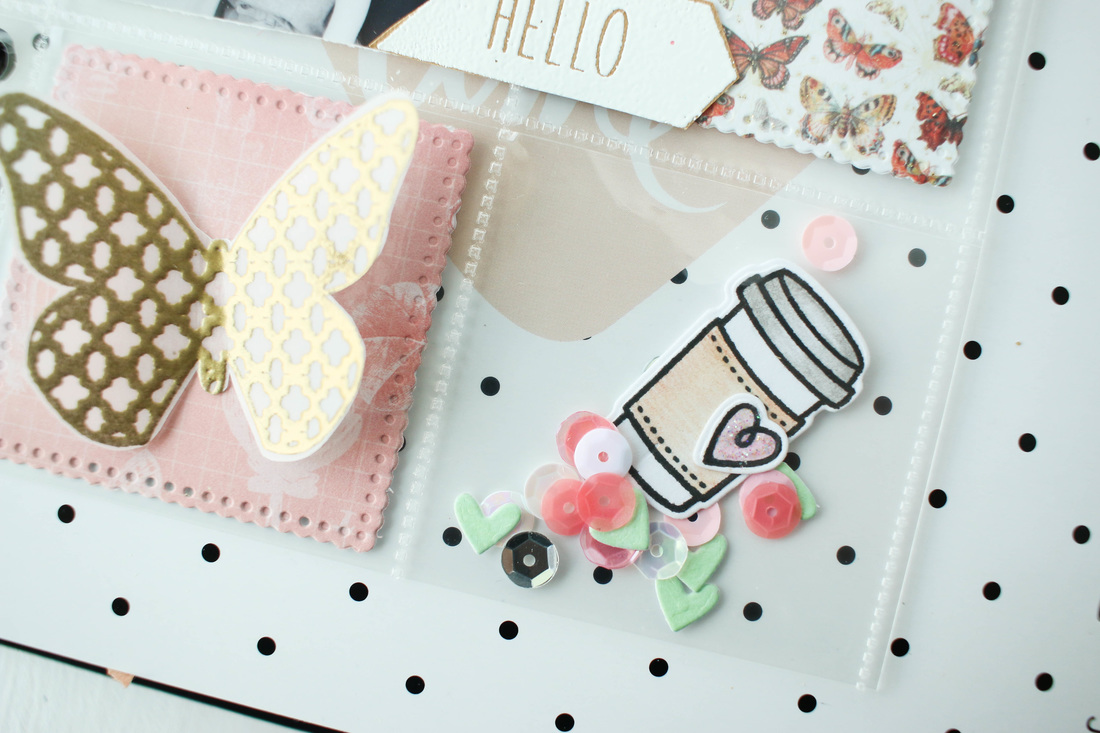
The upper right photo has a Heidi Swapp cardstock frame around it, as well. I just love it! The very bottom left pocket I turned into a shaker. I added some pink and white sequins, some tiny die cut hearts that I misted with Tattered Angels' Mint Julep Glimmer Mist, and a die cut coffee mug.
|


|
|
Bookmarks
|

|
So, bookmarks aren't planner specific, but that's great! They have multiple uses, and SO EASY to make!
The long skinny one you see is just a strip of scrap paper that I found, and cut a flag on the bottom of it. I stamped and embossed the sentiment in gold, and then added an eyelet and Canvas Corp cord on the top.
The other bookmark is a magnet bookmark. I got some Heidi Swapp magnet bookmarks and I love them! I decided to try to make my own. I used some Canvas Corp paper die cut it with a Lawn Fawn Journaling card die. I scored and folded it in half, and then adhered some magnets to the insides. Then, all you need to do is decorate it and clip it on your page!
So, that's what I have been up to lately in my planner. I'll add some links to some products that I used below.
Happy Crafting!
 |
 |
 |
 |
 |
 |
 |
 |
I teamed up with a few of my Creative Crew members to do a video collaboration showcasing Canvas Corp Brands' products. Our theme was "rainbow", and this is what I came up with!
My colors are more of a pastel rainbow since those were the paints I had on hand. I started by taking a dirty, old paintbrush that was past its painting days (which was my fault for not properly cleaning it after I stained a piece of furniture!). I applied a coat of Mankato Decor and DIY paint to the handle of it. Then, I wrapped a paper doily over the front, and some jute twine around just over the bristles.
For the embellishments, I dug through my stash and found several flowers that I liked. They werent the colors I wanted but a little Tattered Angels' paints fixed that! I used Black Orchid and Violet Rose Chalkboard mists.

When I figured out how I wanted them arranged I glued them down. I also added some metal gears from Lollibeads and some Doodlebug sequins.
Happy Crafting!
Linda Svendsen: https://youtu.be/LPIBXUyCcp84
Yasmina TINSANG: https://youtu.be/uofyfS0cH6o
Lena Holmström: https://www.youtube.com/watch?v=uCFft...
Erin Reed: https://youtu.be/TsygKOXXmTs
Gina Knuppenberg: https://youtu.be/VBjvMf28-Nk
Shel Forart: https://www.youtube.com/watch?v=l9O-_...
Marie Heiderscheit: https://www.youtube.com/watch?v=xg8KY...
Tracy Sagriff: https://youtu.be/bq6aYsWaGP8
Here are a few products I used:
 |
 |
 |
 |
 |
 |
 |
 |
 |
 |


Author
So glad you found me! This blog is my little space where I can share bits about my life and my latest crafting projects (mostly handmade cards). My goal is to share, inspire, and to be a positive presence in the creative community.
Take a look around and stop by anytime!


Find me on Instagram!
Archives
January 2018
December 2017
November 2017
October 2017
September 2017
July 2017
June 2017
May 2017
April 2017
March 2017
February 2017
January 2017
December 2016
November 2016
October 2016
September 2016
August 2016
July 2016
June 2016
May 2016
April 2016
March 2016
February 2016
January 2016
December 2015
November 2015
October 2015
September 2015
August 2015
June 2015
December 2014
October 2014
July 2014
May 2014
April 2014
March 2014
February 2014
January 2014
Categories
All
Albums
All Cards
ATCs
Birthday Cards
Brutus Monroe
Canvas Corp Brands
Cards
Christmas
Christmas Cards
DIY
General Cards
Get Well Cards
Halloween
Home Decor
Love Cards
Mixed Media
Papercraft
Planner
Punny Cards
Scrapbooking
Shaker Cards
Special Occasion Cards
Summer And 4th Of July
Tags
Techniques
Thank You Cards
Toddler Art
Tombow
Tutorials
Watercolor
Link Love


 RSS Feed
