Marie Nicole Designs
  • Crafting
  • Life
  • Contact
  • About
  • Gallery

Pumpkin Spice It Up!

10/12/2017

0 Comments

 
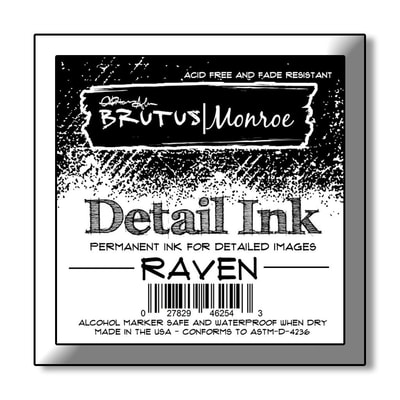
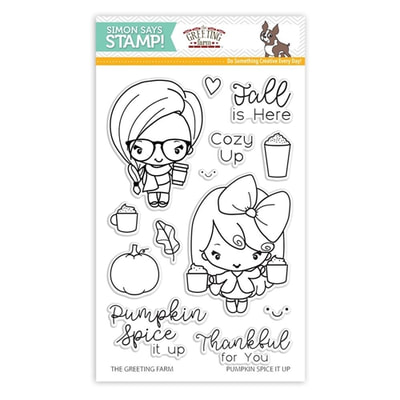
Simon Says Stamp has a number of new, fabulous stamp sets that they released for STAMPtember. I saw this set from The Greeting Farm and it was so cute I just had to have it. The images and sentiments are everything fall, which is my favorite season! 

As soon as this stamp set showed up in my mailbox, I grabbed my supplies and went to town stamping and coloring the images!
Picture
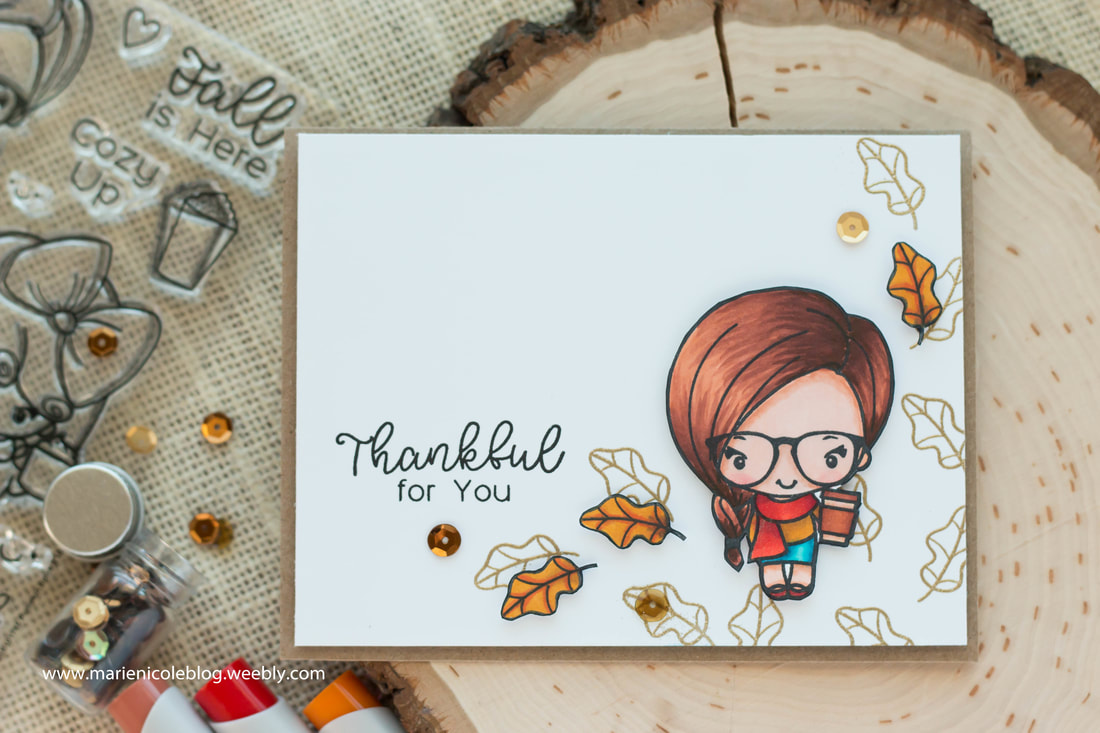
First, I used my Misti and my Brutus Monroe Detail ink to stamp out the girl. Brutus Monroe's Detail Ink is safe to use with alcohol markers, and since I used my StyleFile markers for this image, I didn't want the ink to run. 

After the girl was colored in and fussy cut, I took a black marker and ran it along the outside edges to hide any white paper. This is a great trick for making your fussy cutting look perfect! 
​
Picture
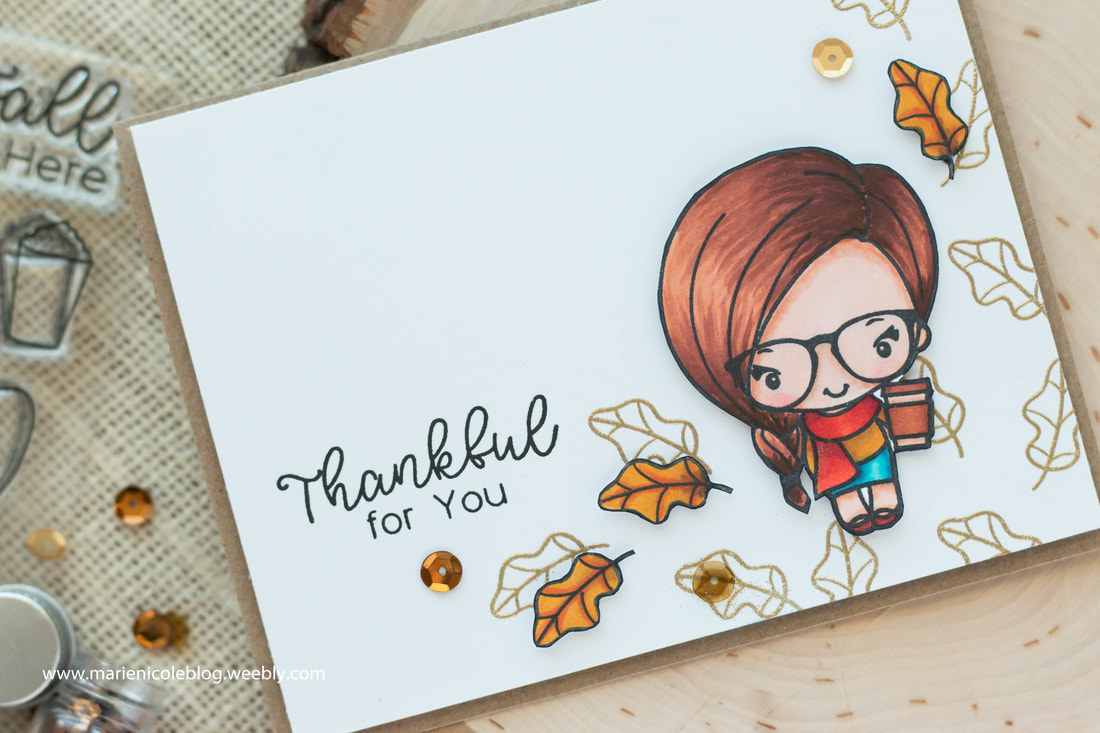
I kept the card clean and simple because I really wanted this girl to stand out. I made a simple background by stamping the leaf from the set in a random order in the bottom right corner. I used Brutus Monroe Embossing Ink along with their Gilded Embossing powder. 

Then, I stamped a few more leaves, colored them, and cut them out as well. These colored leaves I used to give a little more visual interest around our fall girl. 
​
Picture
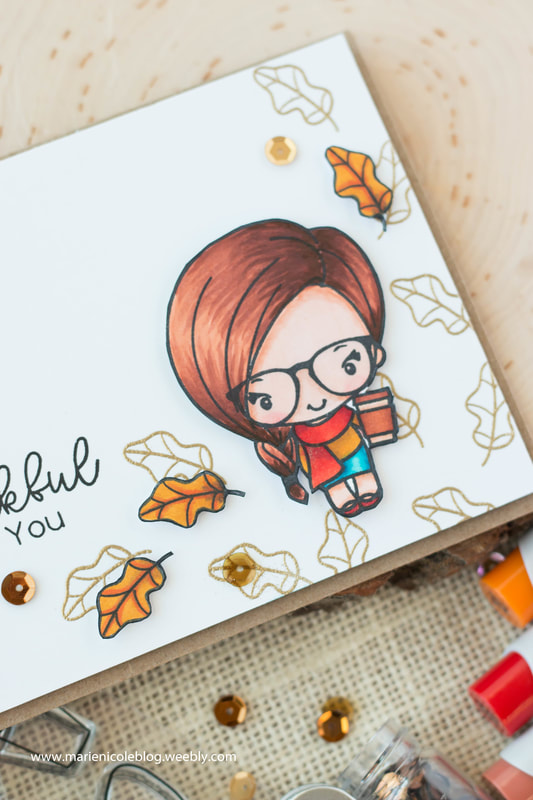
The girl and the leaves are both popped up on some foam adhesive. I also added a few gold sequins for some more subtle color. 

The sentiment is stamped with Brutus Monroe ink as well. I just mounted the sentiment stamp on my Misti and stamped it several times to get that nice dark black.

Finally, I took an A2 sized card base in kraft, and mounted my white panel on it using some kids' craft foam to give some dimension. 
​
Picture
This is such a simple card, but the colors, the images, and the sentiment all works together to create such a fun fall scene! 

Thanks for stopping by! I hope you enjoyed today's card. Please take a look at some of the products I used! 
​


​More from Marie Nicole...

0 Comments

Jeepers Creepers!

9/26/2017

0 Comments

 
Picture

Brutus Monroe recently released a special Halloween themed Inspiration Box and I was able to get my hands on the stamp set that was inside! This stamp set was so much fun with a number of little monster images and some great sentiments to match. Being a 6x8 stamp set, it is also quite a bit larger than the usual 4x6 sets. 

These cute images were just perfect for coloring so I stamped them out in RAVEN DETAIL INK and then colored them in with my STYLEFILE MARKERS. 
​
Picture

After I had all my images colored, I fussy cut them out and set them aside. I used the Frankenstein image for this card, where I ink blended a Halloween moon behind him and added a few strips of paper and a stamped crow as well. 

The other images I used to create some fun and simple ATCs. I pulled some more of my Halloween paper from my stash, and then mixed and matched some simple backgrounds. After having my cards created, I popped the characters up on foam adhesive and then also added some of the fun stamped sentiments. 
​
Picture
Picture

Unfortunately, this Inspiration Box is sold out, but Brutus Monroe is always coming out with new, fabulous boxes and stamp sets, so keep watching for the next release!

Thanks for stopping by!

More from Marie Nicole...

0 Comments

Botanical Banners Thank You Card

7/11/2017

0 Comments

 
Picture
I've been away from my craft room for quite some time because of a few exciting life changes. My husband and I welcomed a new baby girl into the world recently, so life has been centered around a newborn lately! I did steal a few quiet moments while the kids were napping though to pull out a few of my favorite supplies and create this fun card. 

The flower stamp is one from Brutus Monroe's stamp set, Botanical Banners, and is one of my absolute favorites! I stamped it out using my Misti and my DETAIL BLACK INK. Then, I did some simple coloring on the flowers using my Prismacolor pencils. When the coloring was done, I just fussy cut around the flowers.
​
Picture
Next, I used some Canvas Corp White Cardstock for the card base, and cut it down to size. I also cut a slightly smaller panel for the front of the card, and then using some Tumbled Glass Distress ink, I lightly blended on some of that blue to the center of the cardstock. I wanted a little subtle color peeking out from behind my other elements. 

I also die cut a stitched circle frame using my Sizzix and Lawn Fawn's Stitched Circle Dies. I colored the stitched frame using a bit more of my DETAIL INK. This way, the black from the stamp perfectly matches the black on the circle frame. 

The flowers are adhered down with a little foam adhesive, as well as the circle frame. I also tucked a little strip of vellum behind the sentiment in order to help the word "thanks" stand out. 
​
Picture
The sentiment is another die from Lawn Fawn. It is their Scripty Thanks die. I love this die because I am able to use it on almost any thank you card I am creating! I cut it out with some more of my white cardstock, and then to add a little dimension to it, I added some white Nuvo Drops to it. I did not let the Nuvo Drops dry as much as I should have, so a few little areas were smudged, so if you decide to use these definitely let them dry for several hours or over night! 
​
Picture
Lastly, I added a bit of black and white striped ribbon to the top of the flowers. I just folded the ribbon in half, stapled it, and then adhered it to the card using a little liquid adhesive. 

I hope you have enjoyed the card today and it has given you a little inspiration for your own crafting! I am definitely not a pro when it comes to coloring images, but this Brutus Monroe stamp does most of the work for you, which is one of the reasons its in my favorites list. 

Thanks for stopping by and have a lovely day! 

More from Marie Nicole...

0 Comments

"Bugs and Kisses" Interactive Clothespin Card

6/12/2017

2 Comments

 
Picture
I just love interactive cards. I think it makes your already special creations just that much more special! I've recently been playing around with shaker cards, slider cards, and for this one, some cute clips that you can remove and use on other things! 

There are three little bees on this card that I stamped out using Lawn Fawn's Bugs and Kisses stamp set, die cut, and then adhered to some Canvas Corp Mini Clothespins. 
​
Picture

First, I stamped out all my images and die cut them using my Sizzix. Then, to build my background scene. I did some light blue ink blending for the sky, and also ink blended on the landscape panels using a few shades of green Distress Ink. 

The landscape panels are cut with Lawn Fawn's Stitched Hillside Borders dies. I layered them over each other, using some foam adhesive to pop up the front layer. This created some space behind the hillside that I was able to clip my little bees to. 
​
Picture

I also tucked the mason jar in behind the front hillside, and covered it with some Glossy Accents to make it look like glass. Then, I added some Canvas Corp Jute Cord that I tied into a tiny bow. 

The sentiment is also from the Bugs and Kisses stamp set. It is stamped and embossed on a strip of kraft as well as vellum. I added a little heart to the sentiment, as well. 
​
Picture

I think this would be such a fun card to send to my nieces and nephews! They could remove the bee clips and add them onto the school notebooks, planners, or even use them as little bookmarks! Of course, its fun to just move them around the card, as well! 

Thanks for stopping by to see this fun little card! Hope it gives you some ideas and inspiration for your own crafting! 

2 Comments

Rockstar Pets

5/30/2017

0 Comments

 
Picture
Brutus Monroe has a ton of fun stamps, and for this card I used the Rockstar Pets set. There's this fun hipster cat along with a dog wearing headphones and several really fun sentiments. 

This cat had so much personality he was just dying to be stamped out and watercolored! The rest of the card is super clean and simple, to let the cat stand out. 

First, the cat was stamped out using the Misti and some Raven Detail Ink. Then, before the ink dried, I used clear embossing powder and embossed the image.

Then, using Distress Ink Pumice Stone, Hickory Smoke, and Festive Berries, I added color to the cat. Embossing the lines always seems to help with watercoloring- it creates a barrier that helps hold the color in the lines. 

The very last thing to do was stamp and emboss the sentiment, as well, and then add a little Glossy Accents to the glasses to make it look like real lenses! 
​
Picture
Hope this gives you a better close up look at this  stamp set! Don't forget to check out the store over at Brutus Monroe for not only this set, but a ton more!
​

More from Marie Nicole...

0 Comments

7 Gypsies Architextures + Altered Paintbrush

5/5/2017

0 Comments

 
This year at Creativation, 7 Gypsies revealed an exciting new line of products called Architextures. These pieces are little embellishments and goodies that you can craft with, and they are vintage-inspired to look and feel like the real thing! They have so many pieces to choose from, including a little mason jar that looks 3D and you can actually see through like glass.
Picture
This mason jar is just one piece in a collection of hundreds that are so inspiring to play with! The other cool thing about it is that the packaging has been designed so that it can also be used in your craft projects. I think this is just brilliant! 

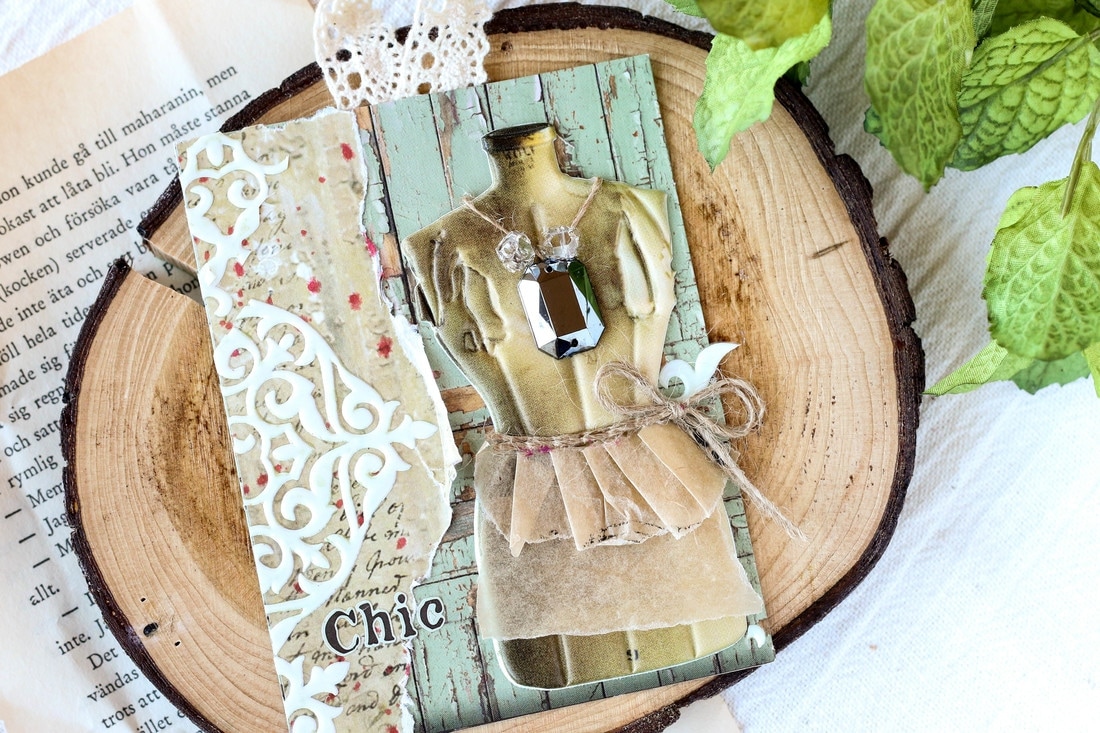
Another piece that I was able to work with while at Creativation is this fun dressform. This piece is 3D, feels soft just like a regular dressform would, and is so much fun to dress up and embellish! I pieced together some packaging and some embellishments to make a little dress on this piece. CLICK HERE if you would like to see the post for this dressform! 
​
Picture
I managed to get my hands on a few Architexture pieces that are found at Michael's stores. There are so many fun ones there but I found these little silver crosses that look like a pendant or necklace piece, and decided to use them on an altered paintbrush. ​
Picture
I have done one Altered Paintbrush in the past. I loved how it turned out so I actually went to Lowes and picked up a few of those $1 wooden paintbrushes for the purpose of altering them. 

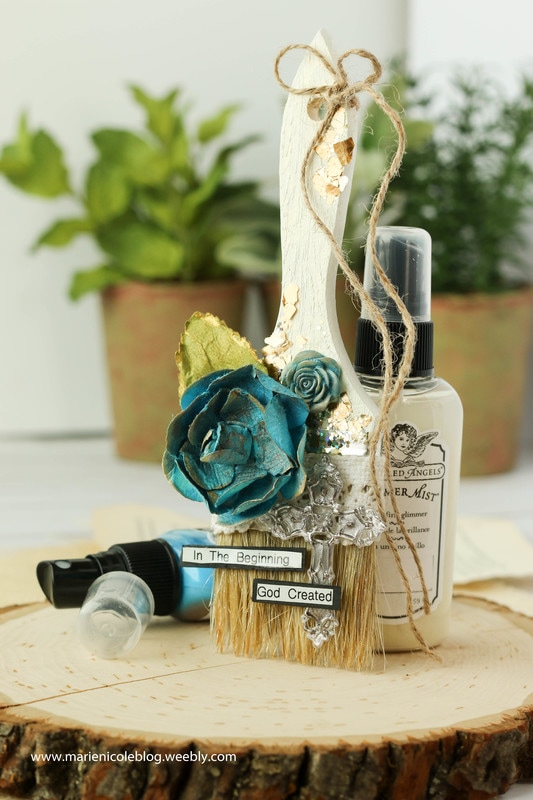
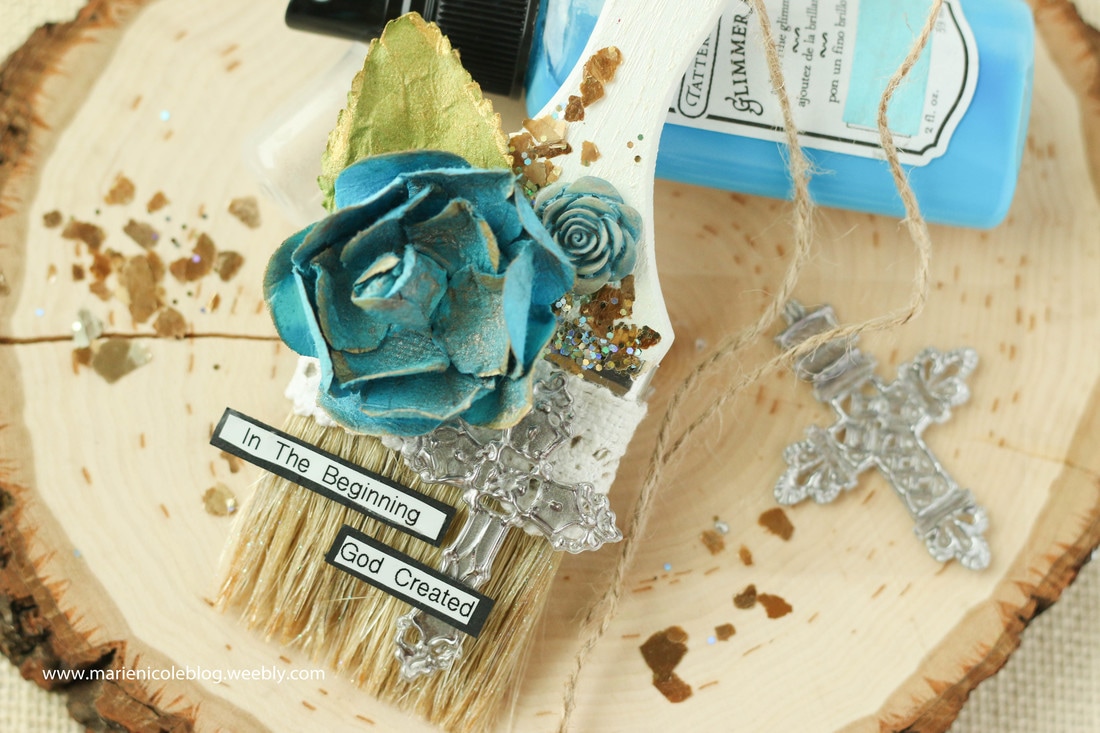
I started by applying a coat of Tattered Angels Crystal DIY and Decor paint. This is a white paint that covers almost any surface very well. Once that layer of paint was dry, I misted over it with some Iridescent Gold Glimmer Mist. I thought the paintbrush just needed a little shimmer! 

I then applied some tacky glue to a few areas on the handle, and stuck some gold glitter flakes to that. I also added some bits of ribbon, a few flower embellishments that I colored with more Iridescent Gold and also some True Turquoise Glimmer Mist, and then moved on to applying the Architextures Cross. 
​
Picture
Although the cross is self-adhesive, I wanted to pop it up a bit so I used some small bits of foam adhesive to adhere it down to the paintbrush. Then, using my labeler, I typed out the verse, "In the beginning, God created..." and adhered the words to small strips of black cardstock. 

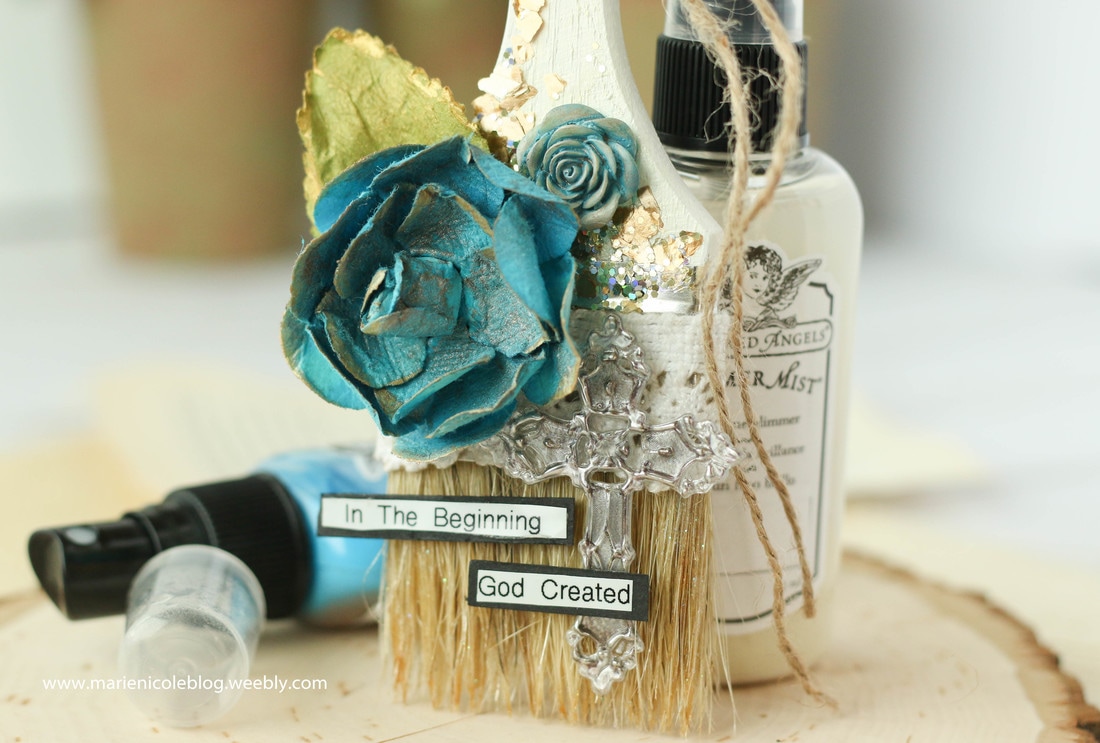
I applied the verse with foam adhesive, as well. 
​
Picture
To put some finishing touches on the paintbrush, I added some Chandelier Glimmer Glam to the bristles, and also tied some Jute Cord around the handle, letting it fall down to the side. 

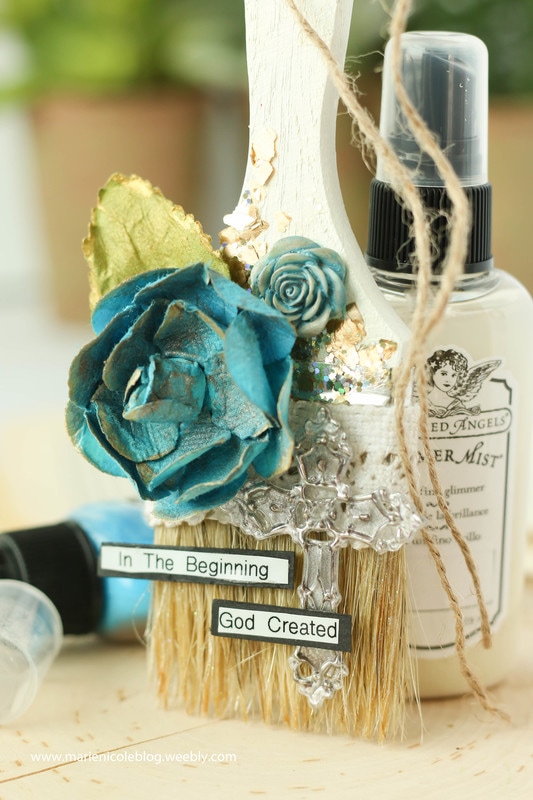
Very simple embellishing job on this paintbrush, but I love the overall message of it! I have it in my craft room and it reminds me who our Original Artist and Creator is. 
​
Picture
If you are interested in seeing more 7 Gypsies Architextures, check out the Canvas Corp Brands Store or visit your local Michaels to see what they have there! 

Thanks for stopping by, and Happy Crafting! 
​

More from Marie Nicole...

0 Comments

Mini File Folder Album

4/27/2017

0 Comments

 
Picture
This little file folder album was so much fun to create. I was inspired by a few Pinterest posts and videos and decided to try to build my own. I grabbed my pack of White File Folders from Canvas Corp and stamped and inked three of them, and then sewed them together to create the "bones" of my album. I left a few of the sides unsewn in order to create a few pockets to tuck goodies or photos inside of. 
Picture
Picture
The front cover was decorated by stamping Brutus Monroe's Enchanted Rose stamp with embossing ink and then embossing in gold. Then, I just ink blended on a few colors and added the little die cut "shine" sentiment. I also spritzed it with a little Tattered Angels Pearl Glimmer Mist for more shimmer! 
Picture
Picture
Picture
The first inside page is decorated with some journaling cards from Simple Stories. I wanted to add a lot of stitched details, so for most of my layers I roughed the edges with a scissors and then stitched around the outsides. I also added a few of the journaling cards with some washi tape so that you can flip them up and add photos or handwrite memories and stories on them. 

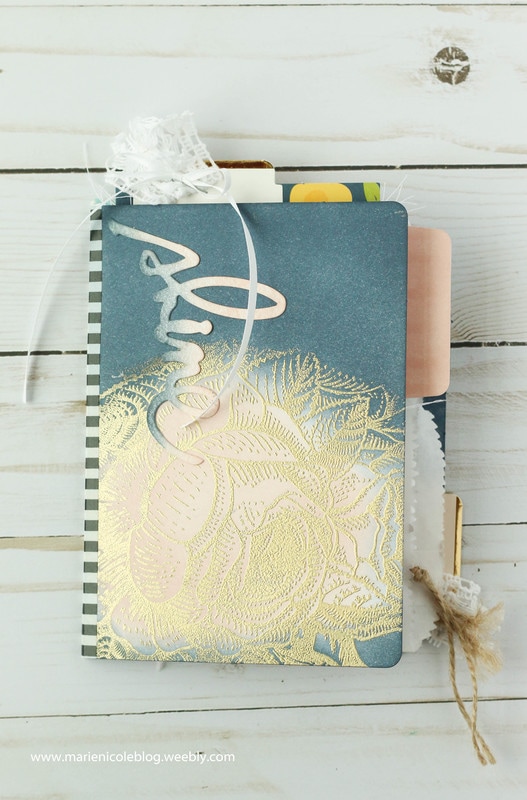
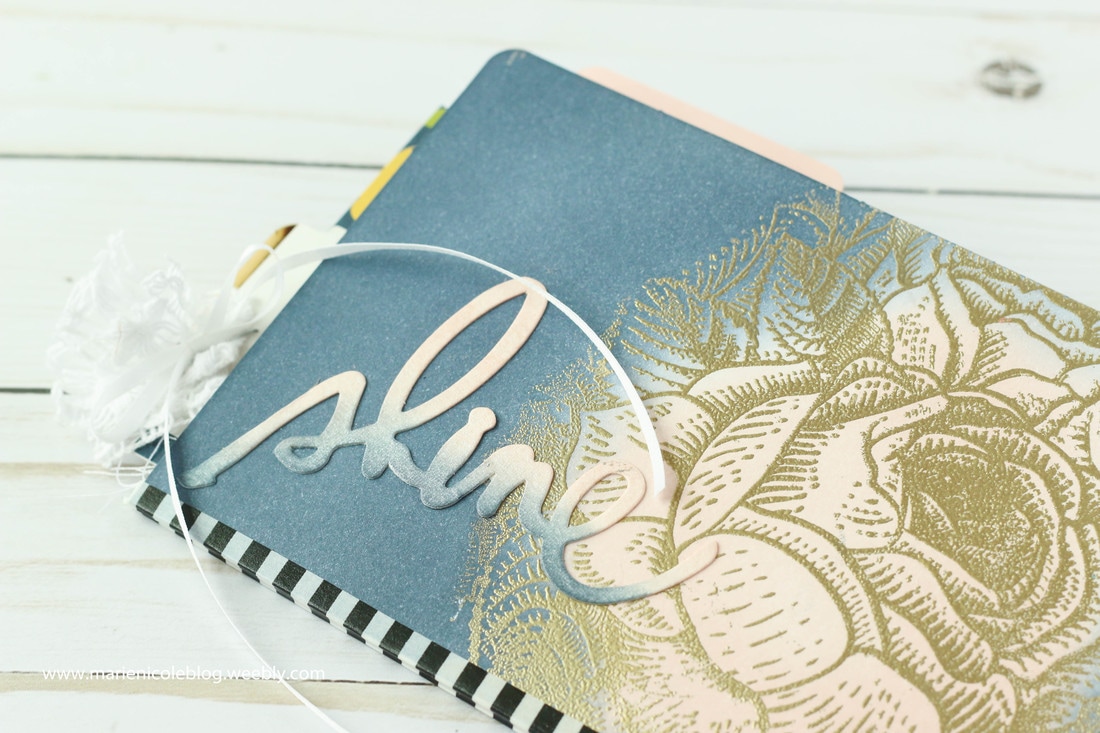
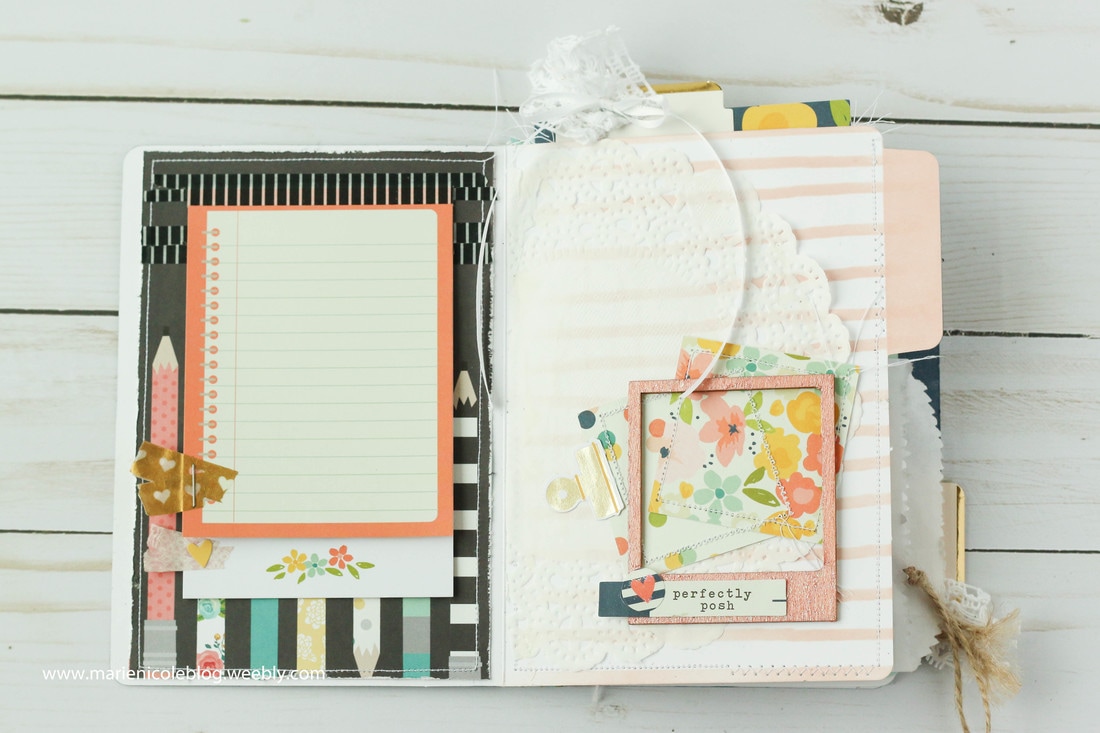
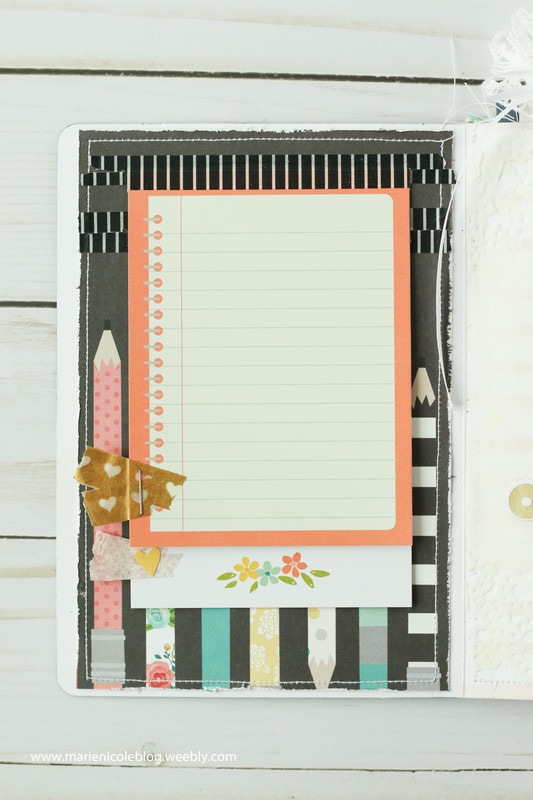
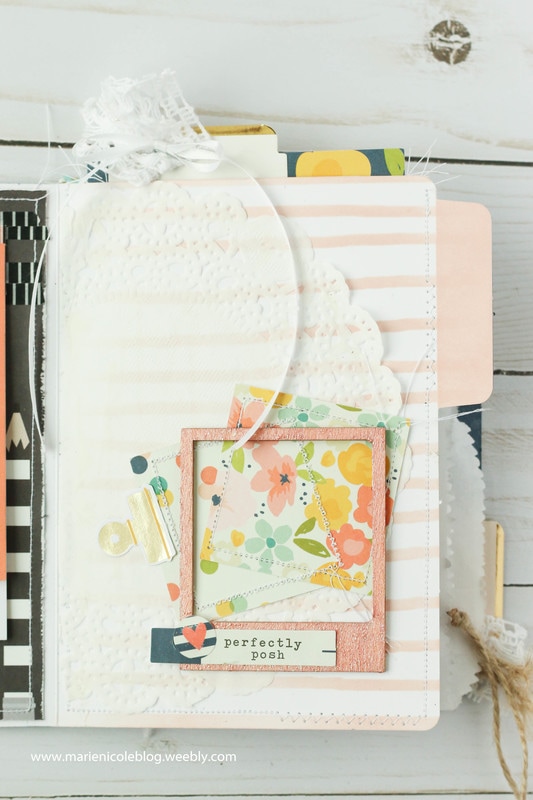
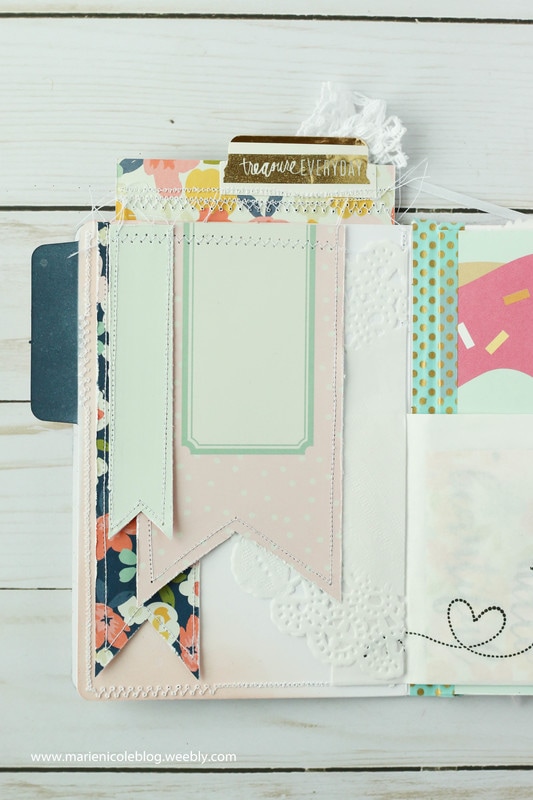
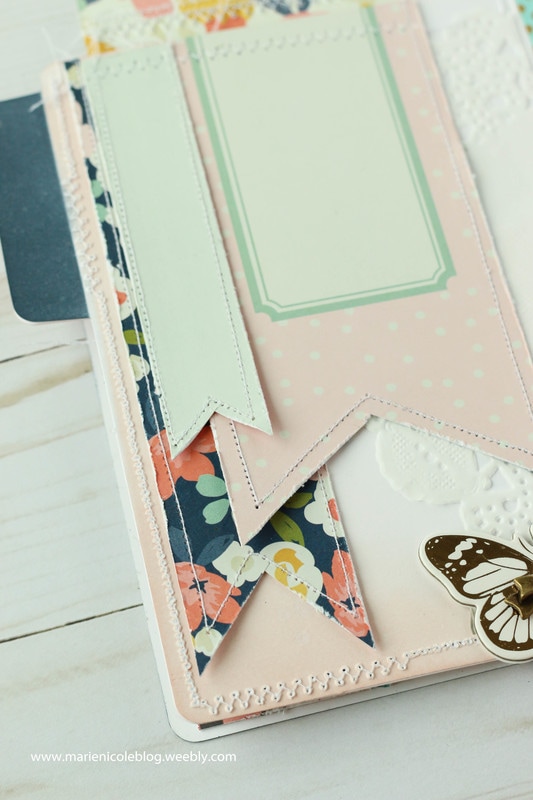
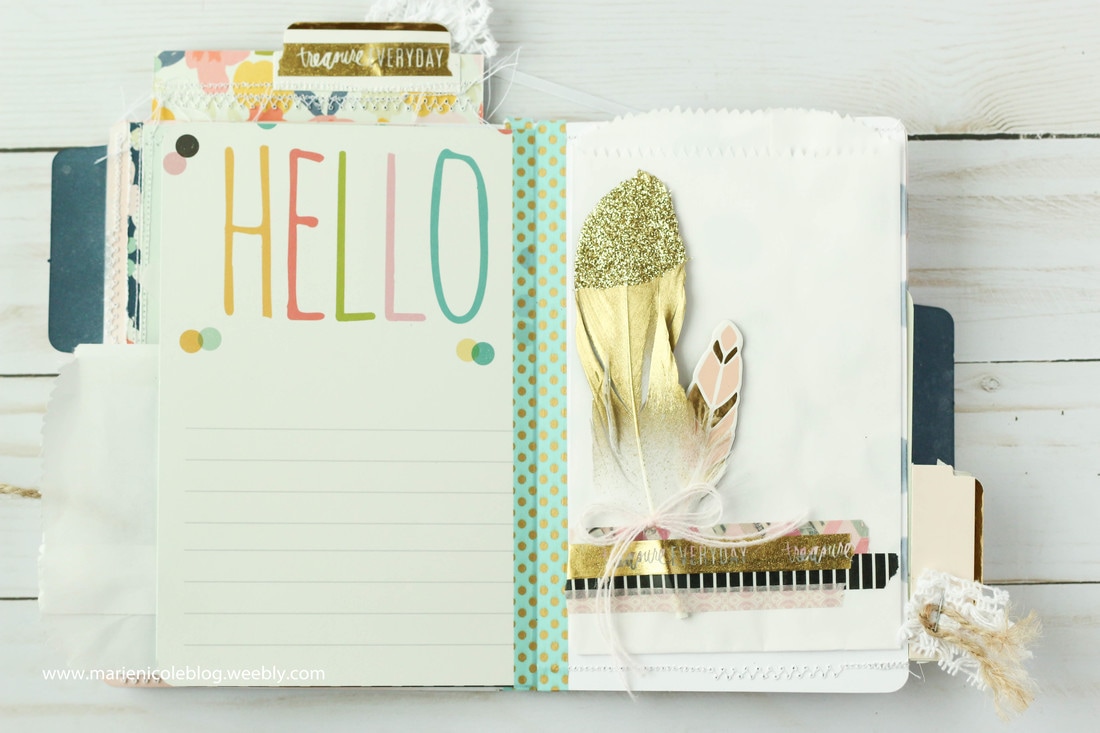
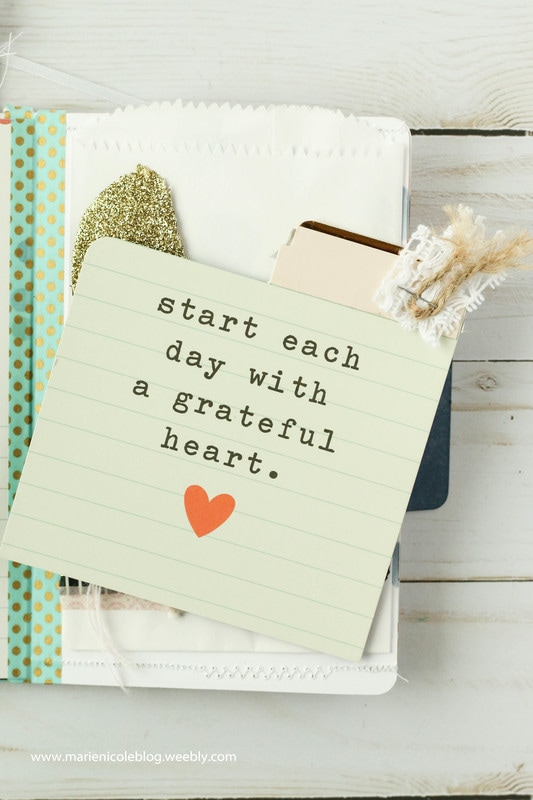
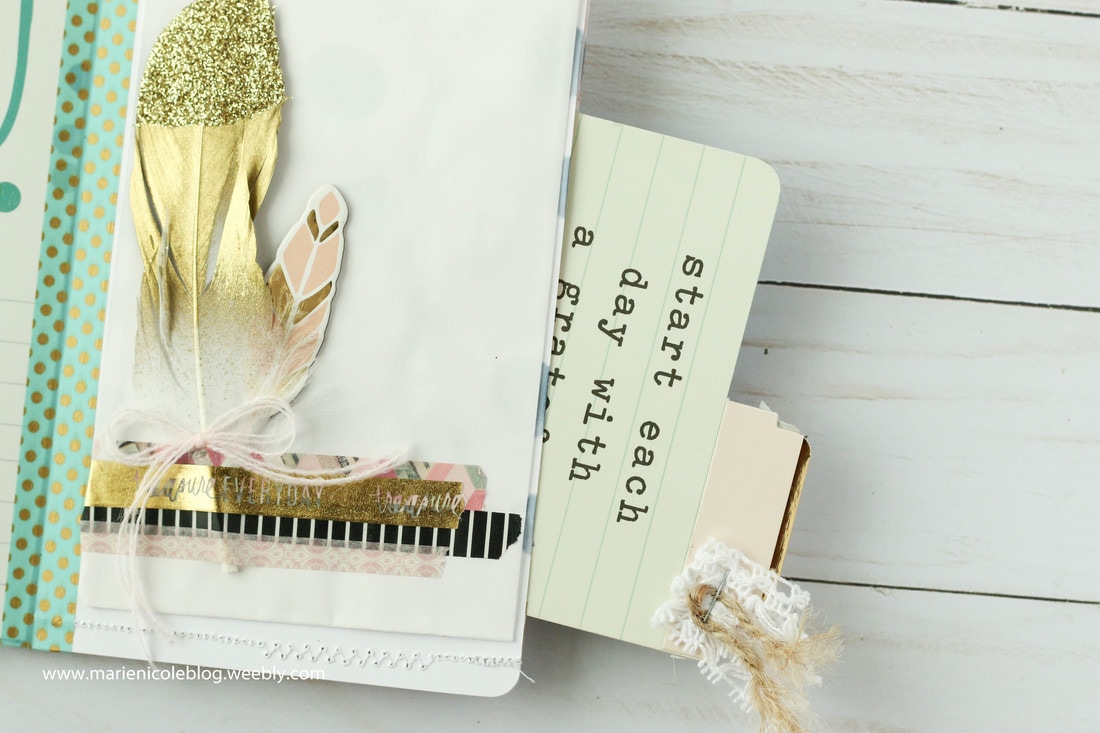
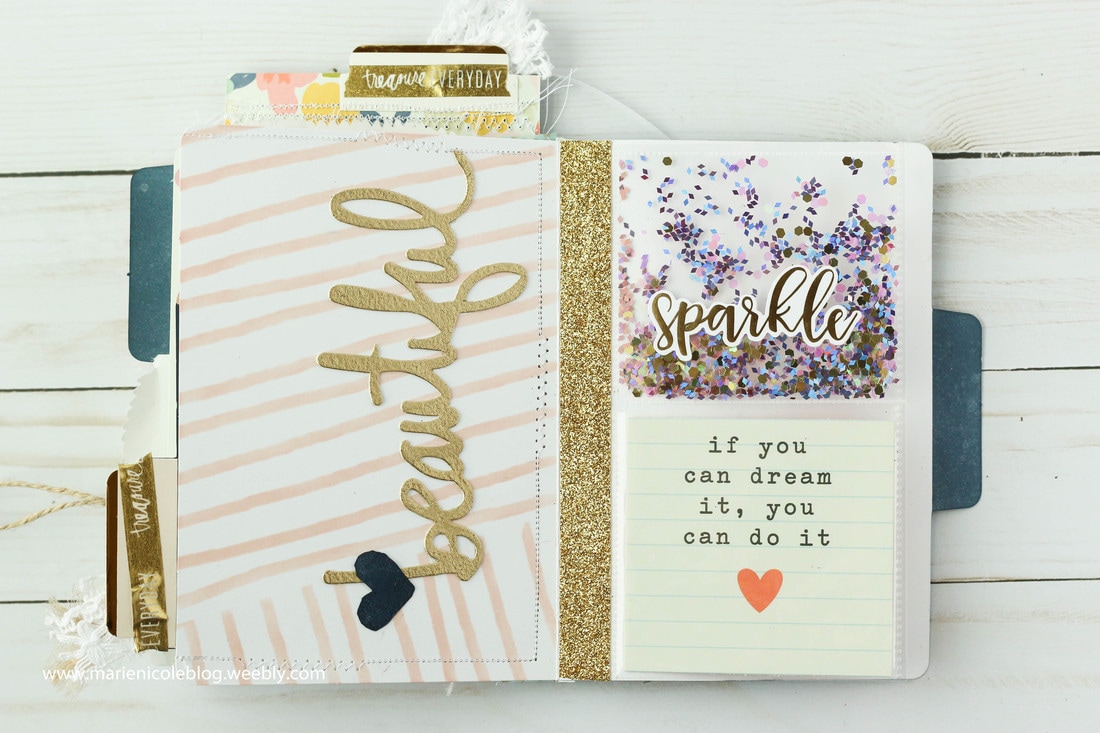
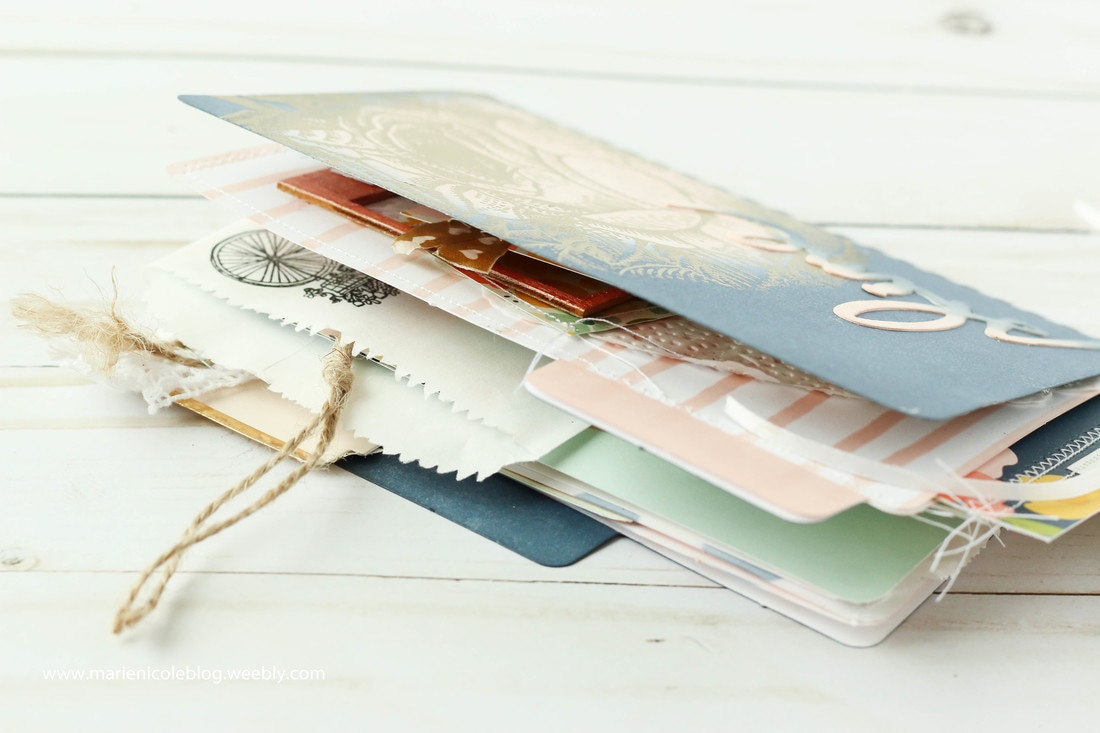
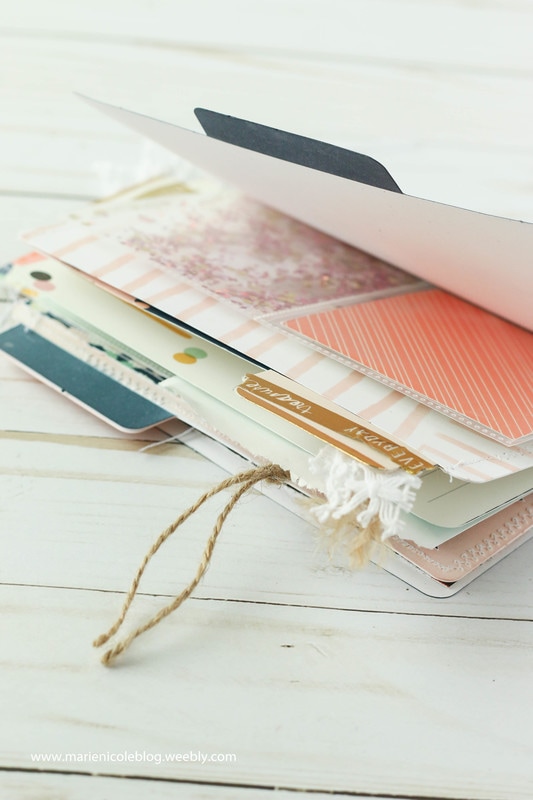
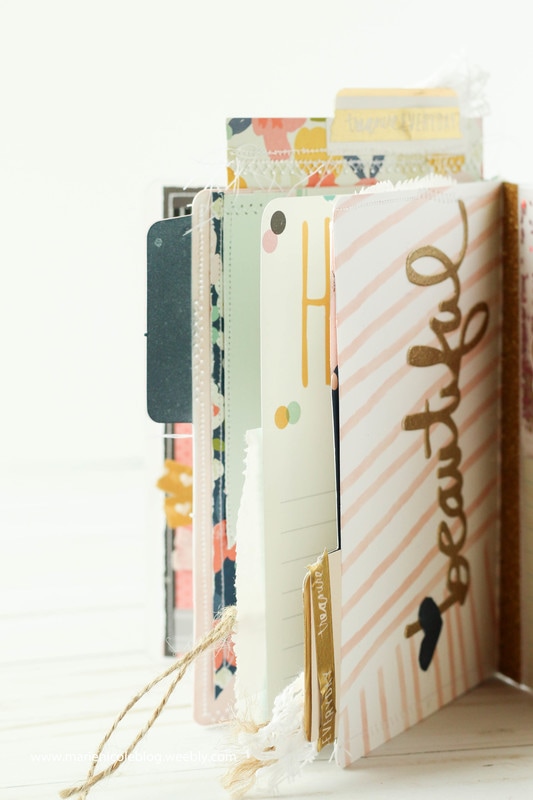
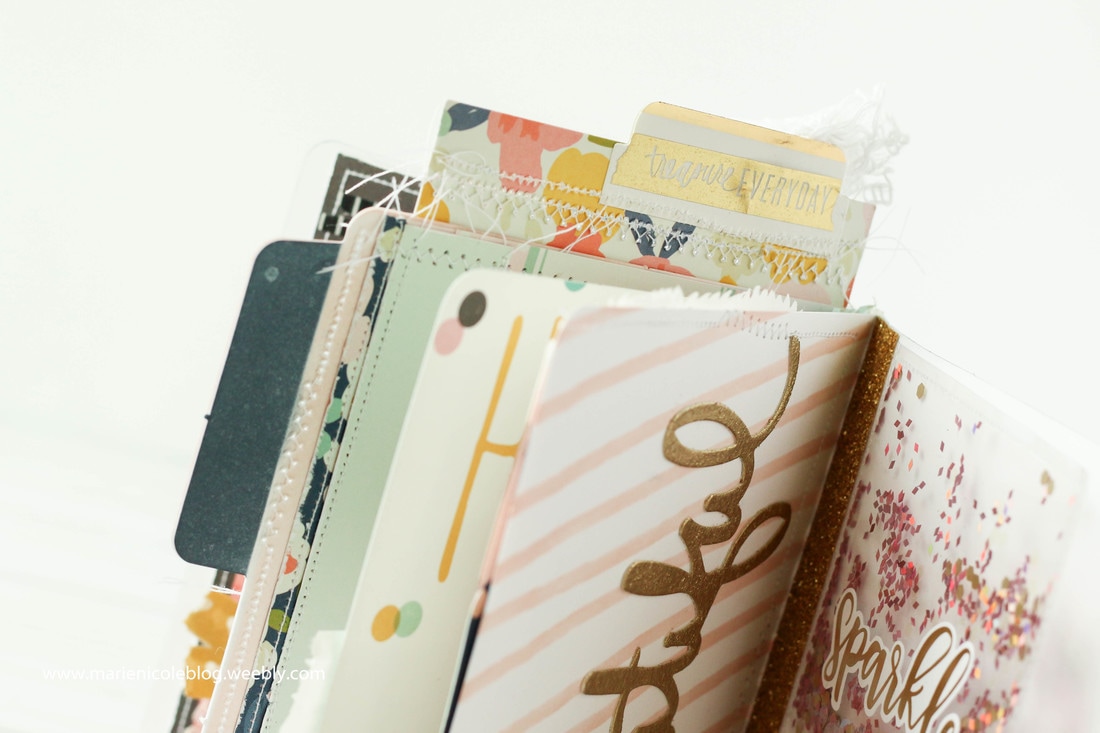
The page opposite the first has some ink blended stripes and then some more layered embellishments. I added a little wood frame that was painted with Tattered Angels paints in coordinating colors. This little frame is perfect for adding a little 2x2 photo inside of. 
Picture
Picture
The top edge of this page I left unsewn in order to create a pocket. Inside the pocket I slipped in a fun journaling card on which I added a tab and some ribbon embellishments. 

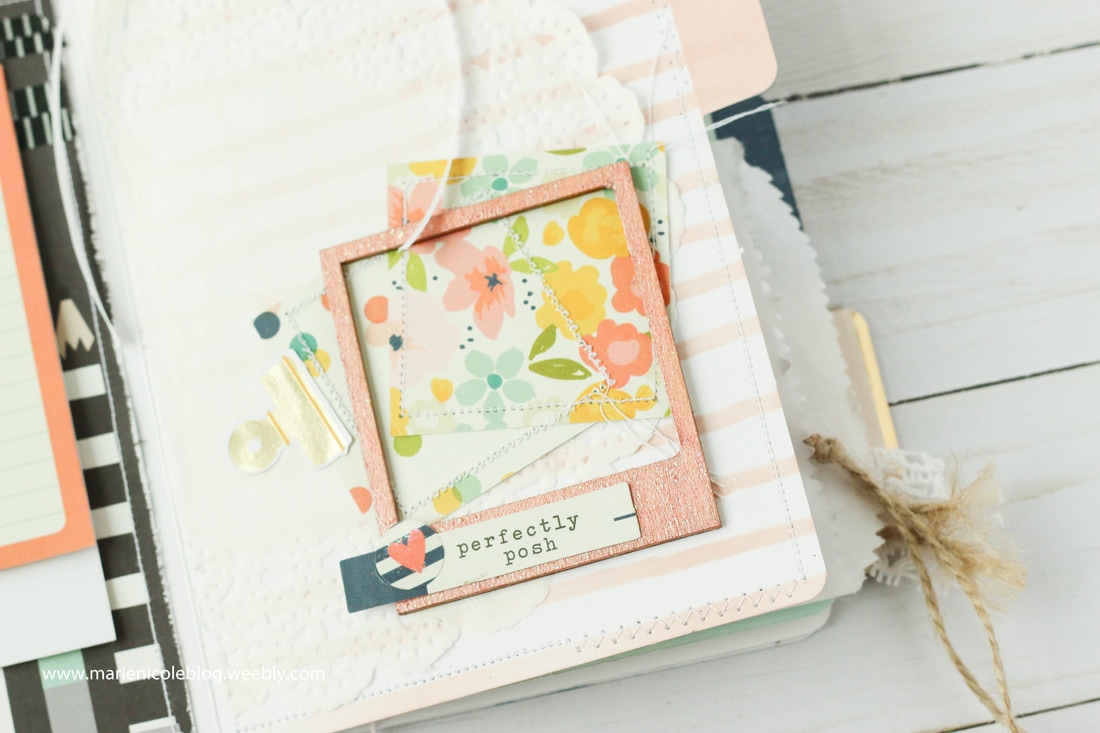
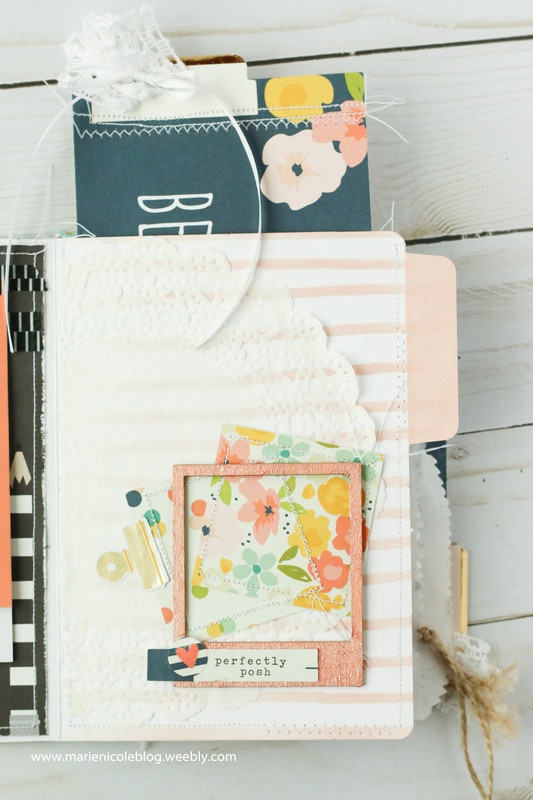
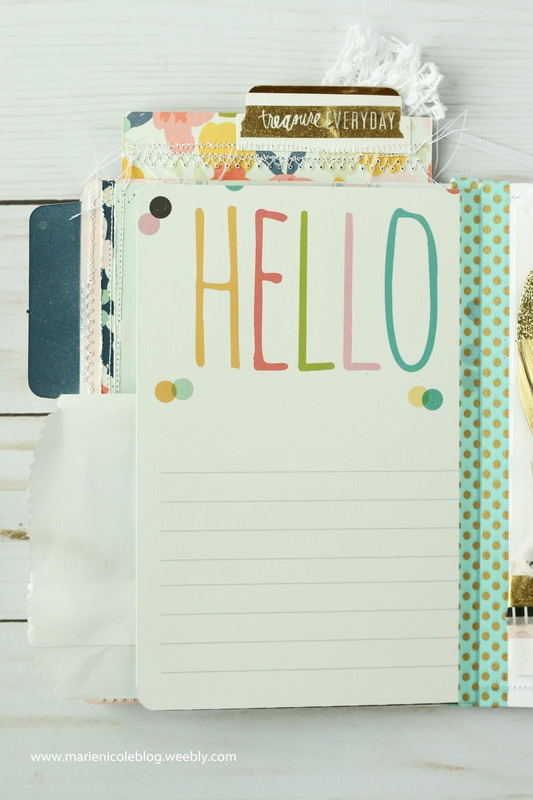
Using all these papers from the same Simple Stories collection made it so simple to mix and match everything! The colors and patterns all coordinate beautifully and took a lot of the guesswork out of selecting papers myself. 
Picture
Picture
Picture
Moving on to the next page, I had fun embellishing with some strips of patterned paper that was also roughed up and sewn. I cut the ends into banner shapes and layered them over each other. 

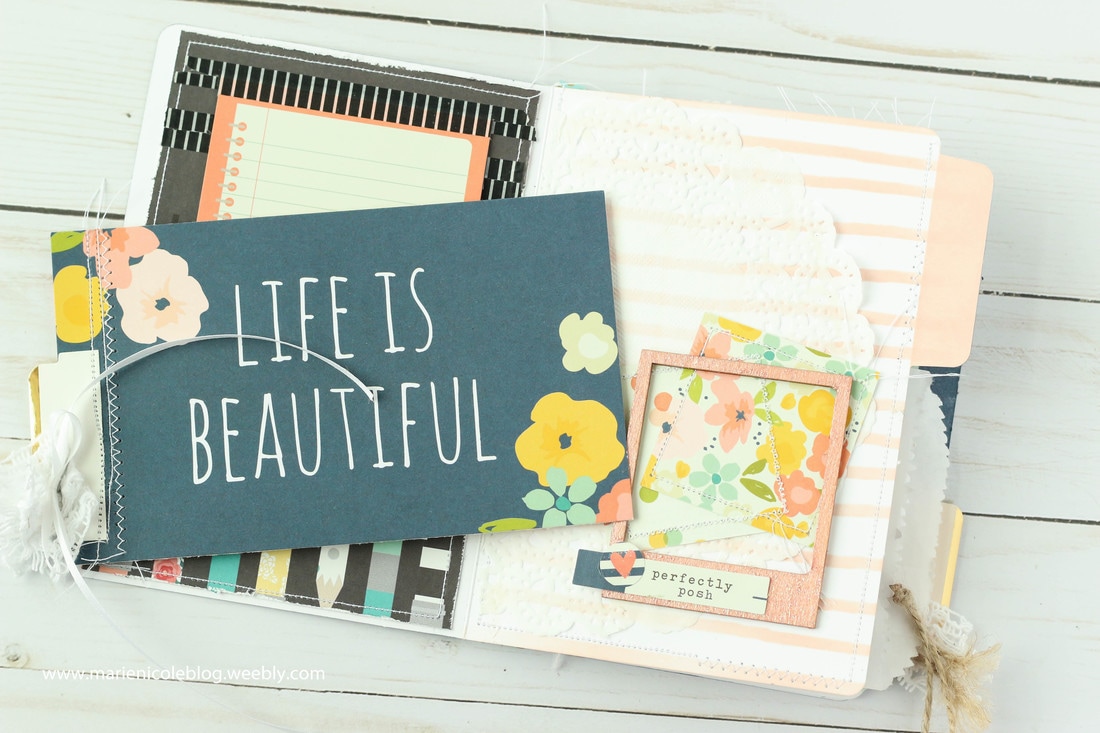
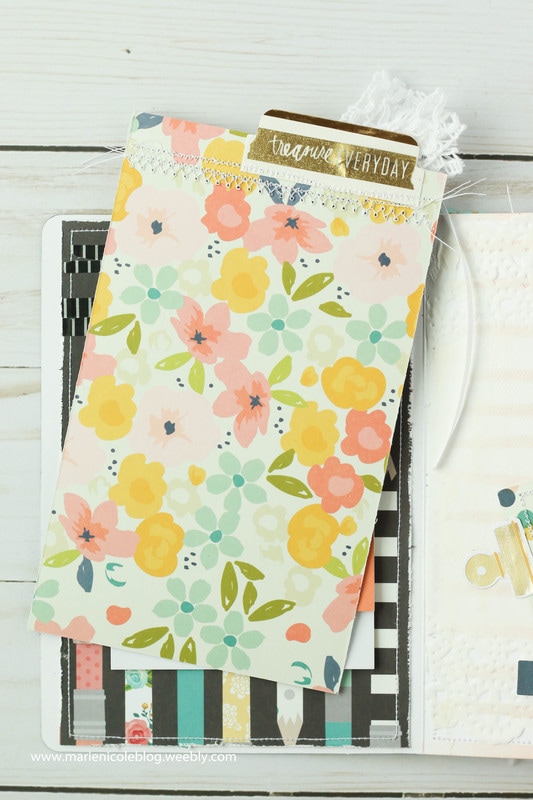
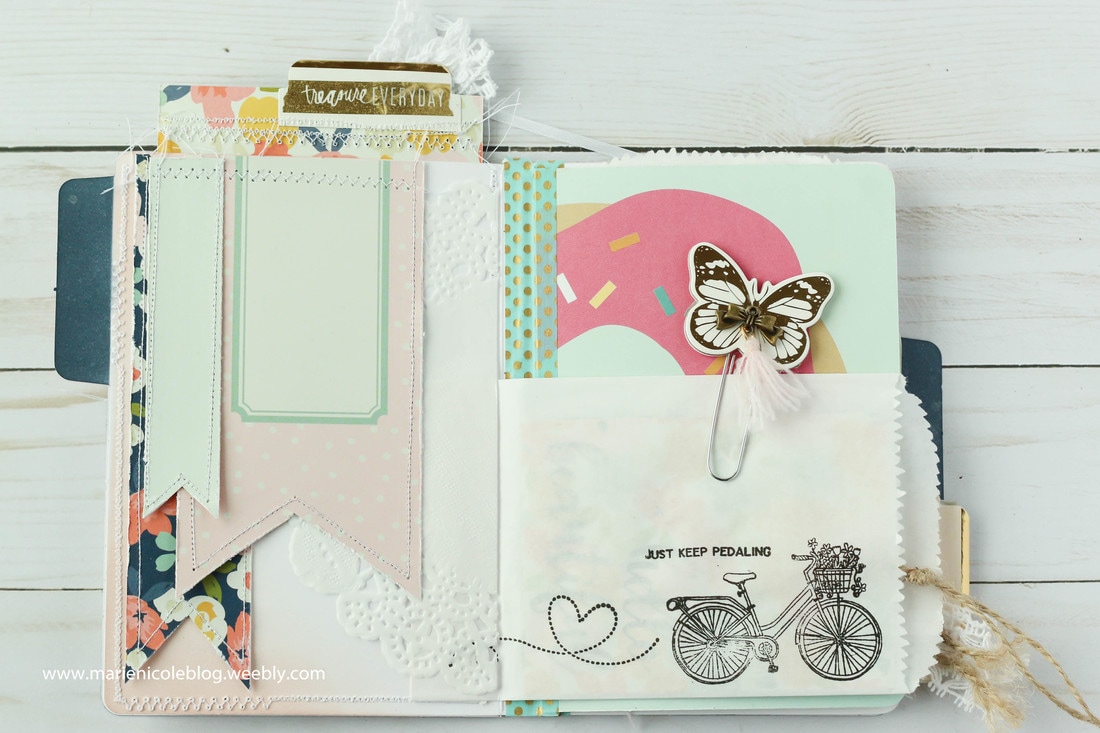
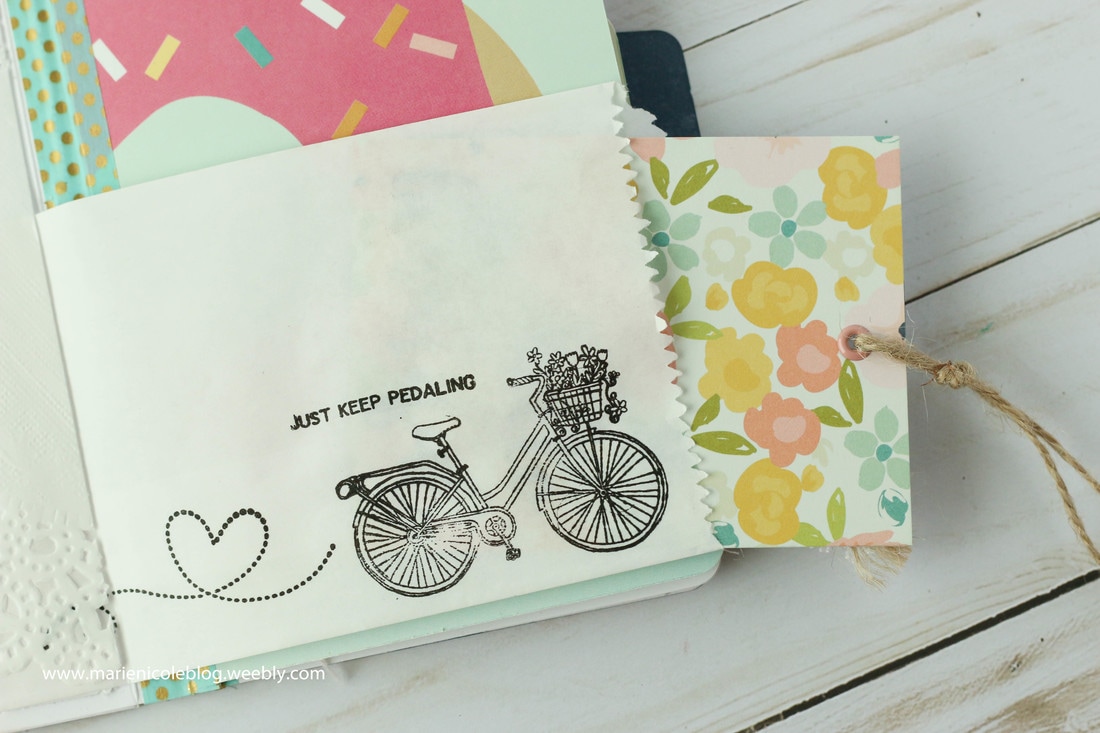
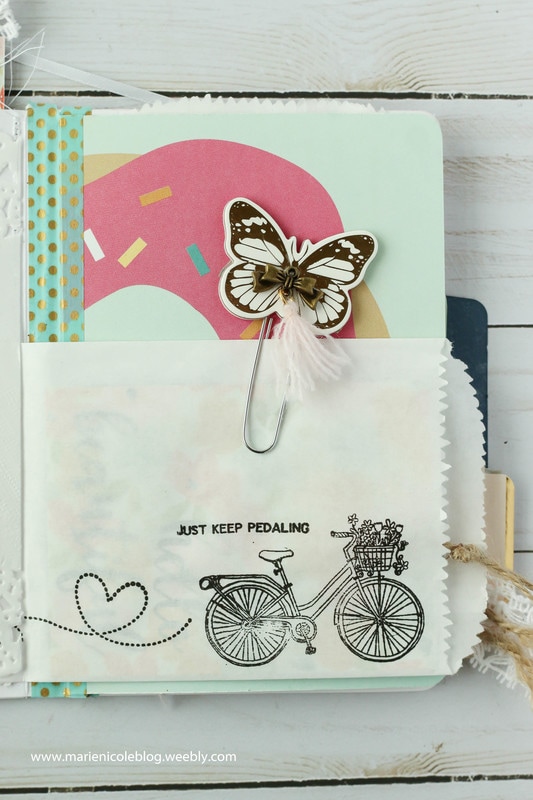
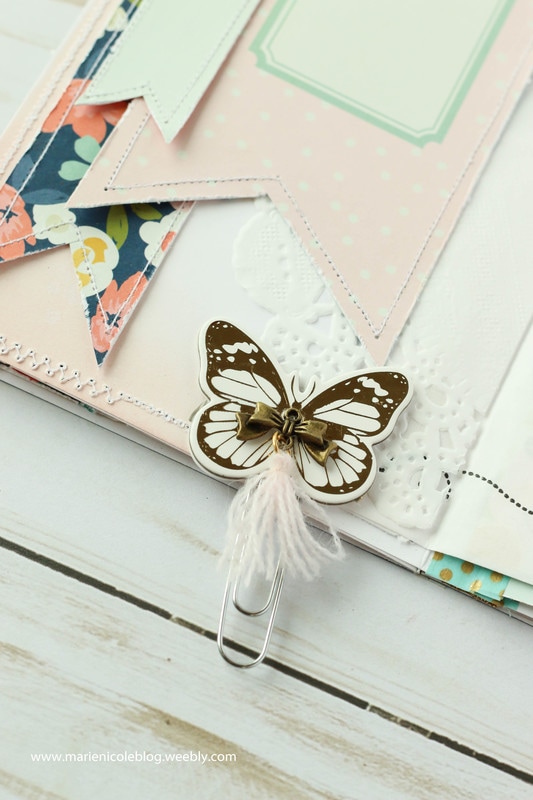
​I also added a little paper bag from Canvas Corp that I stamped on, and added a chipboard butterfly paperclip that I created. There is another journaling card inside of the paper bag to give more room for memory documentation and photos. 
Picture
Picture
Picture
Picture
Picture
Picture
Picture
I also added another page here by taking a large journaling card and taping it down with some fun washi tape. I loved that donut image and the colors matched nicely with the soft color palette that I had going on. On the flipside of the donut image there is more lined space for writing on. 
Picture
Picture
Picture
Opposite of the added page, I added another paper bag that I added more washi tape to, along with a few feathers. The paper bag is left empty to allow a little room to pace ephemera and fun little keepsakes in. 
Picture
Picture
Picture
The side of this page I left unsewn to create another pocket. I found a journaling card I liked and added another tab and some ribbons and twine as well. 
Picture
This last page was fun to decorate. I used my Pugsley stencil from Brutus Monroe to create ink blended stripes and then added a die cut sentiment, "beautiful", which I embossed with more gold embossing powder. I also created a fun pocket page with my Fuse Tool to add to the right side of this spread. The top pocket is a shaker pocket filled with glitter, and the bottom pocket is another journaling card. 
Picture
Picture
This album was so much fun to put together and I have a feeling Ill be creating more of these albums in the future! I havent decided if I'd like to use this myself or send it away to a friend. 
Picture
Picture
Picture
Picture
Thanks so much for stopping by to get a peek inside my mini file folder album! I have included some links below on items I used to create this. 

Happy Crafting! 

More from Marie Nicole...

0 Comments

Chalkstock Address Cards

4/19/2017

0 Comments

 
Being a cardmaker, its just natural that I also love sending out happy mail to friends and family. I like to try to keep my address book up to date, but it can be hard to figure out how to keep my book tidy when I need to change the addresses in there! 

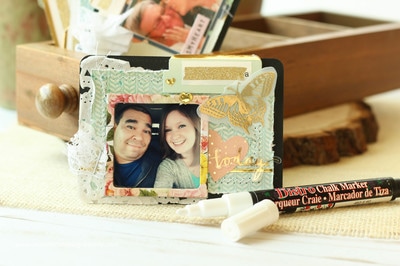
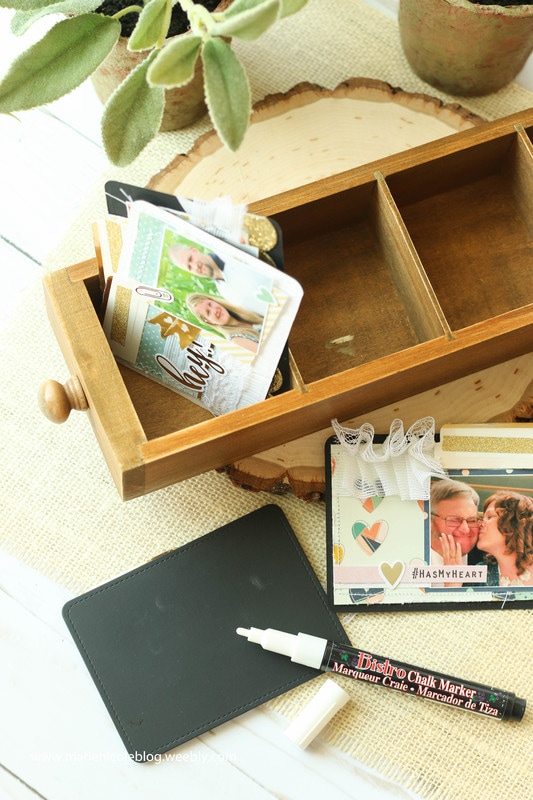
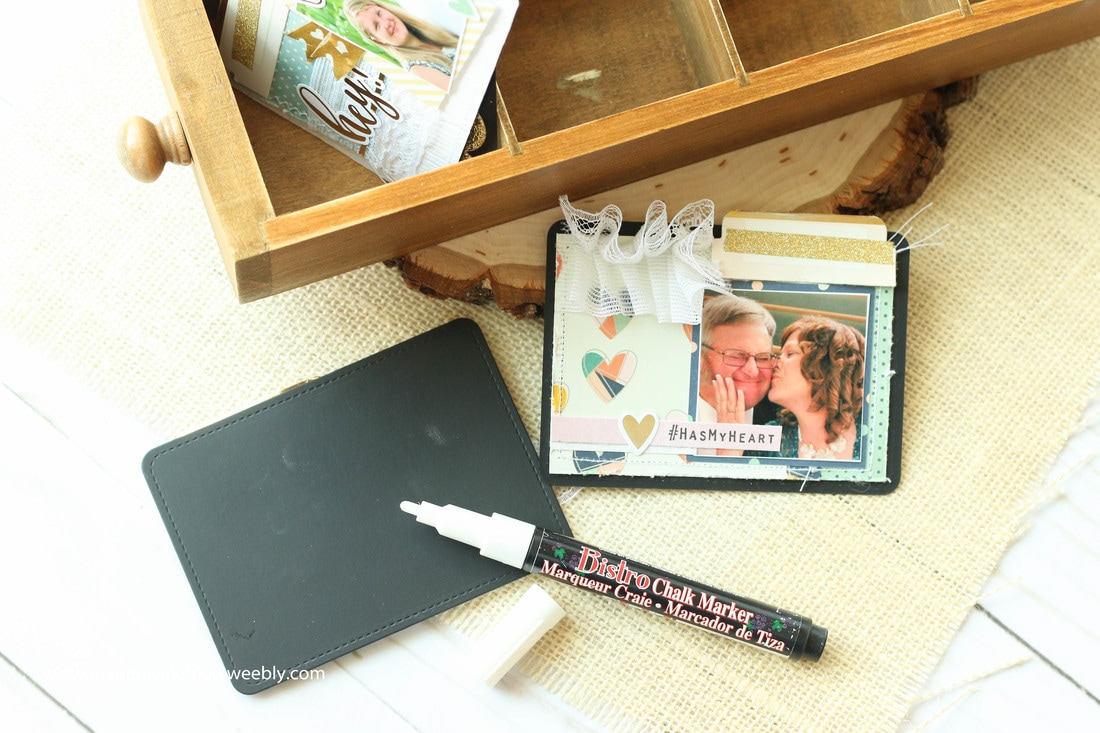
I had this idea to use some of Canvas Corp's Chalkstock to create these fun little address cards. I embellished the front sides with photos of my friends and family, along with other pretty embellishments, and then left the backside blank so I could write their addresses and special dates in with chalk.
​
Picture

I chose this Chalkstock for the reason that it acts as a paper verson of a chalkboard! You can write on it with chalk paint, markers, or regular chalk, and then wipe it off with water and write on it again. PERFECT for writing addresses and important info on the back of small cards. The best part? You can make your cards pretty and not have to worry when the time comes to change the info! 

I have my cards displayed here in a little 7Gypsies Librarie Drawer. Canvas Corp Brands currently has these drawers on sale, and once they are gone, they are gone for good! I'm so happy I picked one up when I did, but if you dont have one dont worry! Just find a cute little box that works for you!
​
Picture
Picture

That's it! A simple way to keep my loved ones addresses organized even when they change. I used a journaling card die to make these little address cards, but you could make your own simply by trimming to the size you want and then rounding the corners. 

Hope that gives you some fun ideas on how to use this Chalkstock. Its such a unique paper that its really worth a try! 

Happy Crafting! 
​
Picture


​More from Marie Nicole...

0 Comments

Tips on Ink Blending + Beauty & the Beast Inspired Card!

3/29/2017

1 Comment

 
Ink blending has become one of my go-to techniques for adding color to die cuts, backgrounds, stamped images, and pretty much everything! I don't claim to be an expert at it, but there are a few tips I have picked up along the way that has helped my blending. I'll share a few of these tips with you in this post.

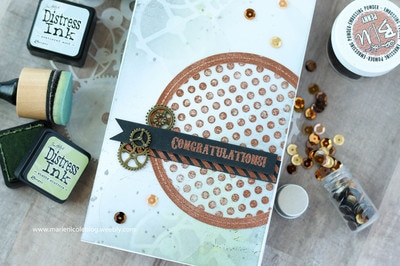
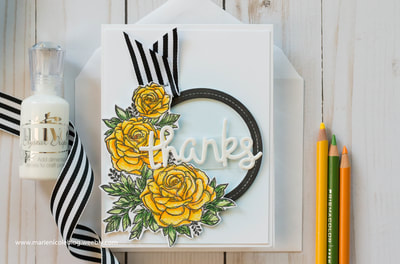
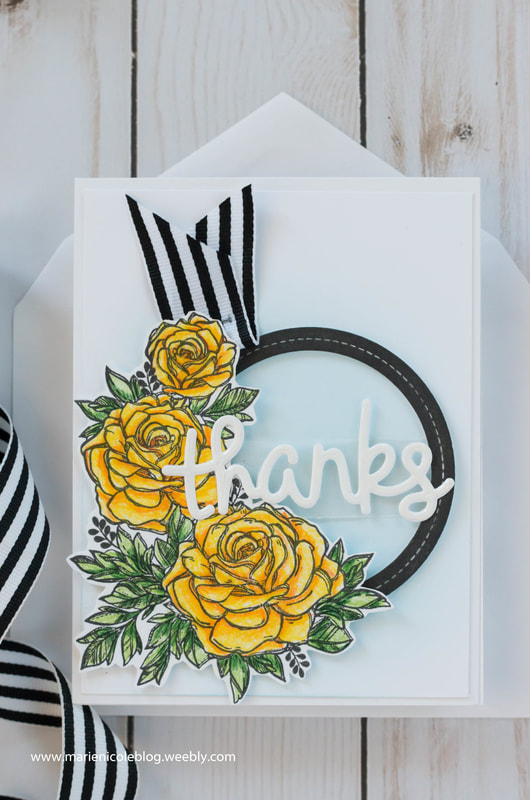
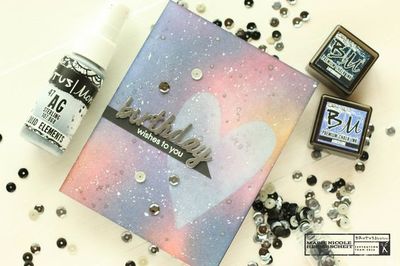
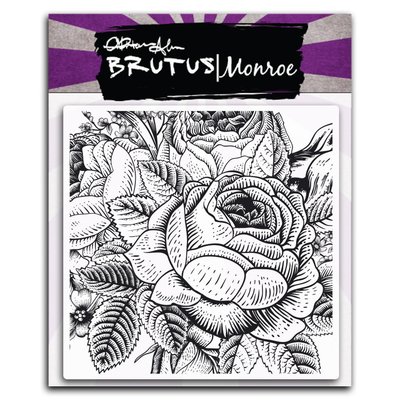
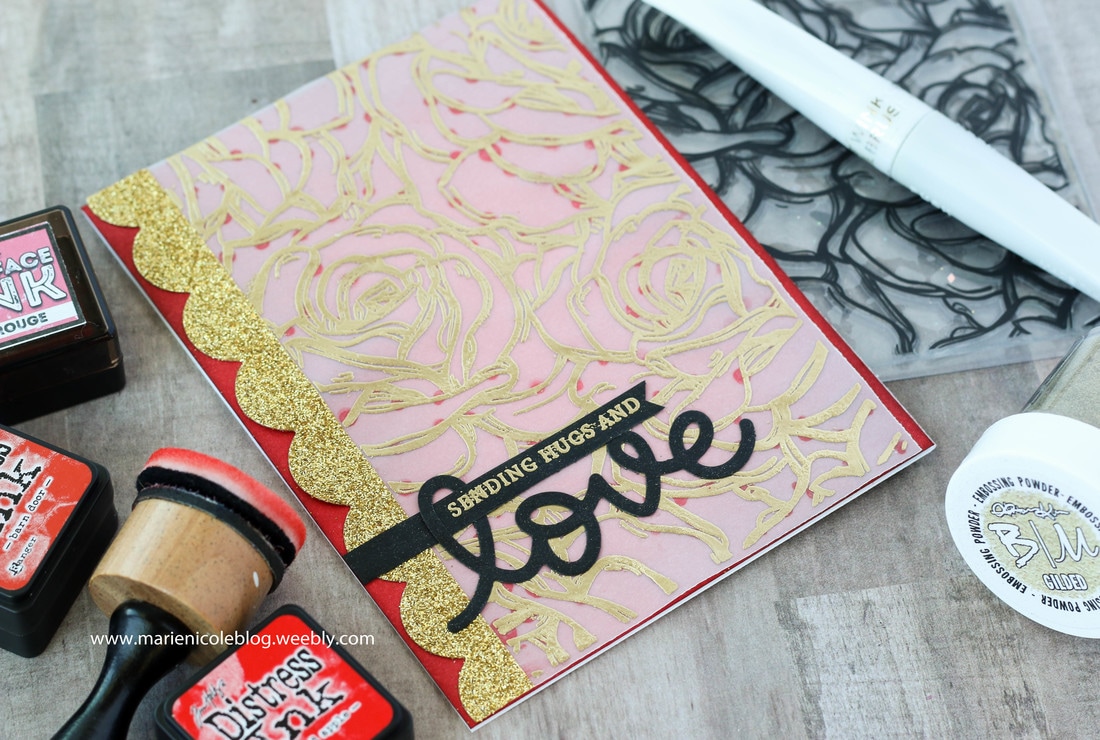
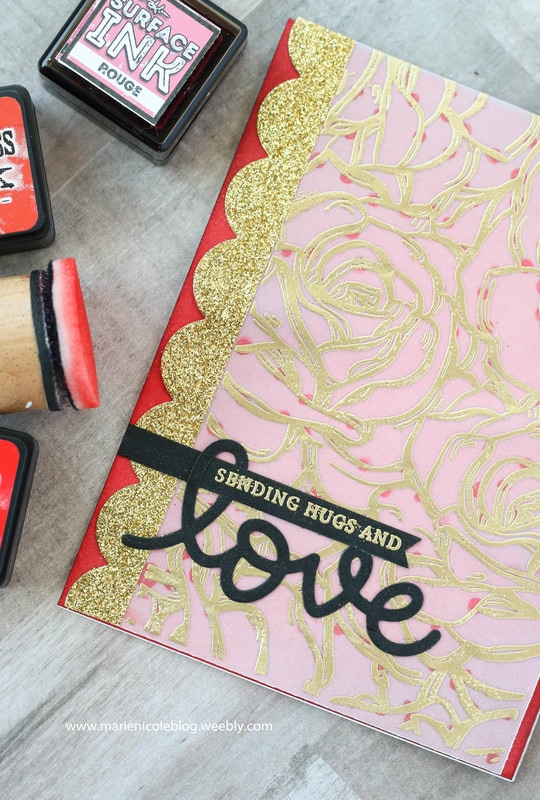
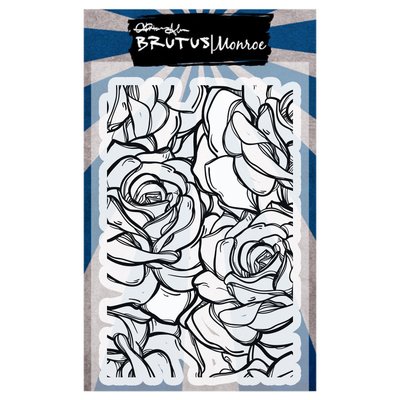
​For the color on the background of this card, I blended some different shades of red together to create an even color to stand out behind this piece of vellum that was stamped and embossed.
​
Picture

​The vellum piece on the card is embossed in some of Brutus Monroe's Gilded Embossing Powder, and the stamp used is Brutus Monroe's Rose Garden Background Stamp. I also added a piece of gold washi tape to one side that I die cut with a scalloped border die.

​Ok, so on to the ink blending tips! I'm just covering a few questions that I most frequently hear asked.

​Q: Do I need high quality cardstock to get a good blend?
​A: Yes and No! I say this because YES, a high quality cardstock will get you a better blend because it will take the ink better, but at the same time NO, because ink blending is still possible on cheap cardstock. All the cards you see me create are built on cheap department store cardstock. Also remember that sometimes if you leave your paper for 10-15 minutes and come back, it may look a little smoother because you have given the paper time to soak in the ink.

Q: Why does my ink tool leave lines or marks?
​A: Several reasons, one of them being that your foam blender may be new or not yet "broken in". Once you use your foam pad for a while, the fibers get broken down a bit and become softer. Also, as you use it, the fibers also become more saturated with ink, which will help to apply ink more evenly. Another way to avoid those lines is to start blending off your page and then to lightly blend into the paper coming in from the edges.

​Q: Why doesn't my blending look smooth and seamless?
​A: Again, there could be a few reasons here. One being the last question we covered, and two being that you may not have added enough ink! Sometimes to get a nice even blend you really have to work at it. My motto is, "Just Keep Blending!" (think like Dori!). Put some time and elbow grease into it and also try to add enough ink. When you start off on white paper, you might see some of those foam pad marks or lines, but as the paper gets saturated they even out.

​Also, blending lighter inks can be more difficult than darker inks. Get some ink on your foam tool, tap it off on some scratch paper, and lightly start your blending. You can always go darker but its harder to go lighter!

​I hope these have been some helpful tips for you! I have a video here of the card I made, and I also explain some of these tips. Enjoy!
​
Picture
Picture

​If you have any wisdom to offer on ink blending, or if I forgot to mention something that would be helpful, please feel free to comment below! I love hearing from all of you!

Happy Crafting!
​

More from Marie Nicole...

1 Comment

Congrats Card with Stenciled Gears Background

3/22/2017

0 Comments

 
This card was created with a few items that I have not played with in a while. Sometimes I like to dig into my supplies and revisit some of my old favorites to get my creative inspiration flowing again! I also try to play around with different looks and styles than my usual feminine, clean and simple style.

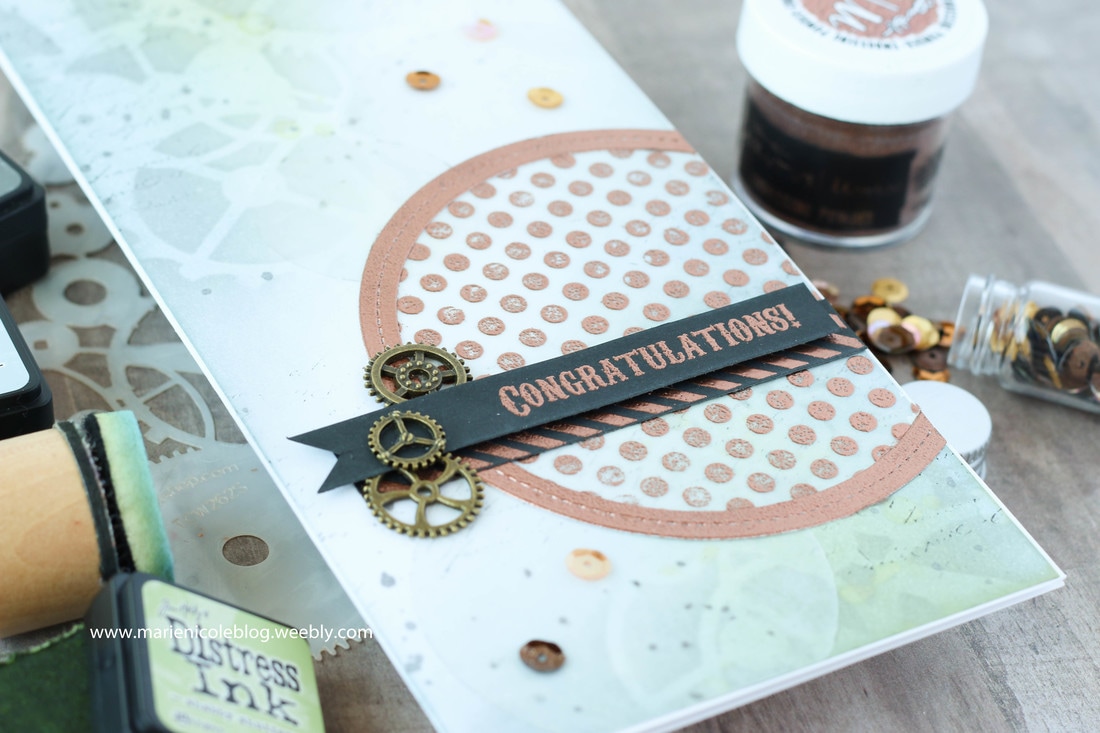
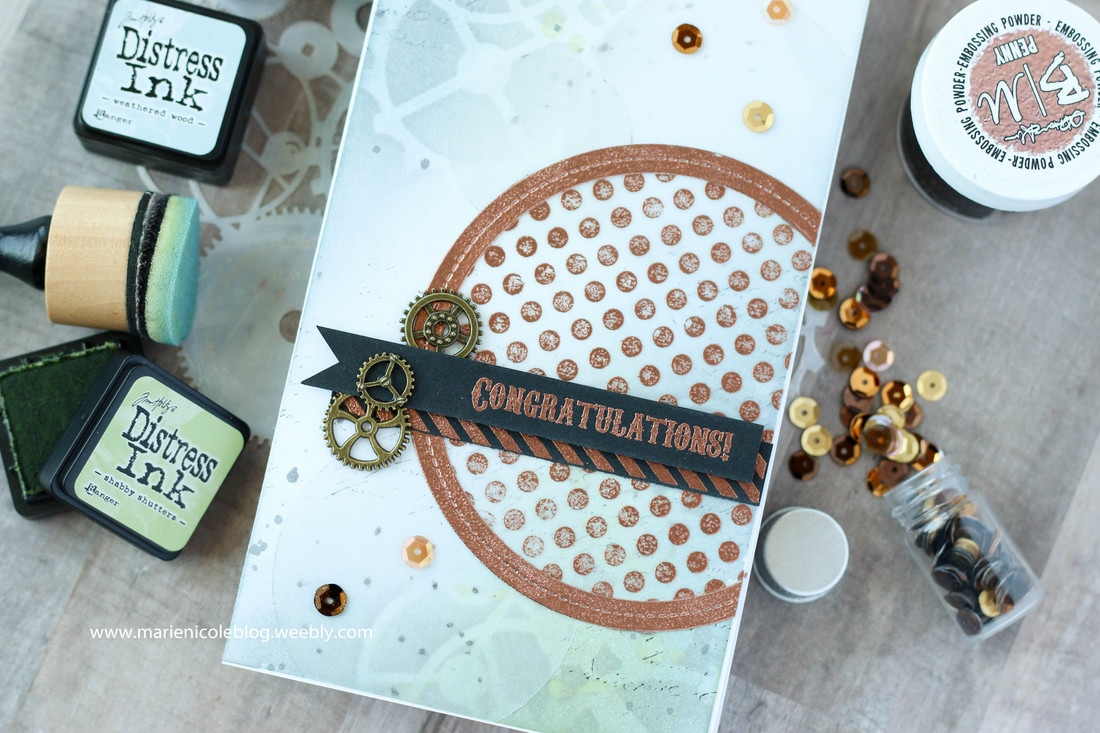
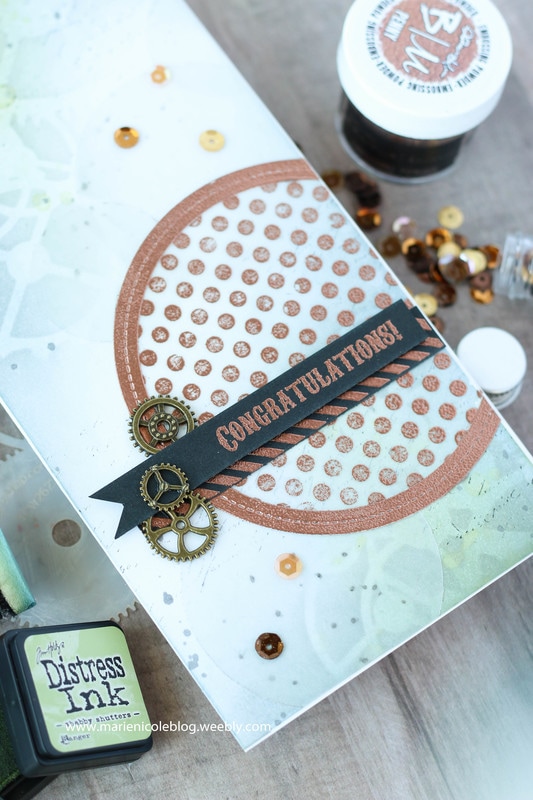
​This card is still quite simple, as it doesn't have a ton of embellishments, but the background makes it stand out.
​
Long and skinny card base from Canvas Corp Brands. Love the gears background and that shiny Brutus Monroe Embossing Powder- Marie Nicole Designs

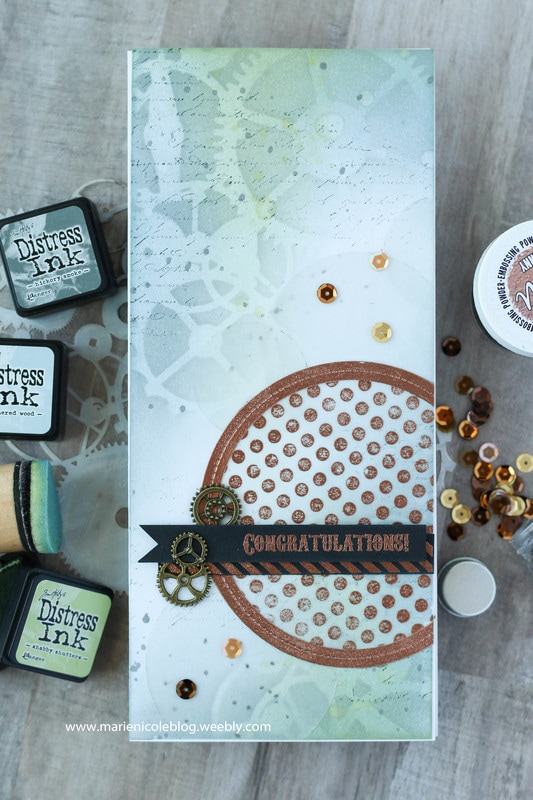
​I began with a Long and Skinny card base from Canvas Corp Brands. Then, I stenciled some Hickory Smoke Distress Ink over my TCW Gears Stencil. After removing the stencil, I added some Weathered Wood over the Hickory Smoke. It gave a grey-blue color that reminded me of metal gears.

​Next, using my fingers and a paintbrush, I flicked on some water droplets to get the ink moving. After that was dry, Shabby Shutters Ink was blended over the top, highlighting where those droplets had been.

​Then, to add just a little more interest, I also stamped some faded text using Black Soot Distress Ink.
​
Long and skinny card base from Canvas Corp Brands. Love the gears background and that shiny Brutus Monroe Embossing Powder- Marie Nicole Designs

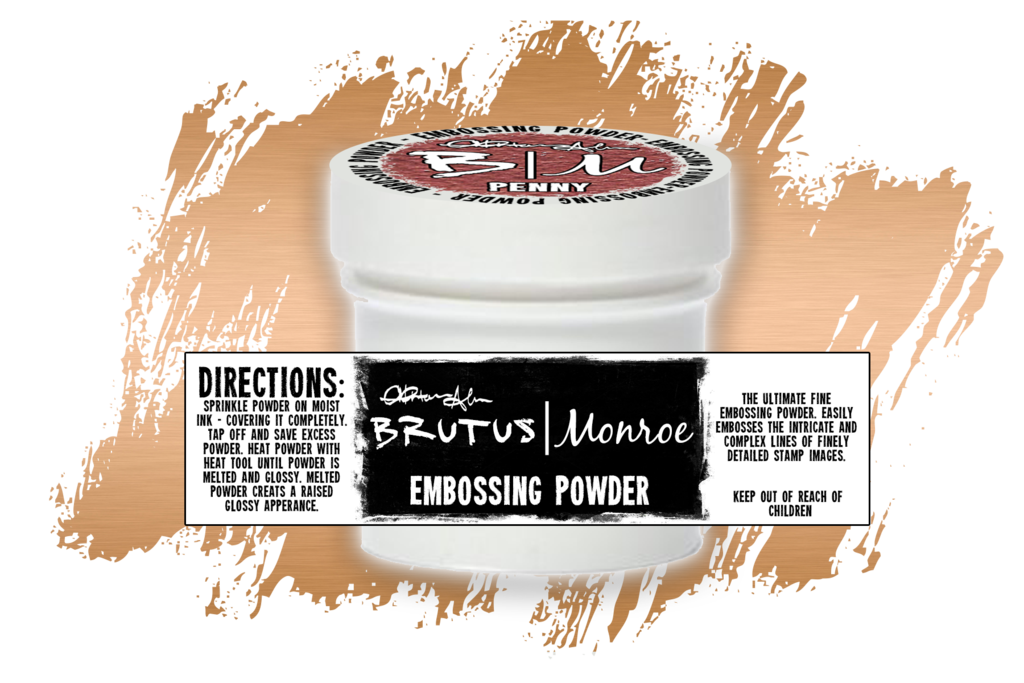
​Next, using some Lawn Fawn Circle Frame Dies, I cut out several different sizes of circles from vellum. The big circle was stamped with a polka dot stamp and embossed with some Brutus Monroe Penny Embossing Powder. I love this copper powder- it shines just like the metal!

​I also embossed one of the frames to adhere around the circle so that it would make the big one stand out. The other circles where adhered in the background. They are very subtle, but the add some interest without taking away from the background.
​  
Long and skinny card base from Canvas Corp Brands. Love the gears background and that shiny Brutus Monroe Embossing Powder- Marie Nicole Designs

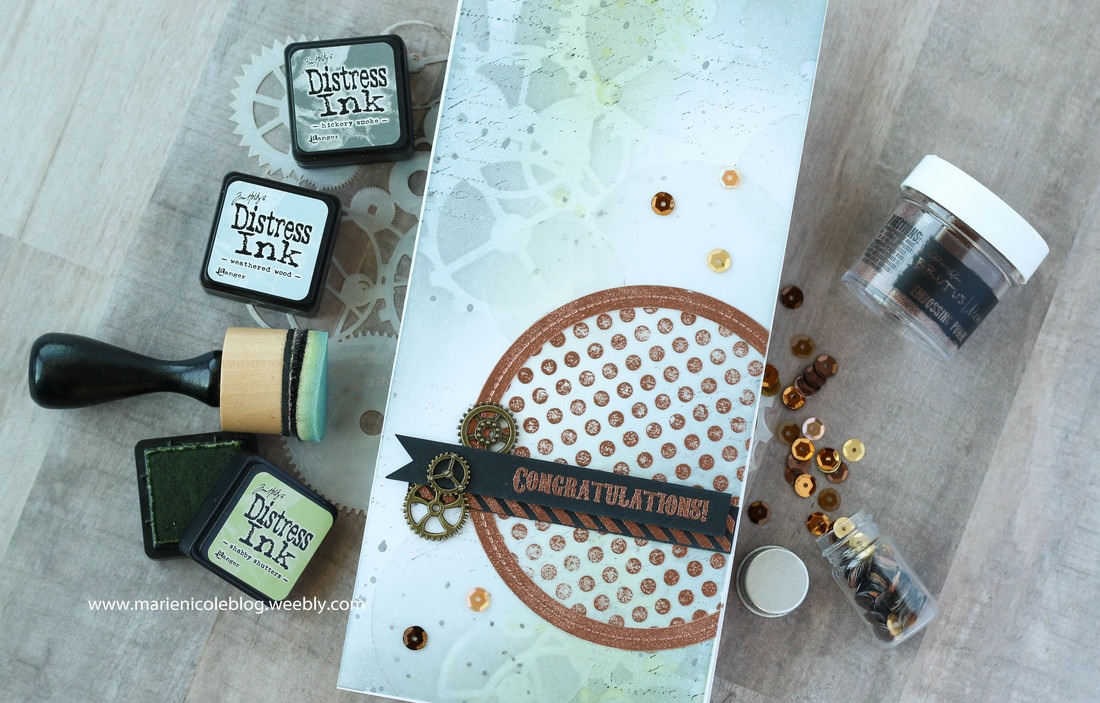
​The sentiment was also stamped and embossed in Penny, as well as a strip of black cardstock that was stamped with a striped pattern. To embellish, just a few bronze gears were added, and then a few gold sequins.

Like I had mentioned, its a different style than my normal girly cards, but I like it! It would be a great card to give to guys to celebrate and achievement.

​Thanks for stopping by today! If you are interested in any of these items, please check out the links below!
​
Picture
Click here
Picture
Click here

More from Marie Nicole...

0 Comments
<<Previous
Forward>>

    Pin it!
    Picture

    Author

    So glad you found me! This blog is my little space where I can share bits about my life and my latest crafting projects (mostly handmade cards). My goal is to share, inspire, and to be a positive presence in the creative community.
    ​

    Take a look around and stop by anytime!


    Picture
    Picture

    Find me on Instagram!


    Archives

    January 2018
    December 2017
    November 2017
    October 2017
    September 2017
    July 2017
    June 2017
    May 2017
    April 2017
    March 2017
    February 2017
    January 2017
    December 2016
    November 2016
    October 2016
    September 2016
    August 2016
    July 2016
    June 2016
    May 2016
    April 2016
    March 2016
    February 2016
    January 2016
    December 2015
    November 2015
    October 2015
    September 2015
    August 2015
    June 2015
    December 2014
    October 2014
    July 2014
    May 2014
    April 2014
    March 2014
    February 2014
    January 2014


    Categories

    All
    Albums
    All Cards
    ATCs
    Birthday Cards
    Brutus Monroe
    Canvas Corp Brands
    Cards
    Christmas
    Christmas Cards
    DIY
    General Cards
    Get Well Cards
    Halloween
    Home Decor
    Love Cards
    Mixed Media
    Papercraft
    Planner
    Punny Cards
    Scrapbooking
    Shaker Cards
    Special Occasion Cards
    Summer And 4th Of July
    Tags
    Techniques
    Thank You Cards
    Toddler Art
    Tombow
    Tutorials
    Watercolor


    Link Love

    Featured on Hometalk.com
    Picture
    Picture

    Visit Marie's profile on Pinterest.