|
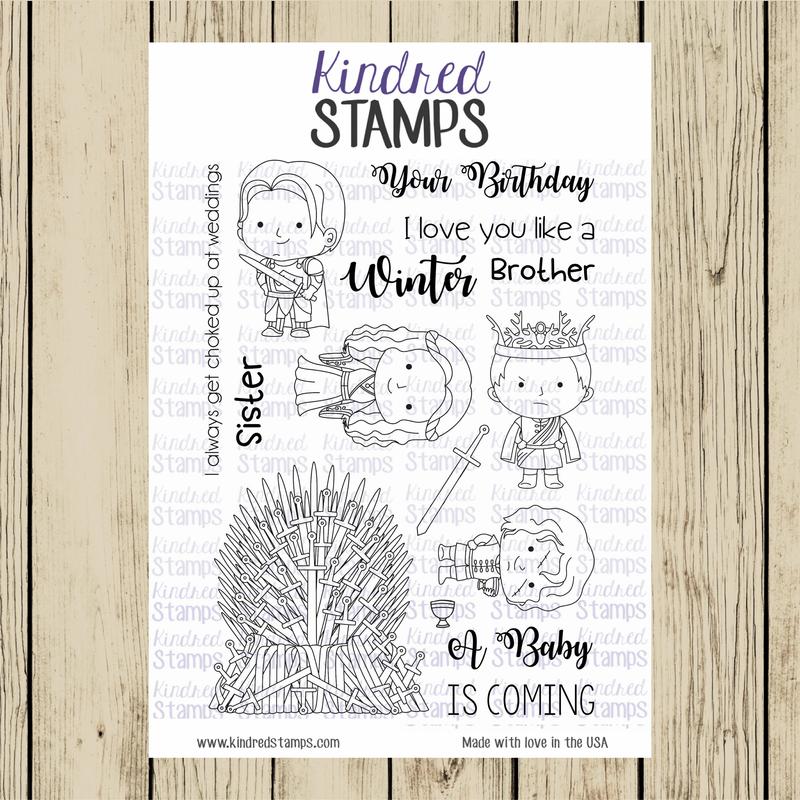
Have you guys checked out KINDRED STAMPS yet? If not, you are missing out! This company has some amazing and unique stamp sets that your SciFi and Pop Culture lover will adore! I am so excited that I am able to participate in the new release from Kindred Stamps! If you are following along on the hop, welcome! If you aren't following the hop and would like to jump in, just follow the links at the end of the post. KINDRED STAMPS is releasing a number of stamp sets, and I got to work with two of them- ROYAL THRONE and HEIRS TO THE THRONE Take a look! Now that you've seen the images, you can see why I was so excited to work with them! I made a number of projects with this release. I'll show you what I've been working on!
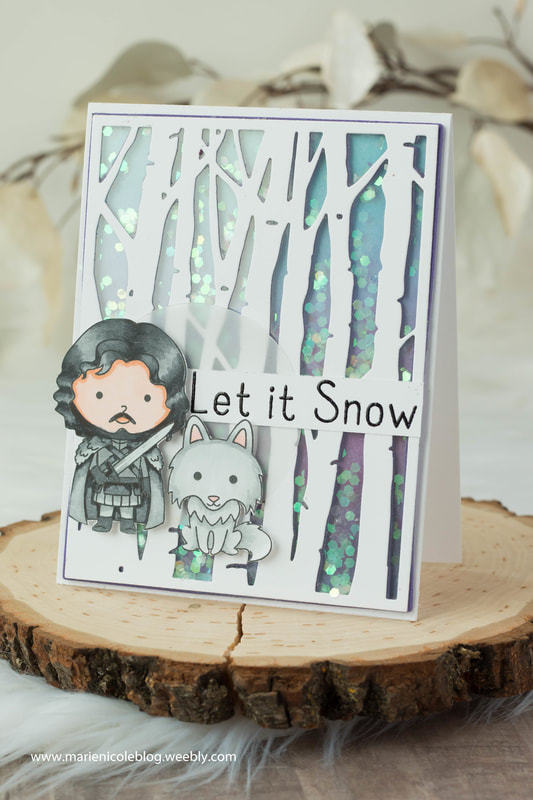
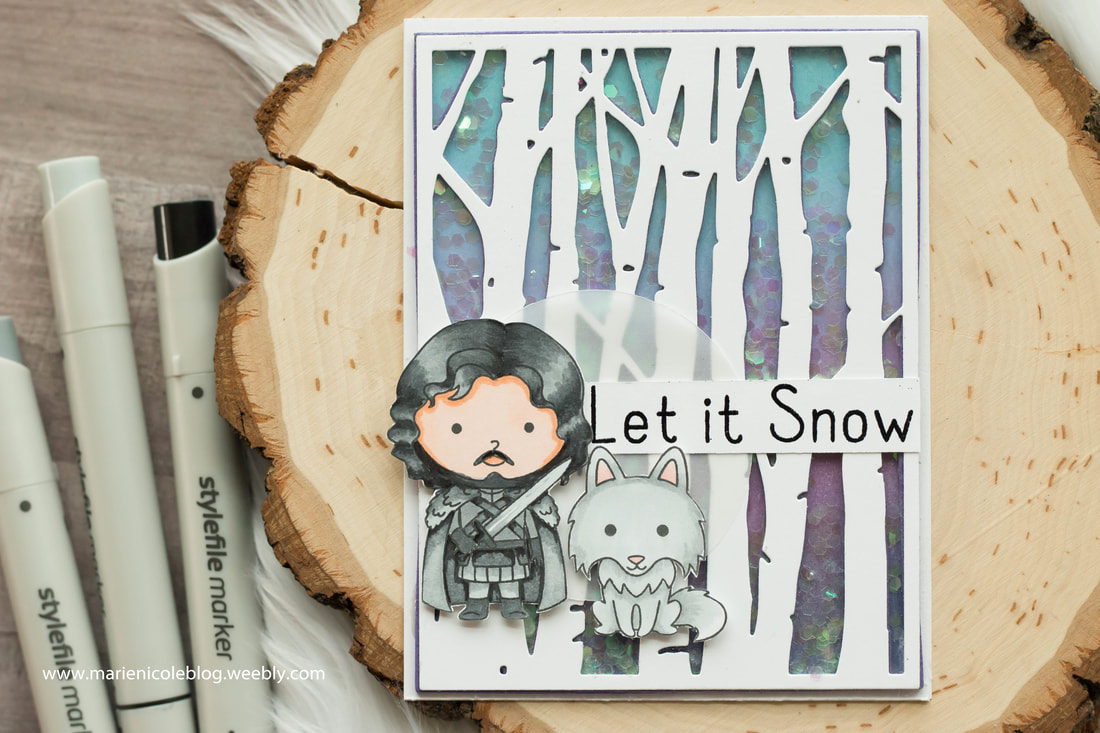
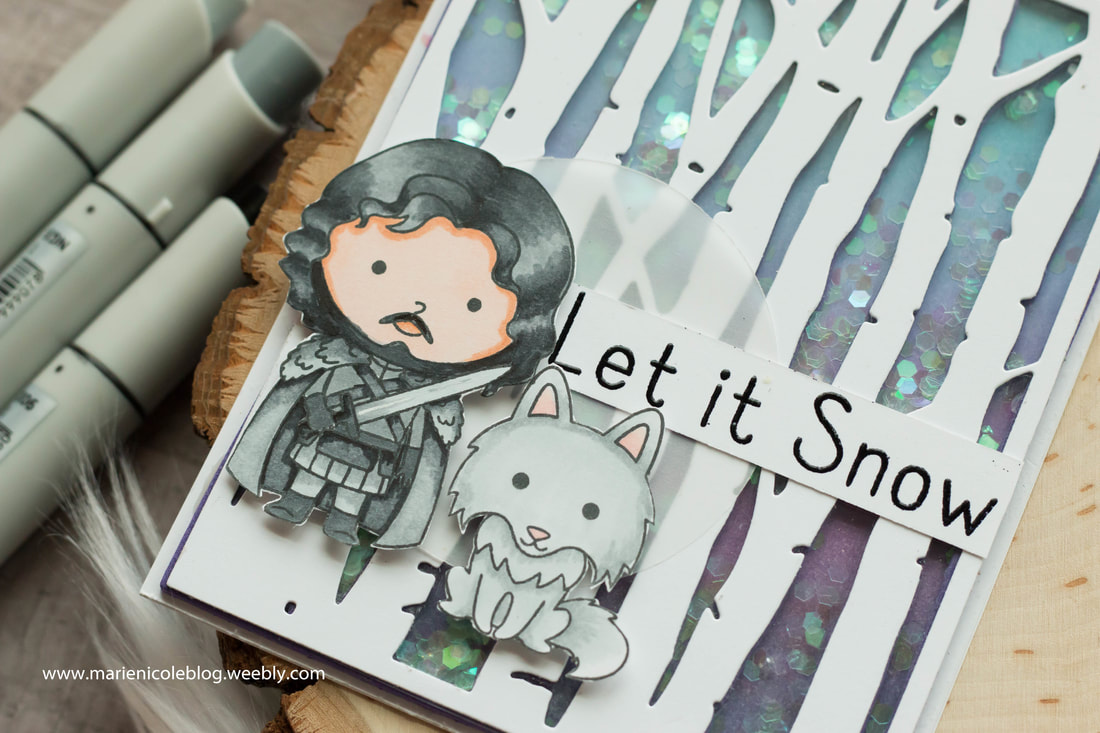
First up is this fun shaker card I created by first coloring in the images with my STYLEFILE alcohol markers. Then, I fussy cut them out. To create the background I used a birch tree die that I cut out with white cardstock. I again cut the die out of some craft foam so I could pop it up perfectly and then fill in the gaps with some glitter. The purpley-blue sky in the background is Distress Ink that I blended together to make it look like a cold, SNOW-y day. Get it? ;) 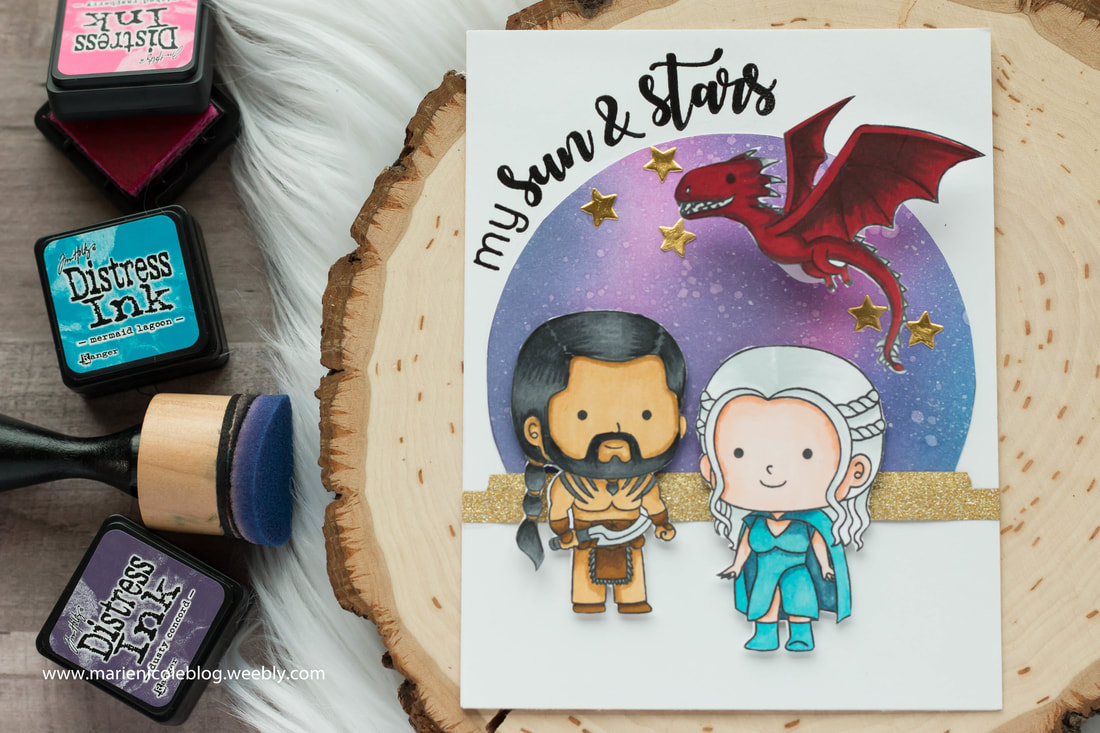
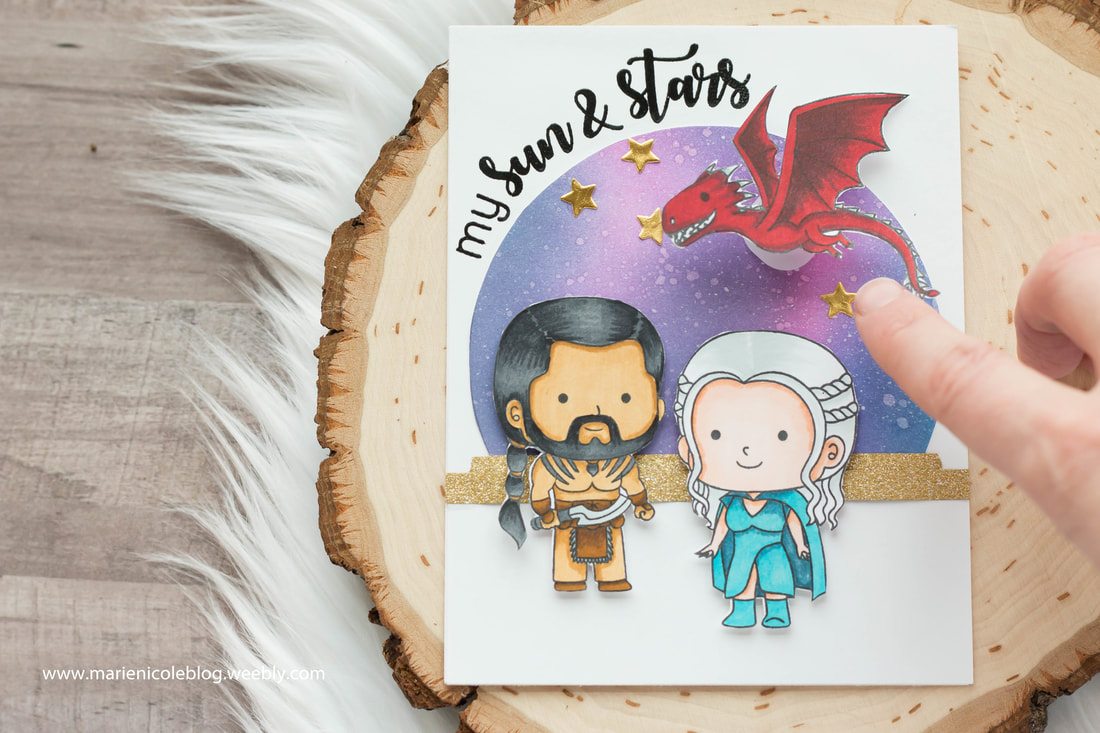
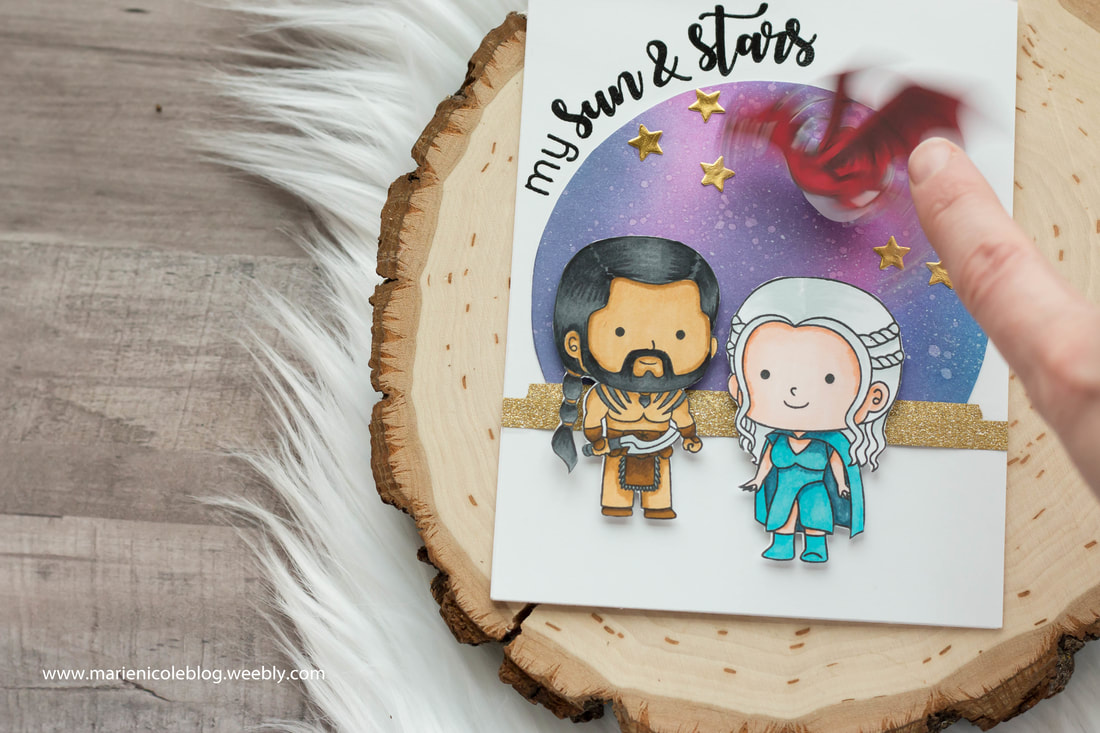
This next card I wanted to look a little more cutesy. It would be a great Valentine's card for a guy OR gal! I ink blended a galaxy sky behind our characters, and then popped them up on foam adhesive in front of it. For the sentiment, I curved the stamps around the sky using my MISTI and then stamped them in RAVEN BLACK ink and embossed them with clear embossing powder. Lastly, I added the dragon on an action wobbler. I think its so fun to see him flying above our characters!
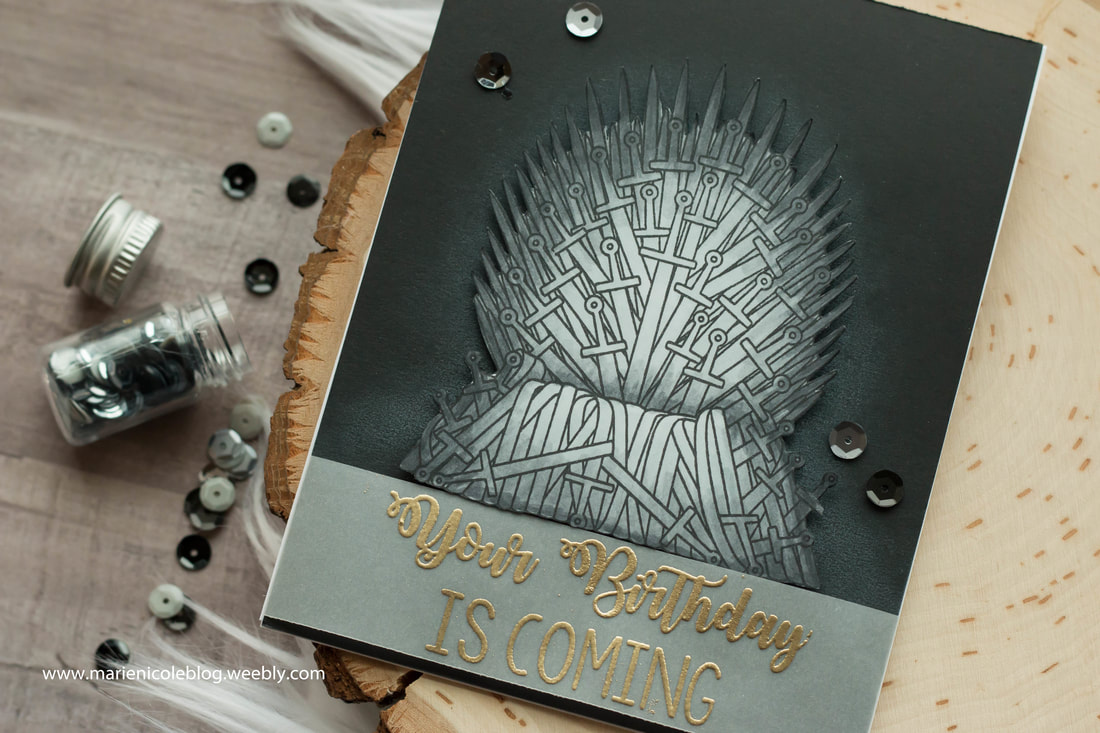
This next card is such an epic birthday card! Wouldn't you or someone you know just love to receive this in the mail? I stamped out the throne and again colored it in with my STYLEFILE MARKERS. Then, I fussy cut it out. I took a piece of black cardstock, cut it down to size, and then blended on some WHITE PIGMENT INK behind where the throne would be adhered. That just gave it the look of fog behind and also made the throne stand out a bit from the background. Lastly, I stamped and embossed the sentiment and added a few sequins. Pretty simple, but I could totally seeing this being the perfect masculine birthday card! 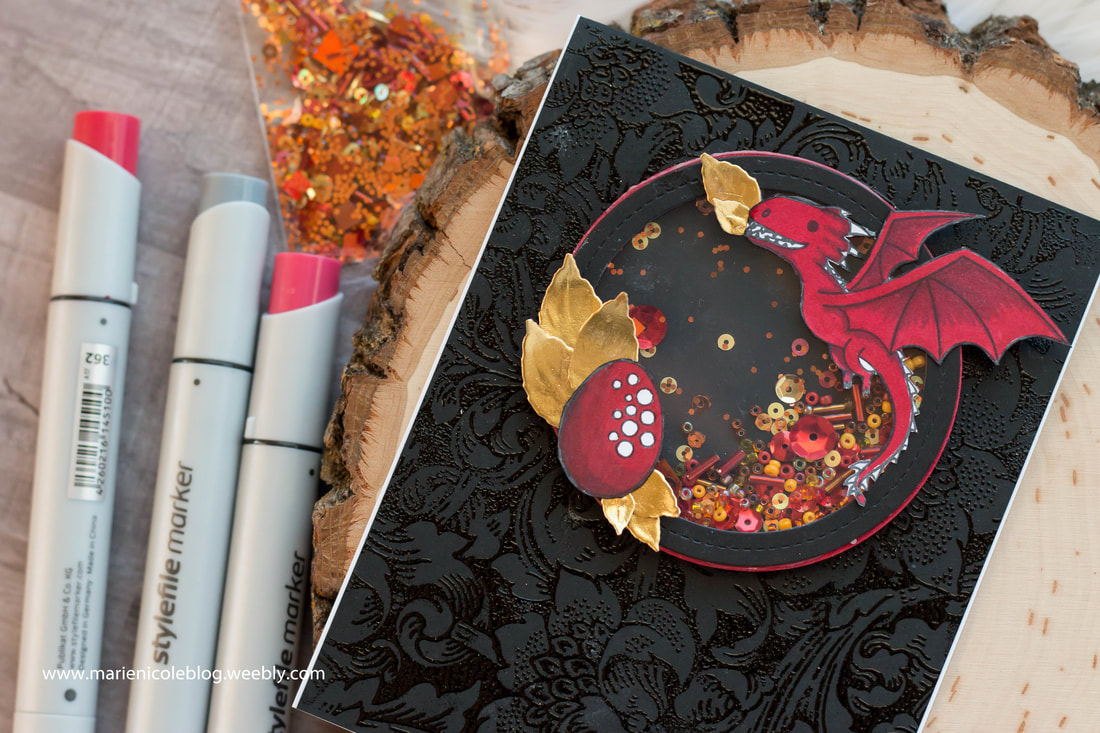
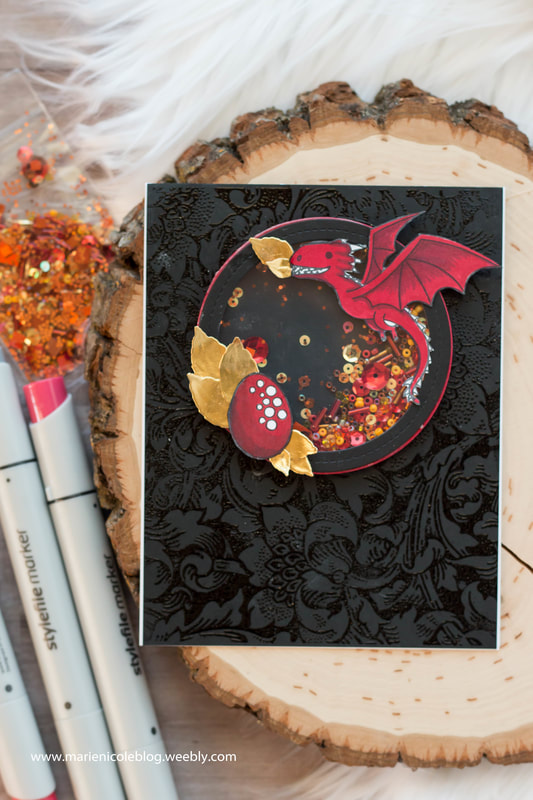
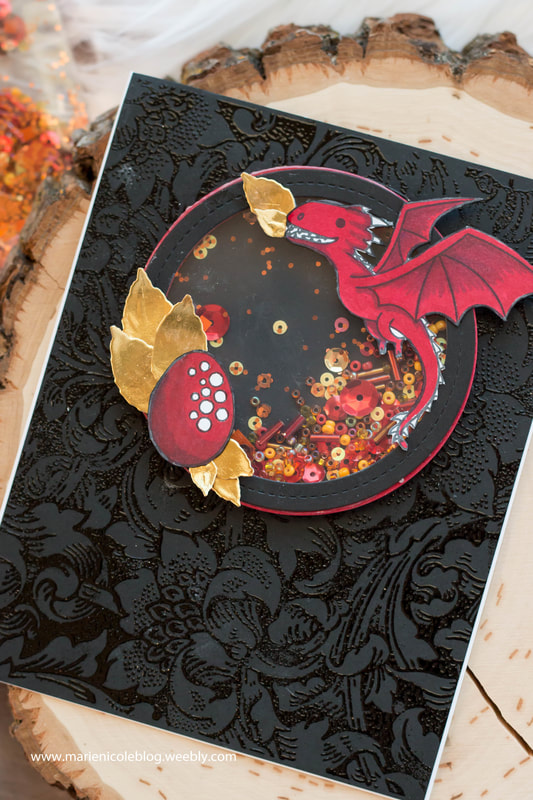
This last card for today is another shaker and perhaps my favorite of the bunch! I knew I just HAD to do a fire-y dragon with this gorgeous shaker mix, so I cut out a circle frame from my dies, and then cut out two more frames with some red craft foam. I stacked and glued them over the background that I created using a background stamp from Brutus Monroe and some RAVEN EMBOSSING POWDER. I love the tone-on-tone texture going on! I then filled the foam circle with the shaker bits and sealed it up with some acetate. In the front, I added the dragon, an egg, and some gold leaves that are meant to look like fire. I left a sentiment off since I'm not sure if I want to use it as a birthday card, a thank you card, or something else yet. Sometimes I just love to create, and then I add a sentiment right before I send it out. This way, it gives me a little more freedom when choosing a card to mail. There you have it! Several cards using the new stamps from KINDRED STAMPS. NOW FOR MORE INFO ON OUR BLOG HOP, AND A WORD FROM KINDRED STAMPS: Thank you for joining us in celebrating this month's release! We know a lot of you have been hoping for sets inspired from times when dragons wandered the earth freely and dire wolves once again moved amongst this land. We brought that to you, and then some. We brought spooky things from the deepest depths of the oceans, and we captured the night sky for you. All you need to do now is to let your inspiration reign! Where will these stories take your crafting? Before your craft table takes you to the many planets of our solar system, let us take you to the blogs for our Creative Team Members and that of our Guest Designer. Everyone is excited to provide you with a sample of their work and to talk about some of the products they used as well as their thought process. On your journey, if you comment on each person's blog post, you will be eligible to win store credit for a future purchase! You must comment on each person's blog, as well as the blog post for Kindred Stamps. The winner will be chosen Friday night, 1-12-18, around 9 pm EST. We thank you so much for your enthusiasm! We can't wait to see what you're inspired by, but remember, if you are inspired by something pop culture related, please refer to our stamp set names on social media and avoid using the actual show or character names. It is very important that we do not step on copyright toes! Thank you ever so much! Now, for the hop! Follow these links! Kindred Stamps Marie Nicole Designs (YOU ARE HERE) R. Winn Creates Dagg Designs Blog Fanciful Spaces The Frolicking Fairy
39 Comments
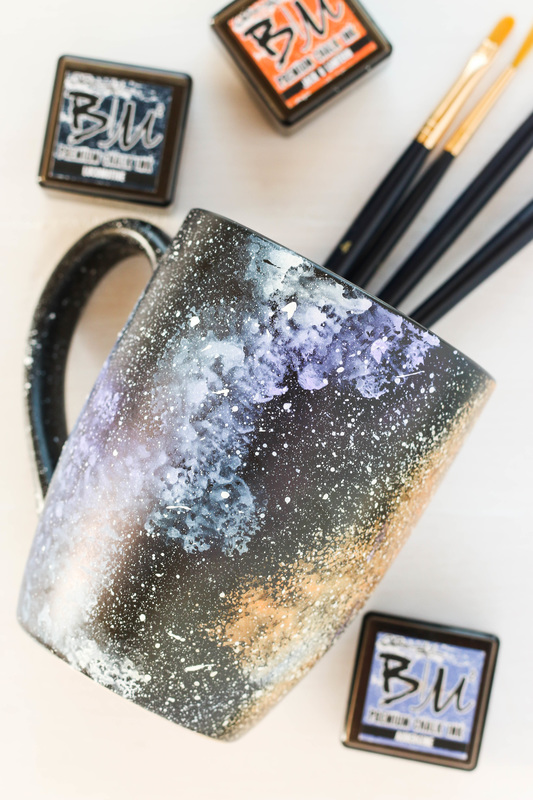
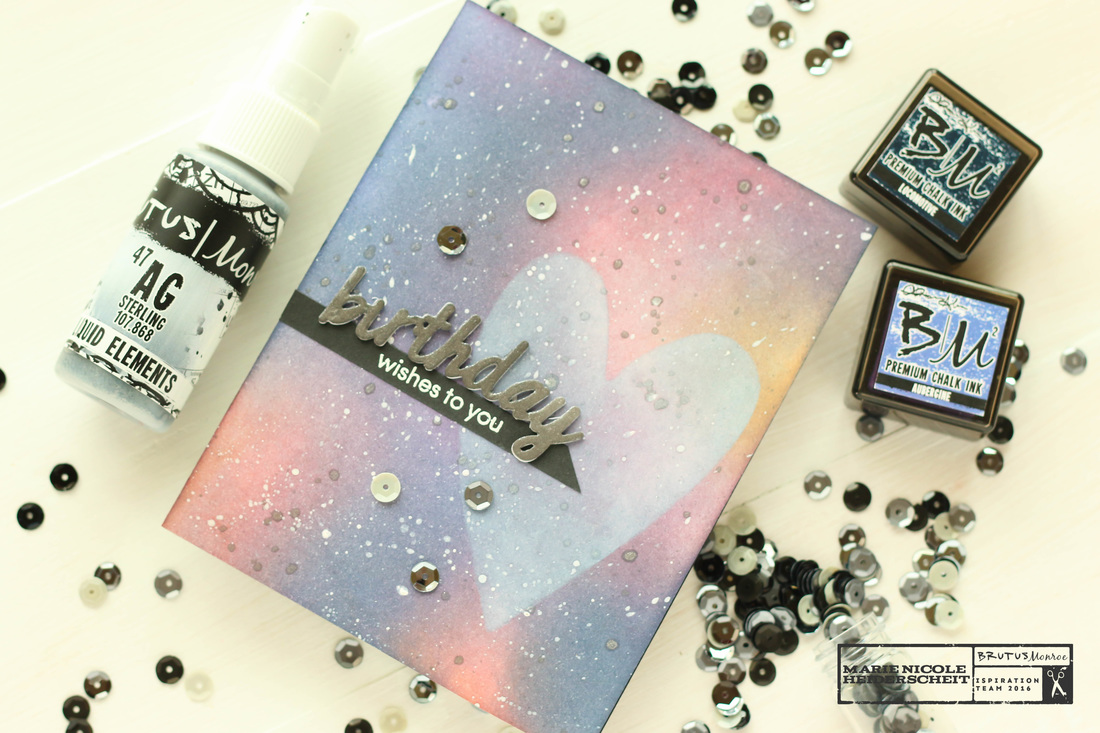
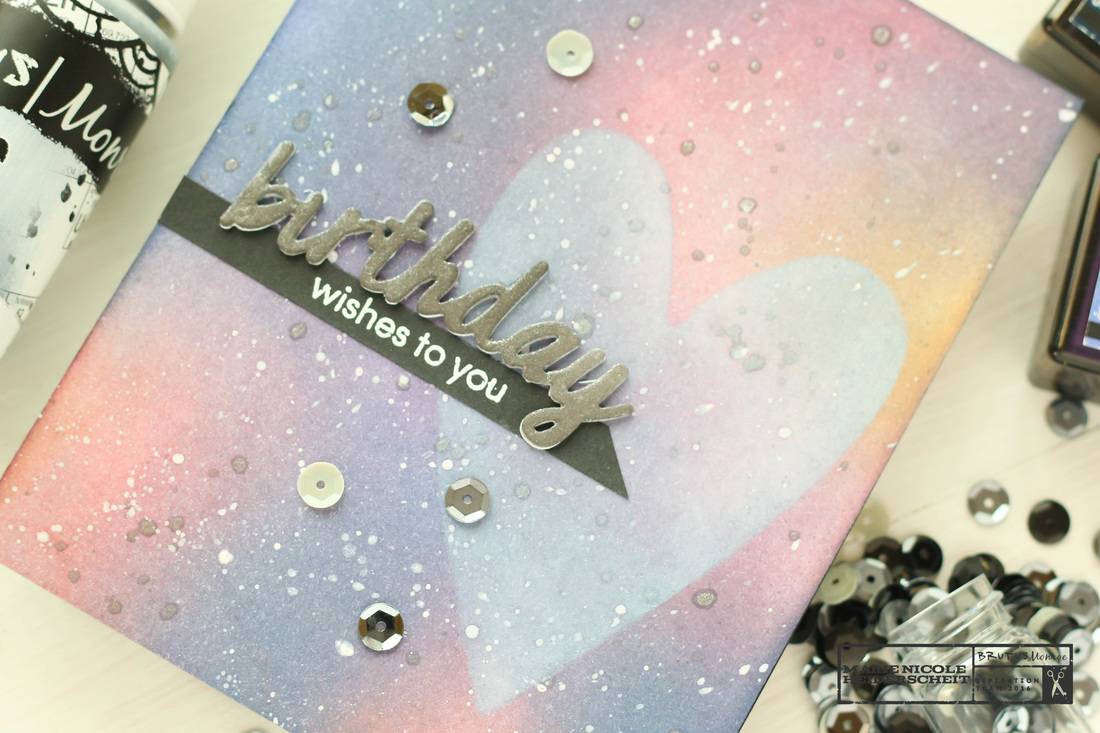
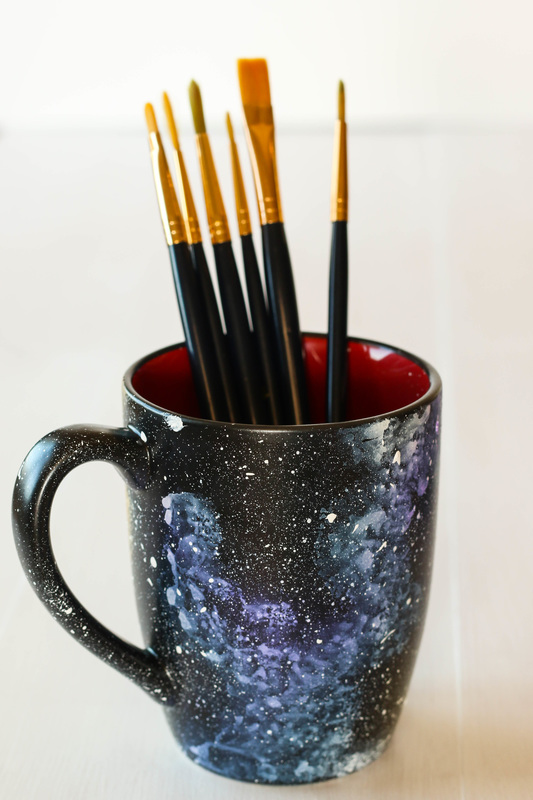
I've been on a little bit of a galaxy background obsession. Most of the time, I apply this technique to paper. I love taking a plain white piece of cardstock and applying all the colors to watch the background come to life. Below is an example of a card I recently did for Brutus Monroe featuring the galaxy background.
 This card was created using a combination of Distress Inks, Brutus Monroe inks, and some Liquid Elements from Brutus Monroe, as well. If you want more details on it, hop over the the Brutus Monroe Blog where I have a description of the process as well as a video. Since I was having so much fun with these backgrounds, I decided to take it a step farther and discover what other surfaces I could apply these galaxies to. I have a black mug in my craft room that I store my heat tool in. I thought it was the perfect blank canvas to do a little galaxy-ing to (yes, I did just turn the word "galaxy" into a verb). I started by applying some Crystal Tattered Angels paint to the black mug. Then, since I am impatient, I sped up the drying process with my heat tool. The next step was to add some color which I did with Brutus Monroe's Chalk Ink. I decided to use this ink because it does become permanent when dry. Distress Inks would wipe off much too easily. After I had some color down, the last step was to add paint splatters to give the impression of stars. I did this using more of the Tattered Angels paint and flicking it on with a paintbrush. Then, I dried the whole surface again with my heat tool. I plan on using this mug in my craft room to house my heat tool, paintbrushes, and any other little craft tools that might need a home. If you plan on using your mug for drinking or eating out of, you might want to go ahead and find a food-safe and dishwasher-safe sealant to apply over the galaxy background. Without the sealant the paint and ink may rub off and would definitely not be something you would want to ingest. 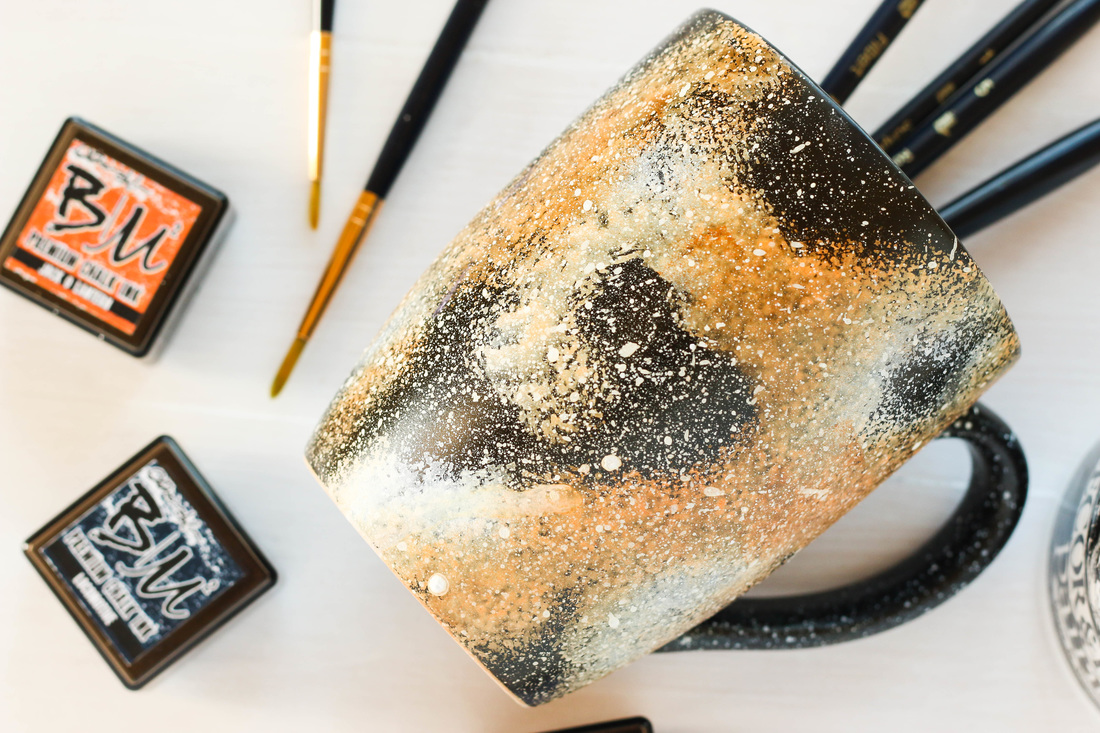
 Thanks for stopping by today and happy crafting!
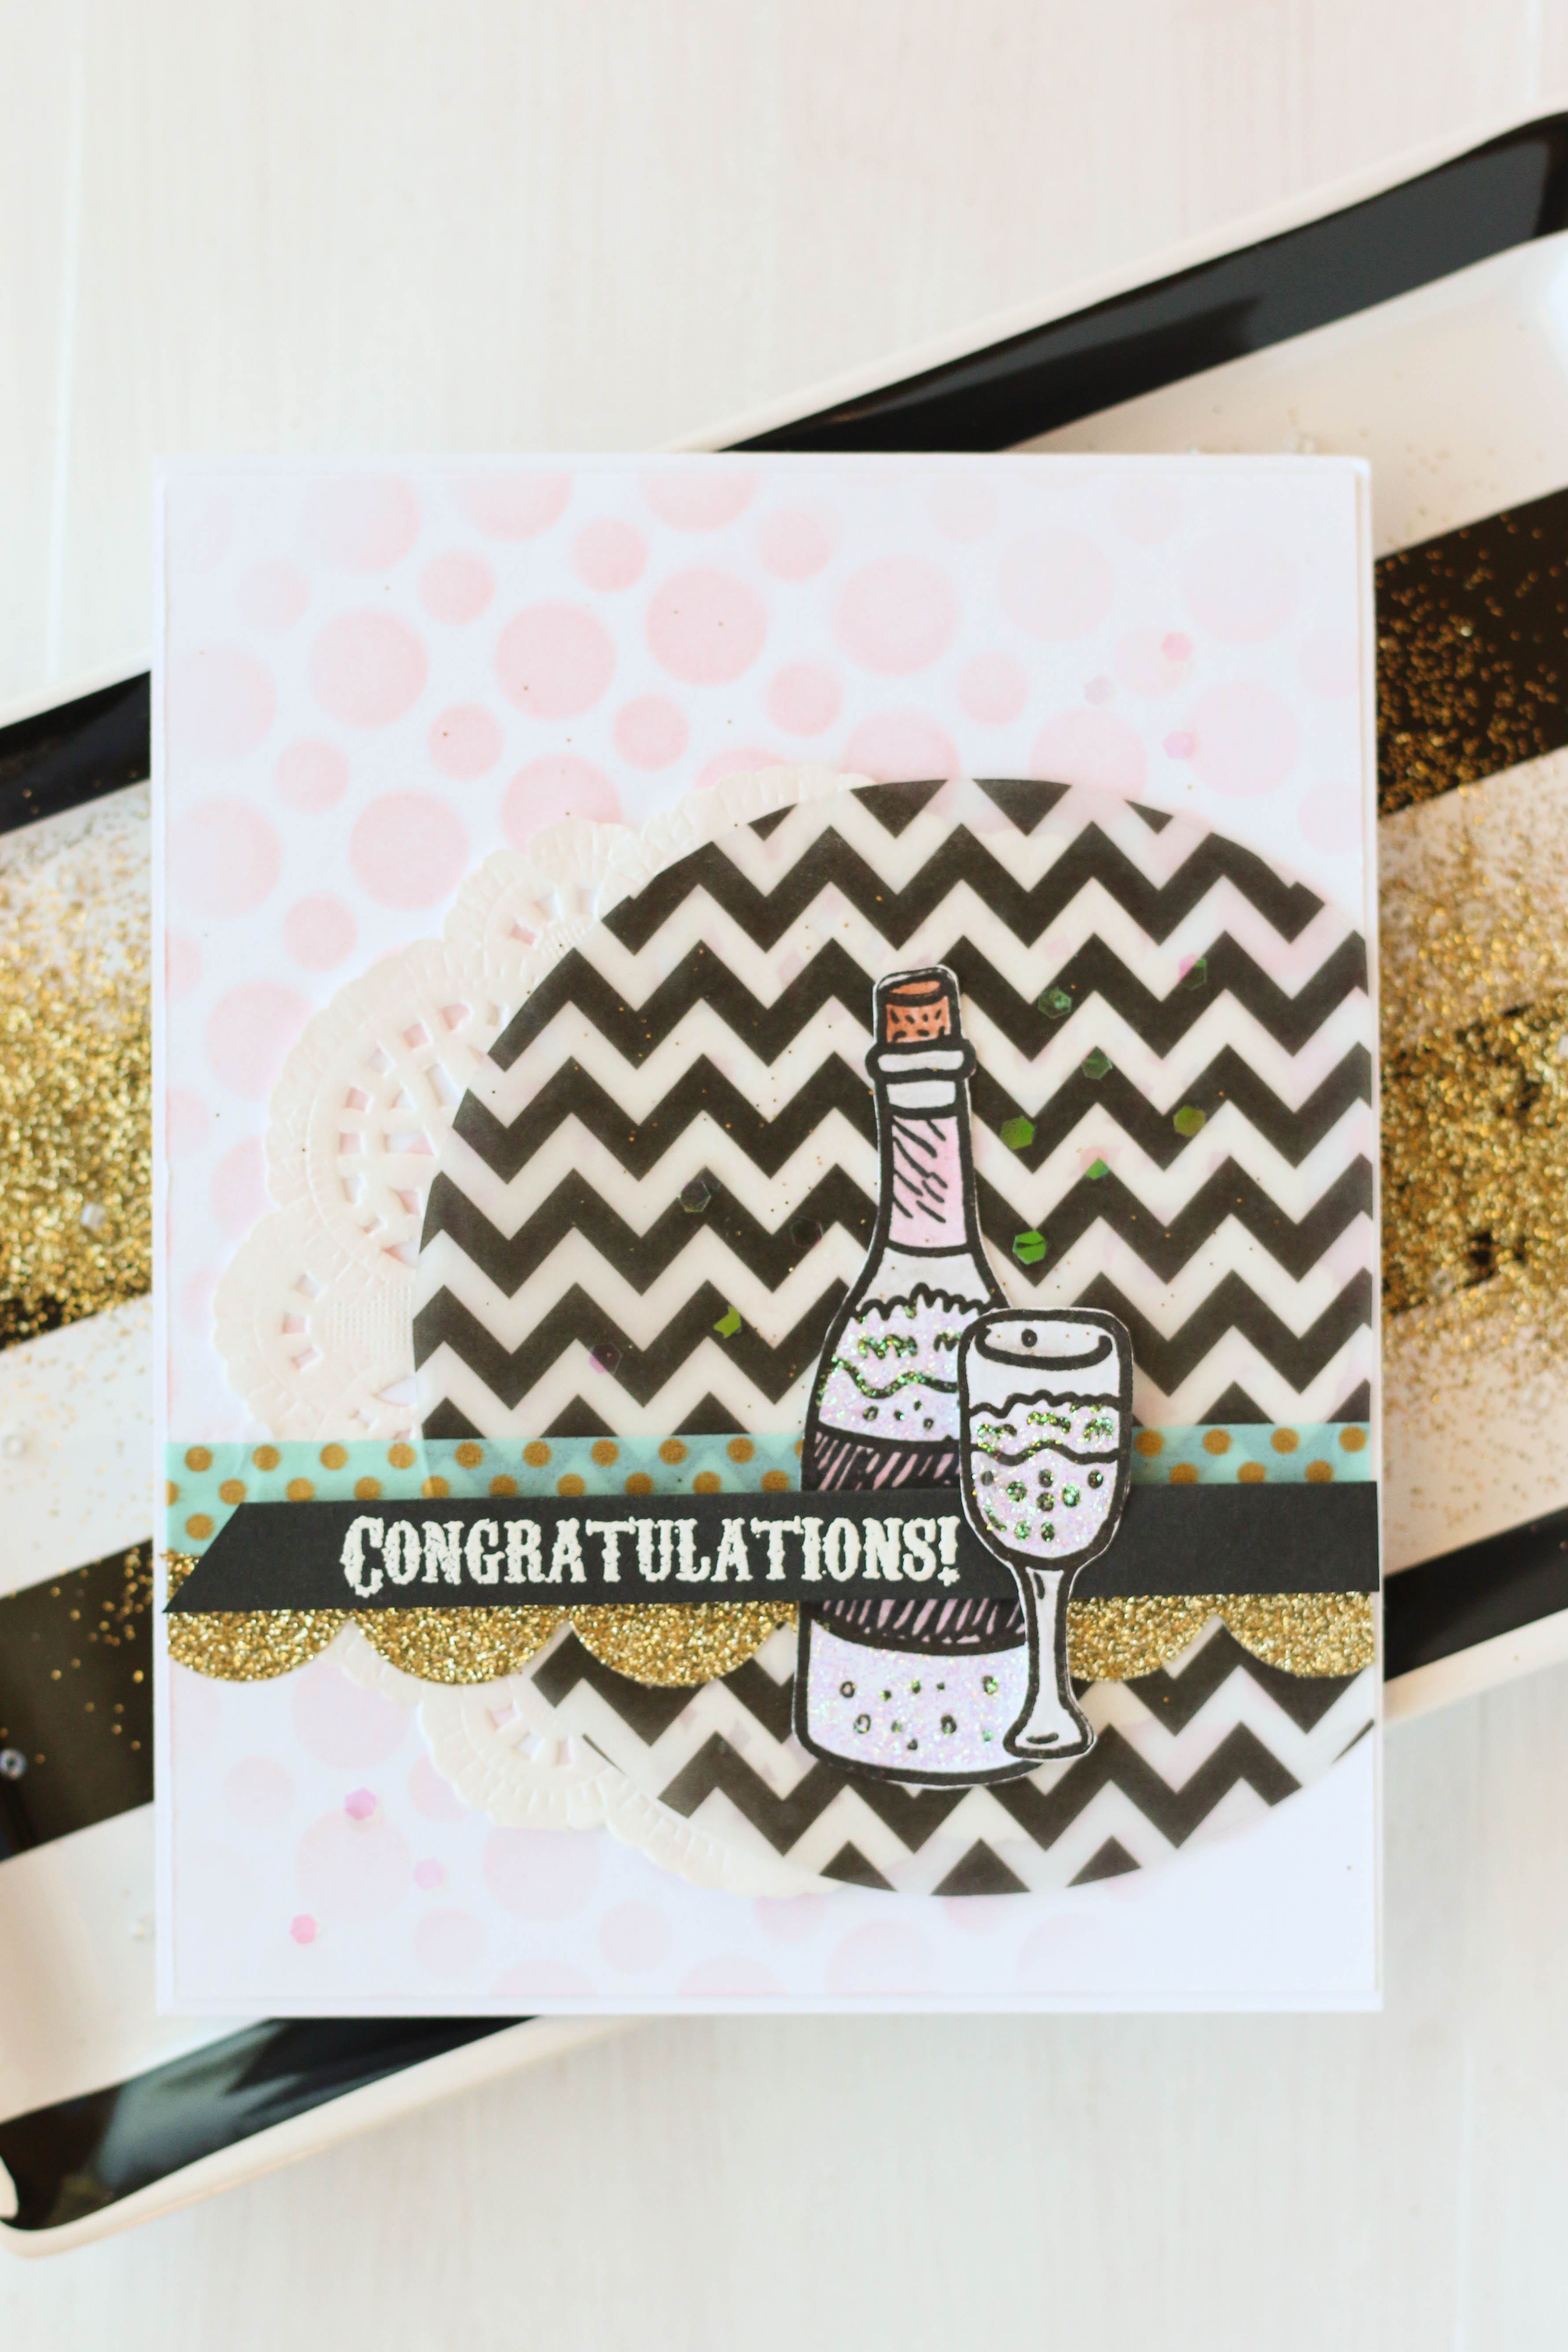
Brutus Monroe offers a great deal with the monthly Stamp Club. Each month, there is a special stamp designed by Christopher Allen and it is totally unique to the stamp club, so it wont be available in the store. December's stamp this year is this fun bottle and glass image.
I stamped out the image, fussy cut it out, and set it aside. Then I started building the base of my card. I stenciled some light pink circles on the card base usingBrutus Monroe's Polka Mixed Media Stencil. I thought the circles kind of looked like bubbles. I then cut out a large circle from a chevron piece of vellum paper and layered it off to the side with a paper doily behind it. Then I added some fun washi tape. The gold tape I ran through my Sizzix with my Scalloped Border Die from Lawn Fawn. 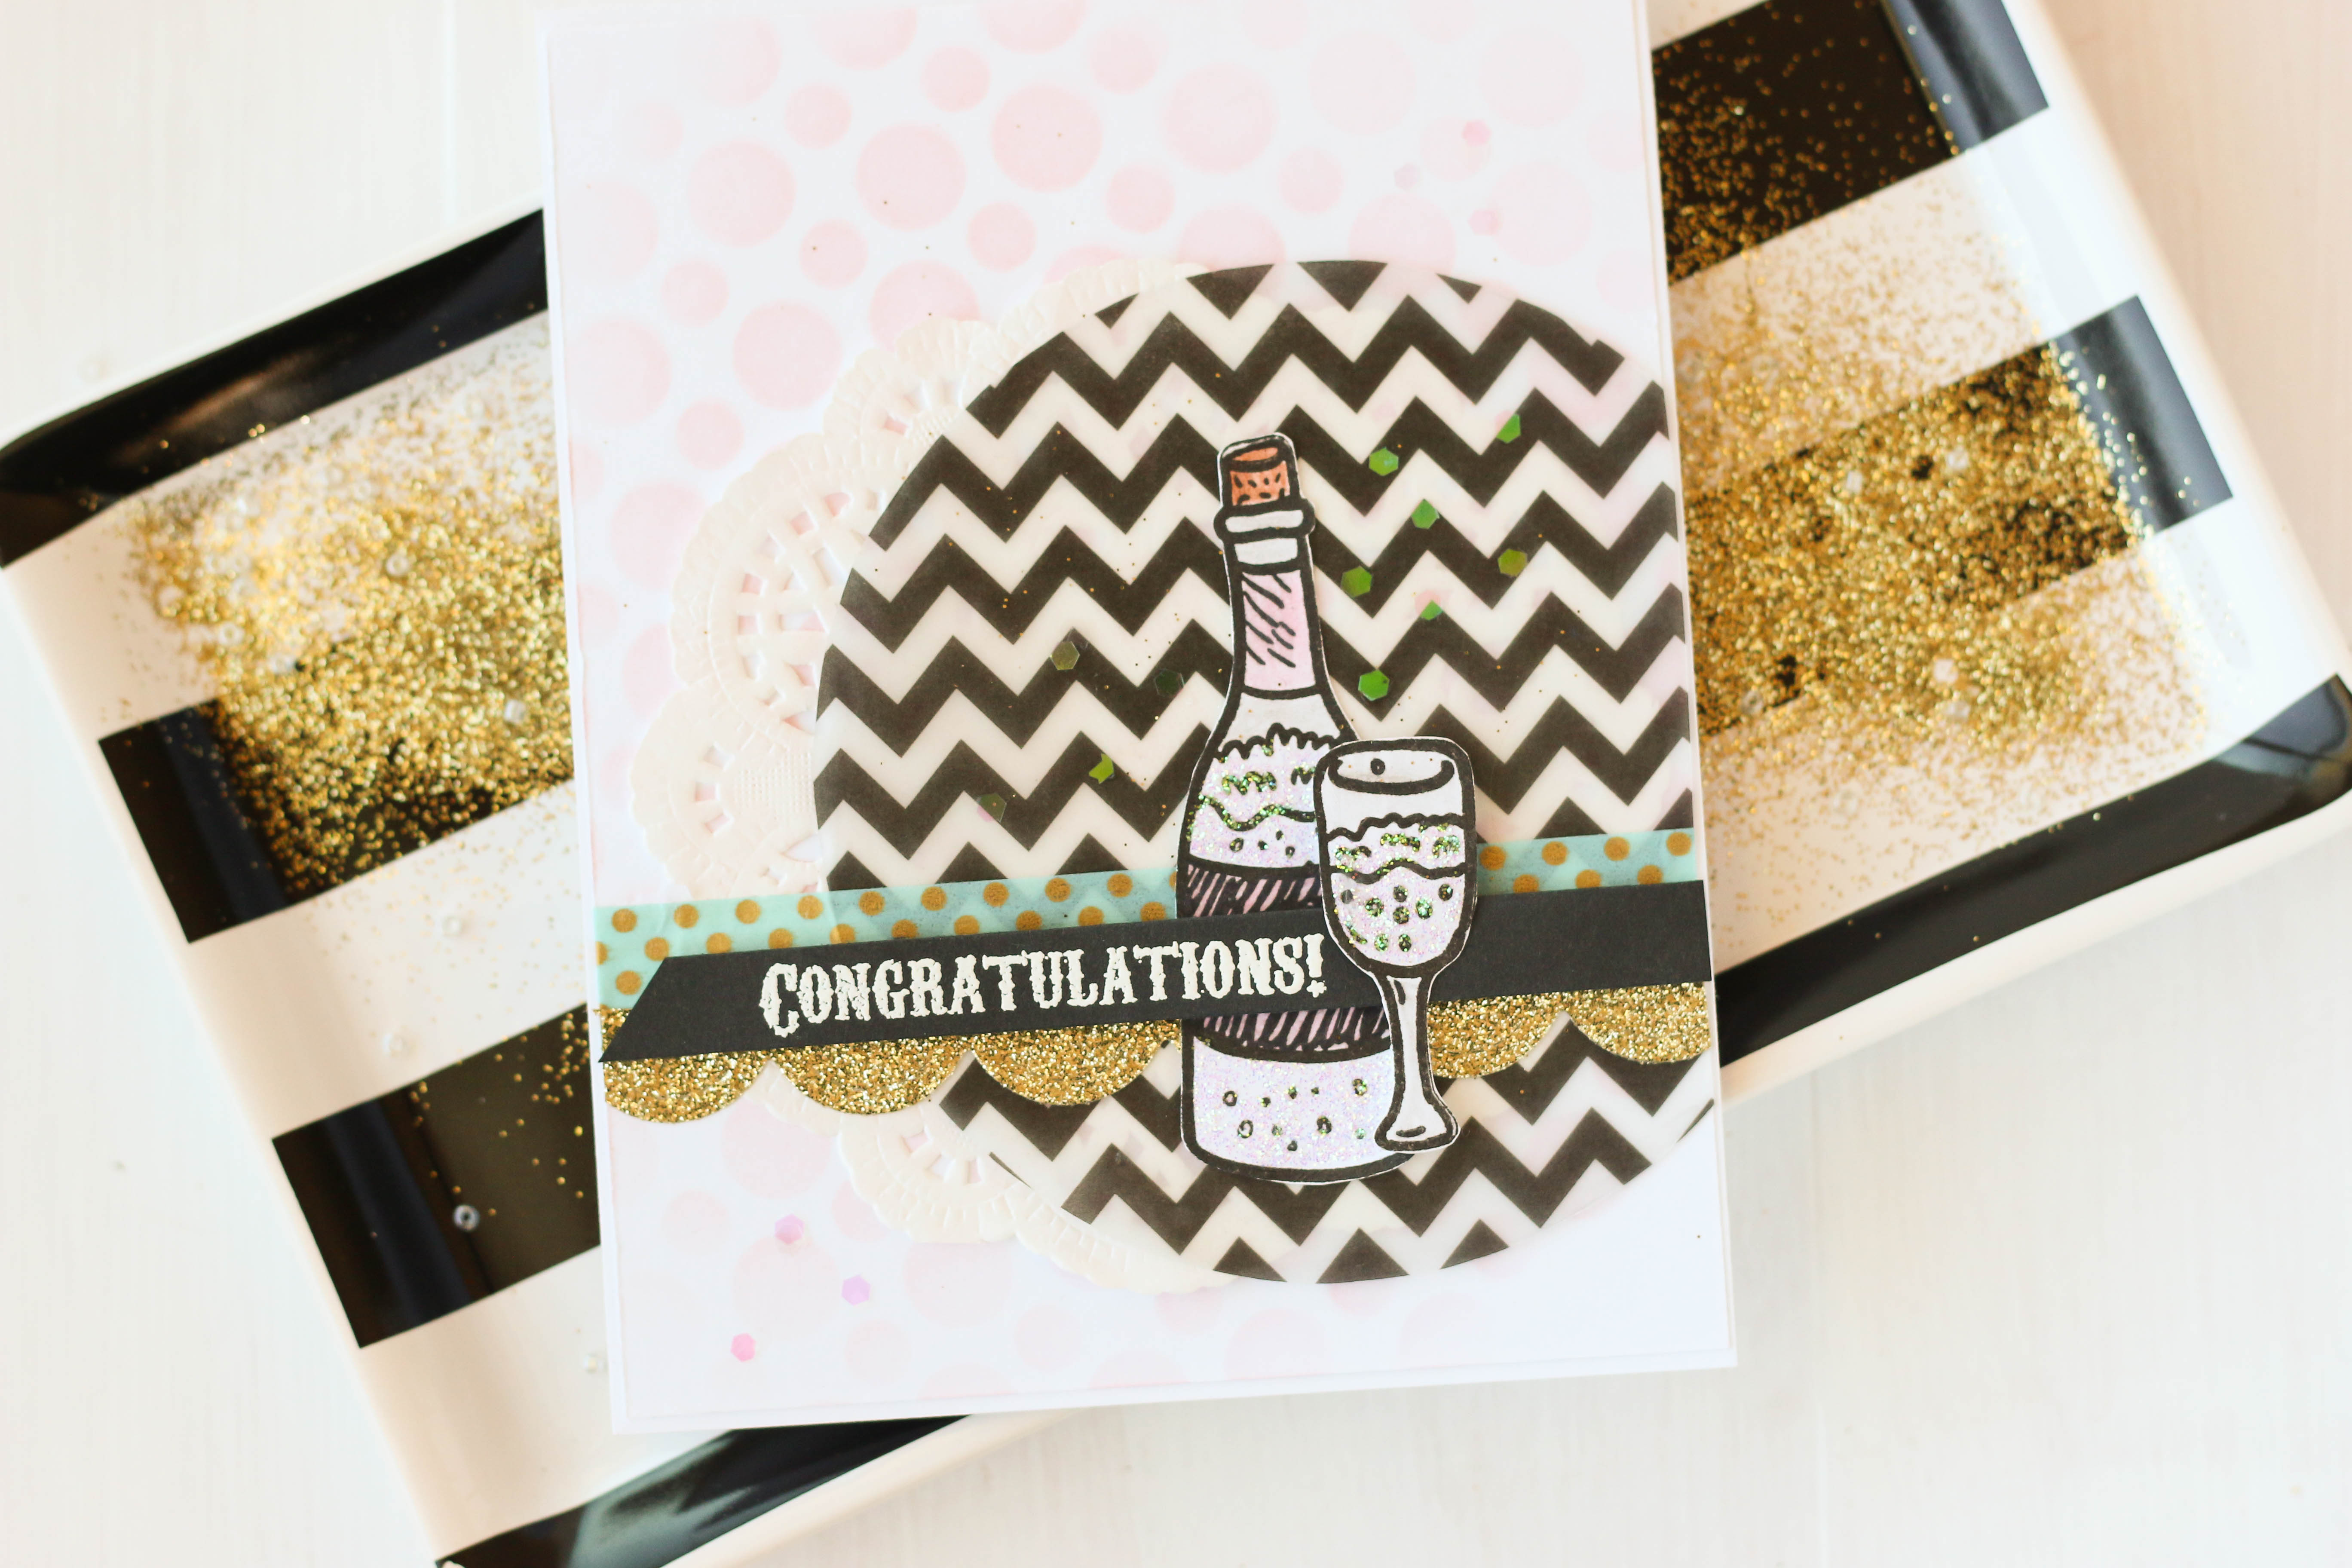
I then adhered the bottle down over the washi tape. I stamped the word "congrats" on a thin piece of black cardstock, and embossed it in white. I stuck it down over the bottle using a few pieces of foam adhesive to give it some dimension. Then, I added the glass off to the side and over the sentiment strip, again using some foam adhesive.
The very last thing I did was add some tiny pieces of iridescent glitter to the background, and I also added some Stickles to the liquid inside the bottle and the glass. 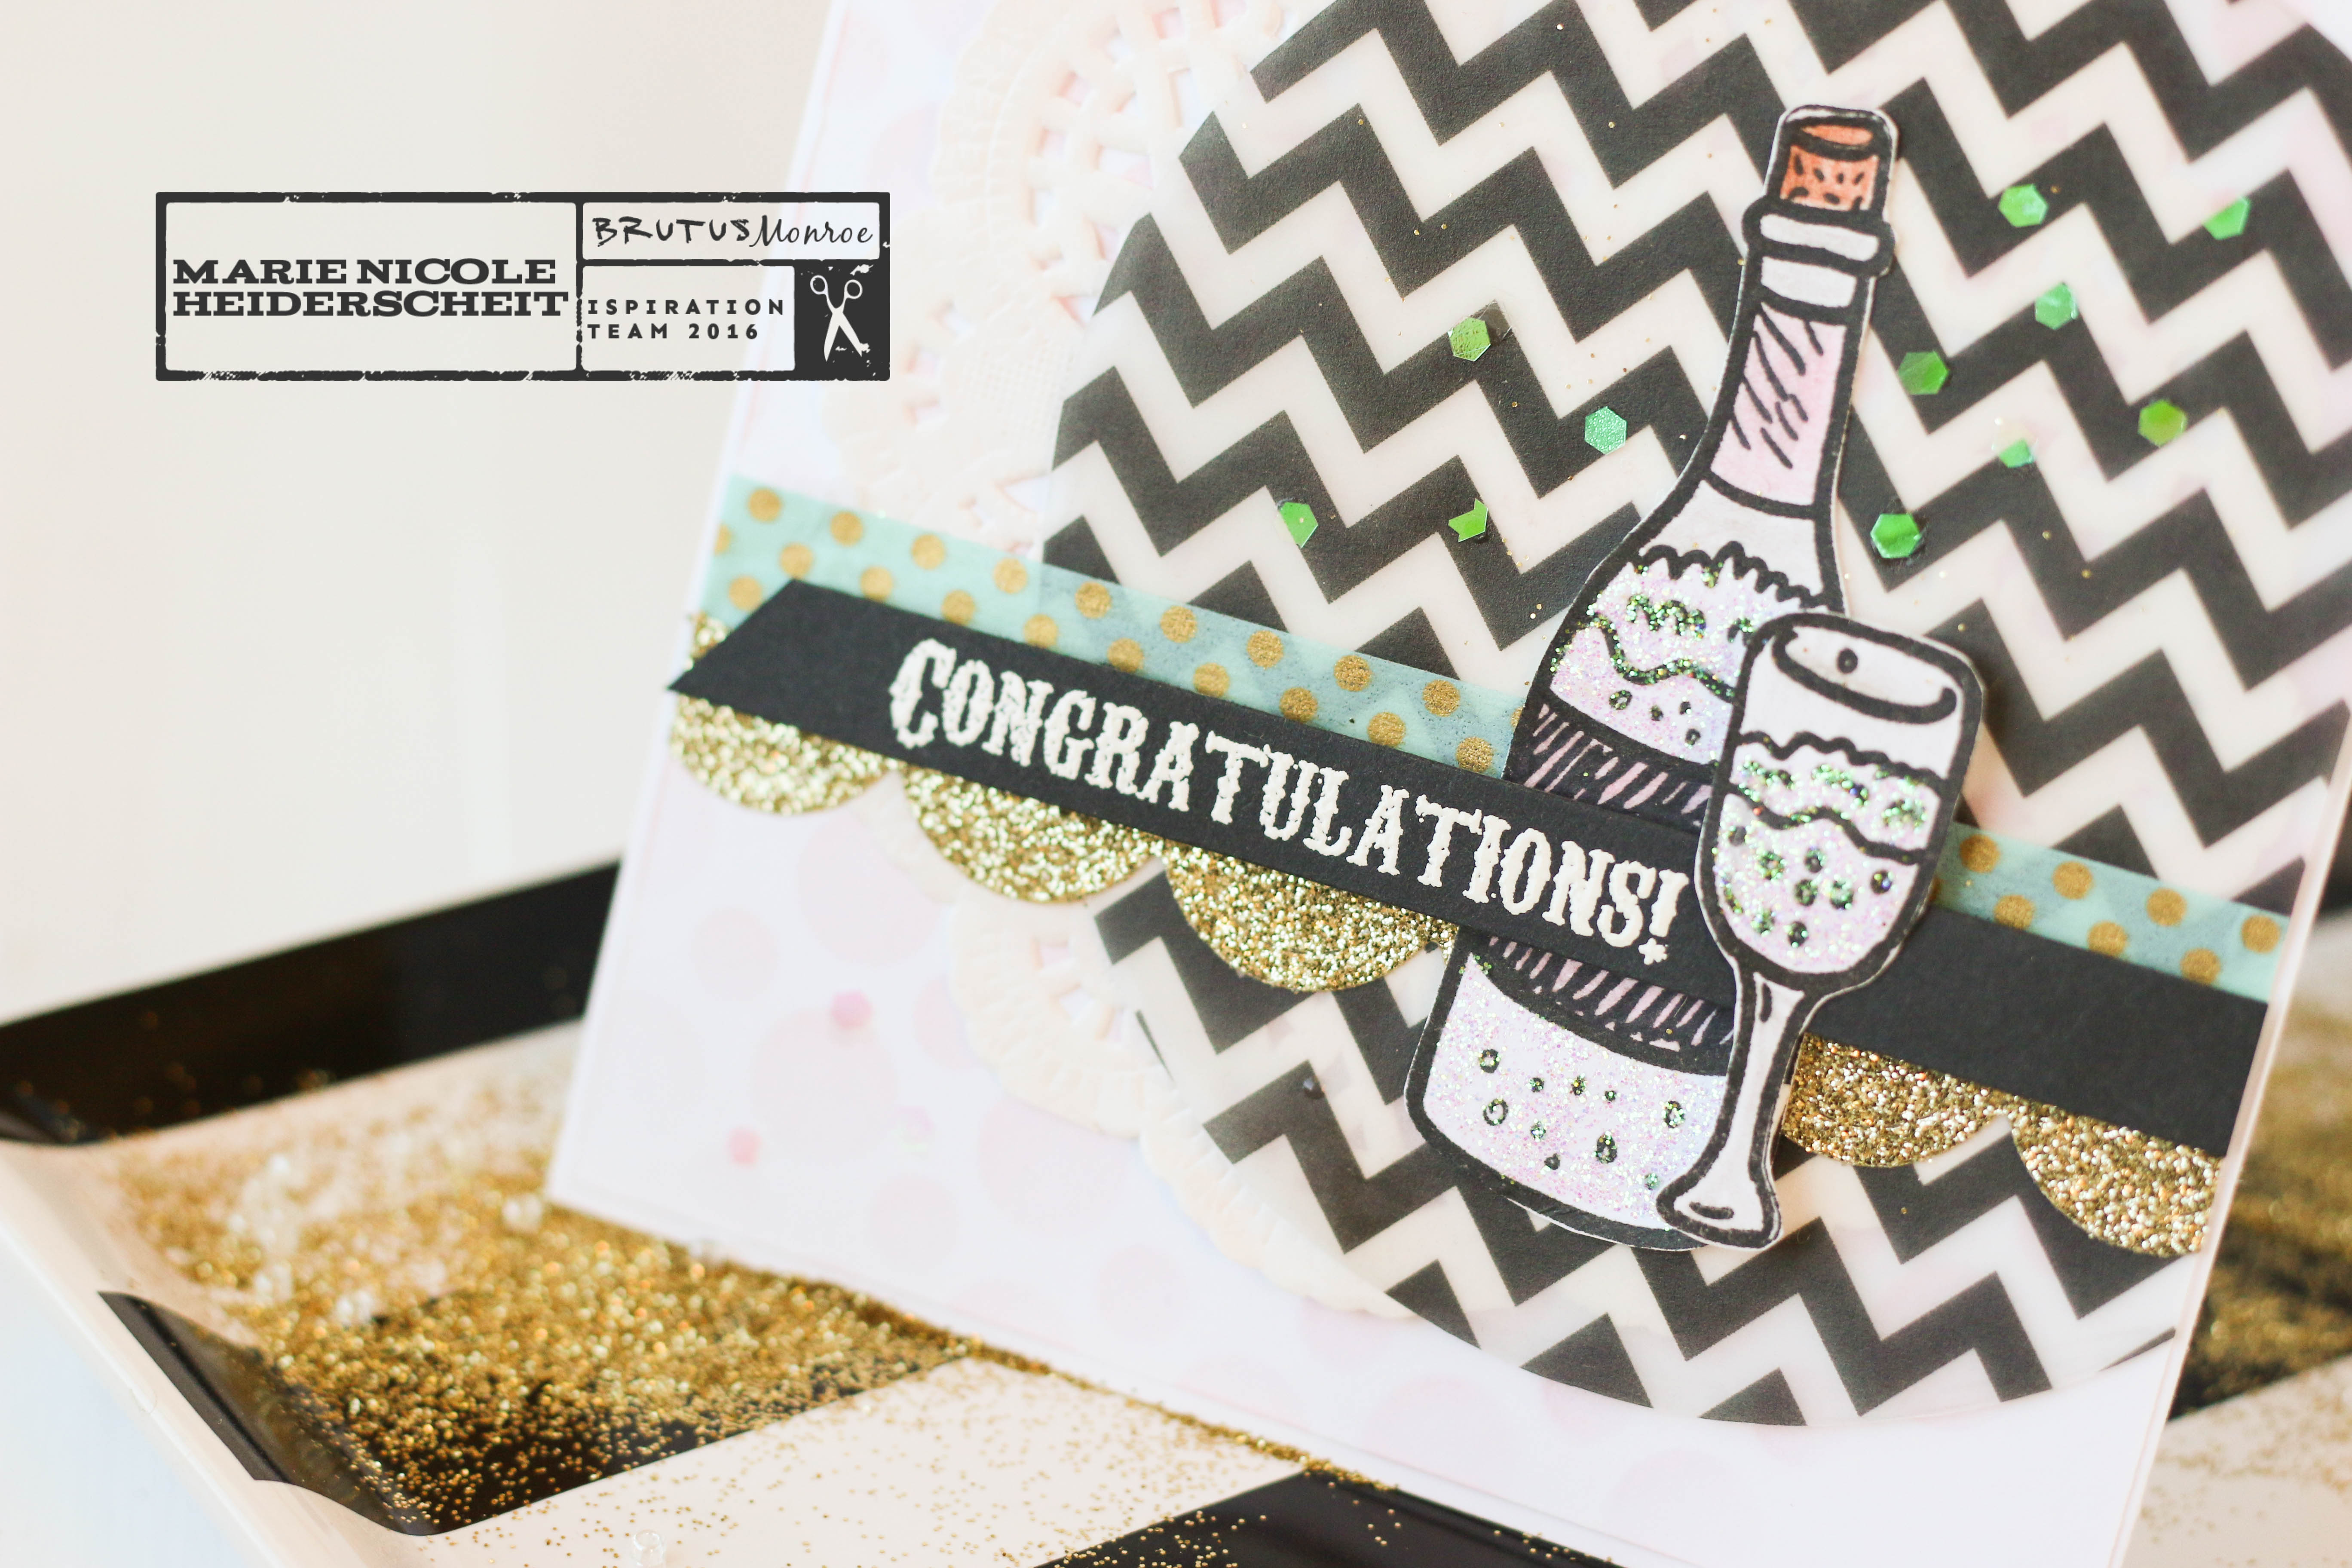
I thought this was a really fun stamp set, and not only is it perfect for New Year's, but it can also be used all year long for weddings or other events that you might want to celebrate. This card ended up having a somewhat girly feel with the light pink and the glitter, so I think it would be perfect for a bridal shower or bachelorette party! Thanks for stopping by today! Dont forget to check out the Brutus Monroe store and Stamp Club. If you are interested in any of the other items I used on this card, I have included a few links below. I'm also linking up with: Simon Says Stamp's Wednesday Challenge! Happy Crafting!!

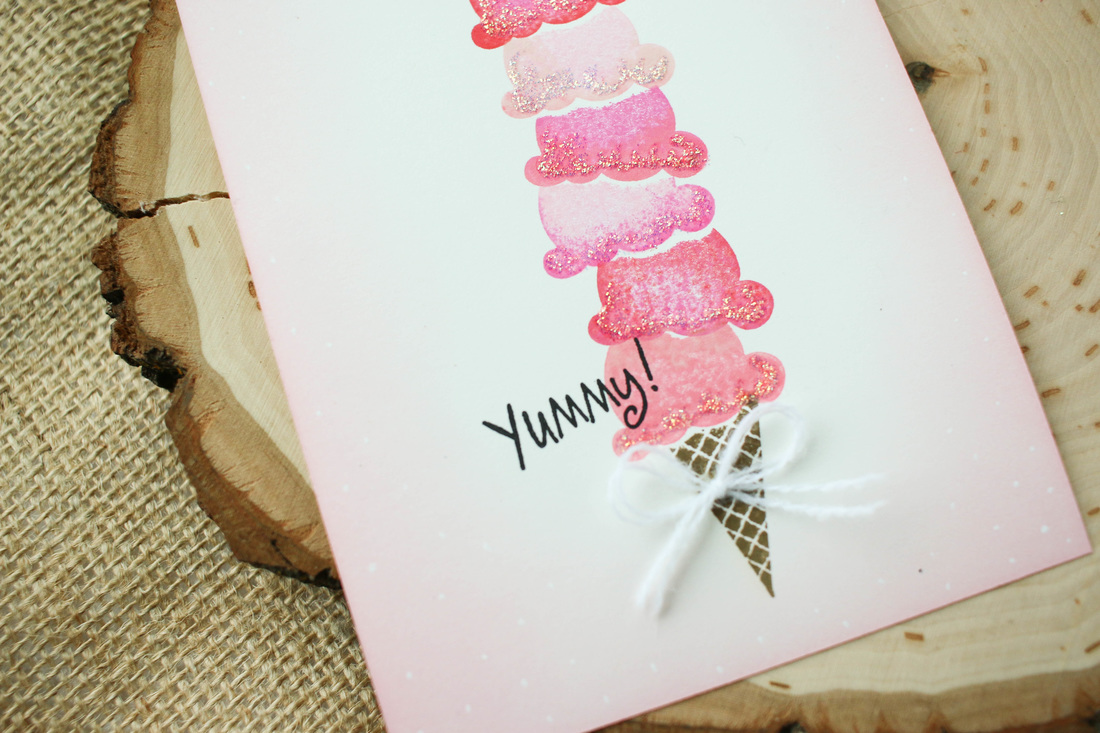
I have a pack ofCanvas Corp postcards and lately they have just been begging me to be decorated. I decided to go ahead and decorate them to send to my nieces and nephews.
I have a Stampin Up! ice cream cone stamp set that I thought would be fun to create a super tall ice cream cone with. I first stamped the ice cream scoops onto some post it note paper, then cut out the image to use for a mask. Each time I stamped a scoop, I covered it with the mask and then stamped another scoop over the top in order to stack the scoops on top of each other. Then, I used a bit of Distress Ink to ink around the edges. A little Versafine Black Onyx ink was perfect for stamping my sentiments with. To finish, I glued on a little bow and added some glittery Stickles to the pink postcard. 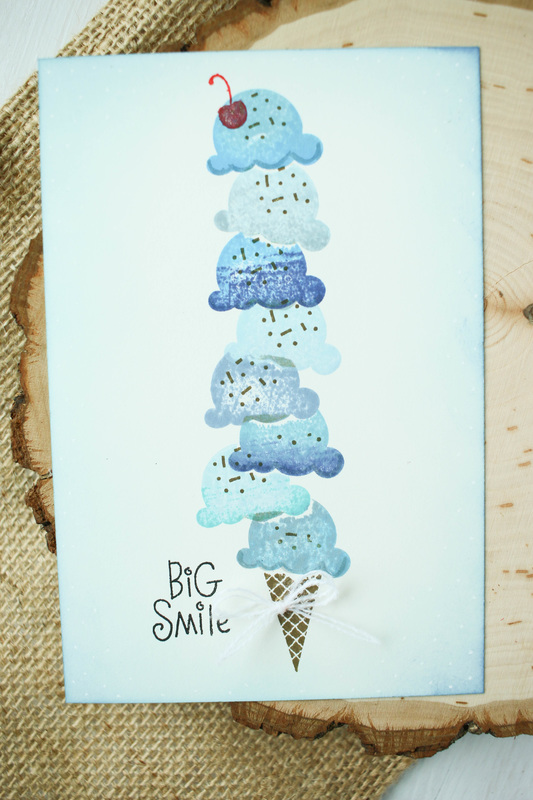
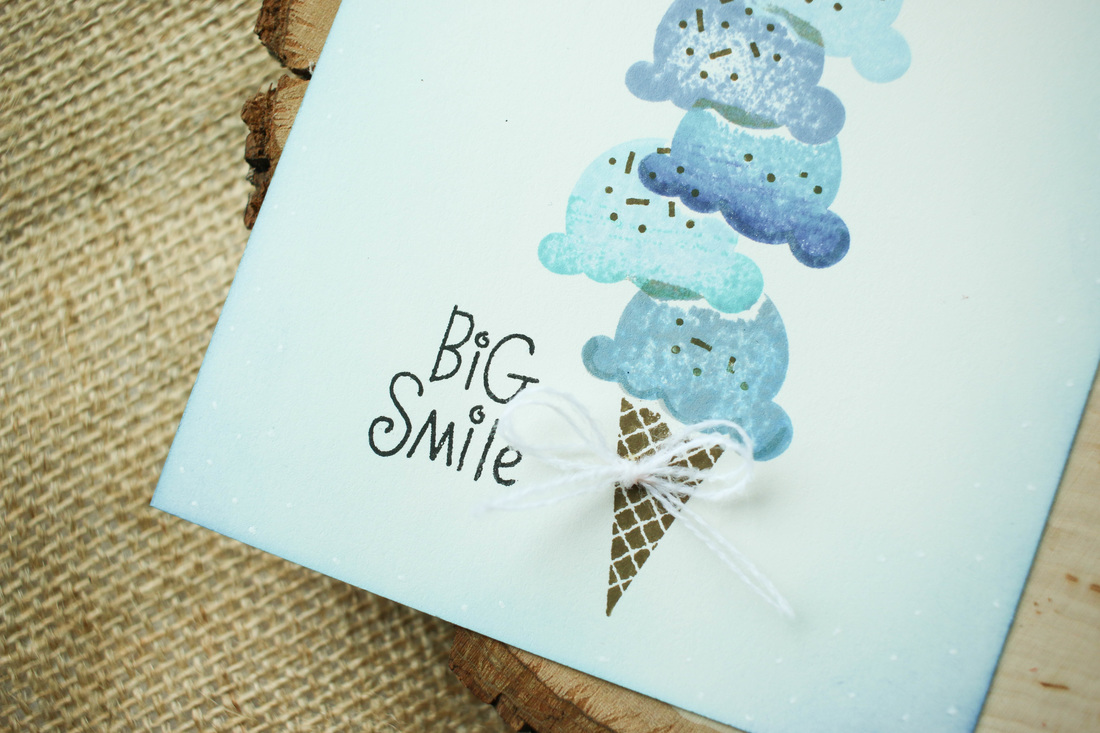
Canvas Corp postcards are 4x6 in size, and they are able to be sent through the mail like a regular postcard. I decided to put my postcards into an envelope to send them together. I also added in some cute die cuts that I thought the kids might like to play with. Super easy and cute! If you do ever decide to send a decorated postcard of your own, it might help to just ask your postal worker for some tips, and if it meets postal regulations. Im also linking this up with: Simon Says Stamp's Monday Challenge! Simon Says Stamp's Wednesday Challenge! Happy Crafting!
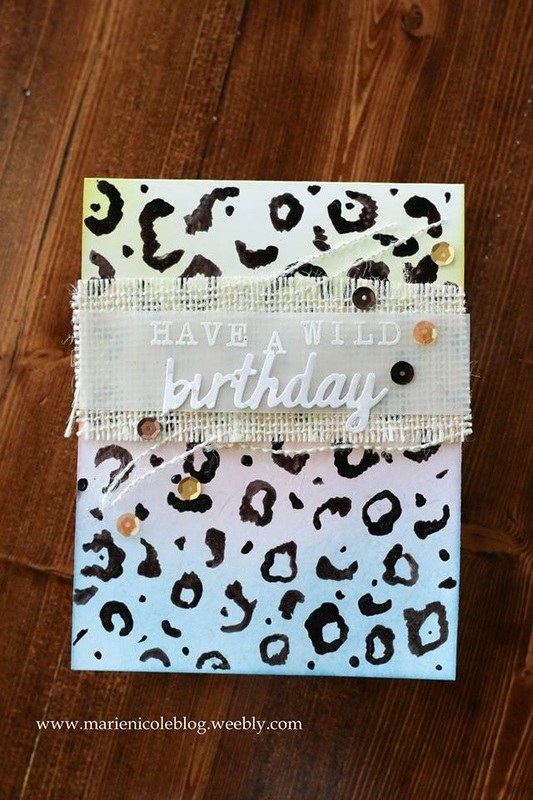
For this card I channeled my inner Lisa Frank. I remember being a girl and saving all my earnings so I could go buy that set of Lisa Frank stationary or stickers. I loved all the bright colors and fun animals! I started by blending several colors of Distress Ink on the background. I used Broken China, Spun Sugar, and Squeezed Lemonade. Then, I took some Java Glaze from Tattered Angels and painted on the cheetah print with a paintbrush. I have a cheetah print pajama top that I actually copied the print from (glamourous, I know!). When the glaze was dry, I cut a piece of CCB burlap and then embossed the sentiment in white on a piece of vellum. The word "birthday" I cut with my Sizzix and then used my Tombow Stamp Runner to adhere it down. The last step was just to embellish it using a few Doodlebug sequins! I'm linking this card up with: Simon Says Stamp's Wednesday Challenge! 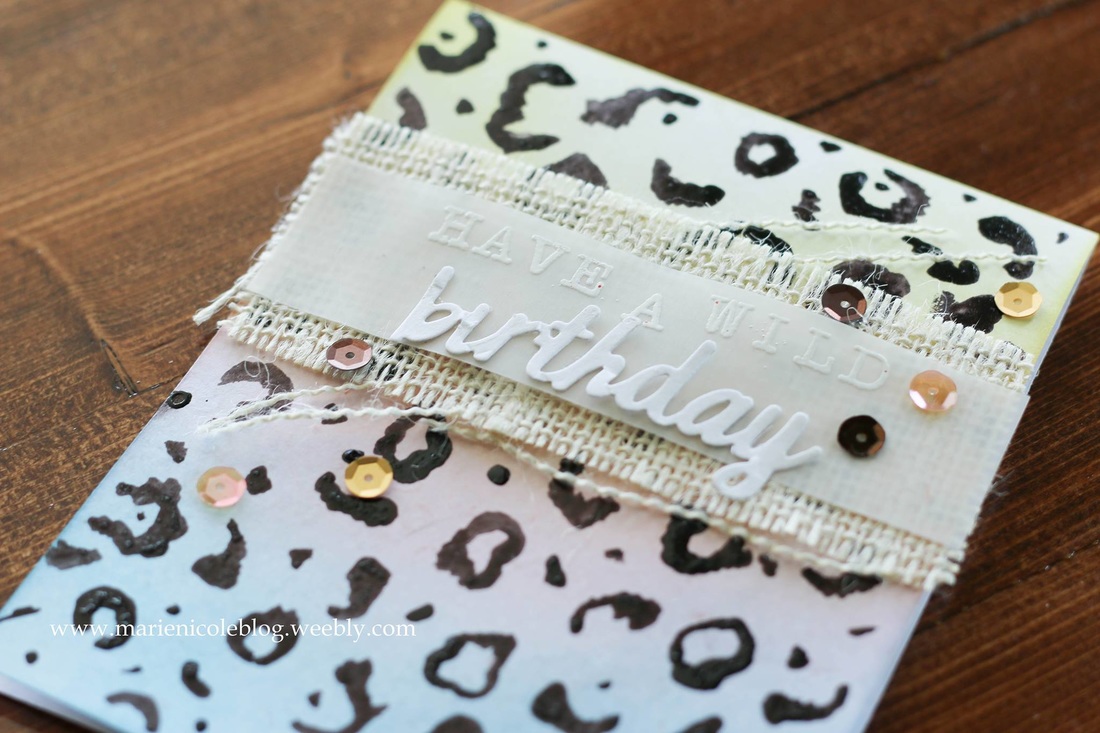
Thanks for stopping by today and if you are interested, check out some of the products I used!
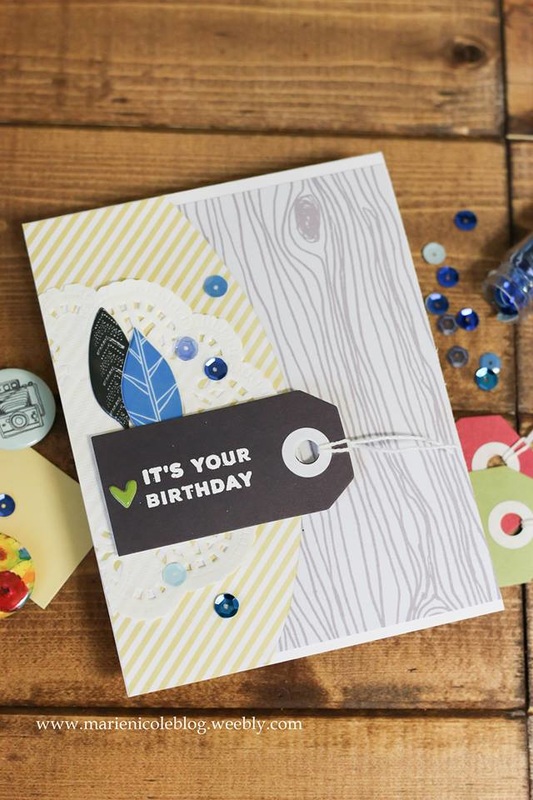
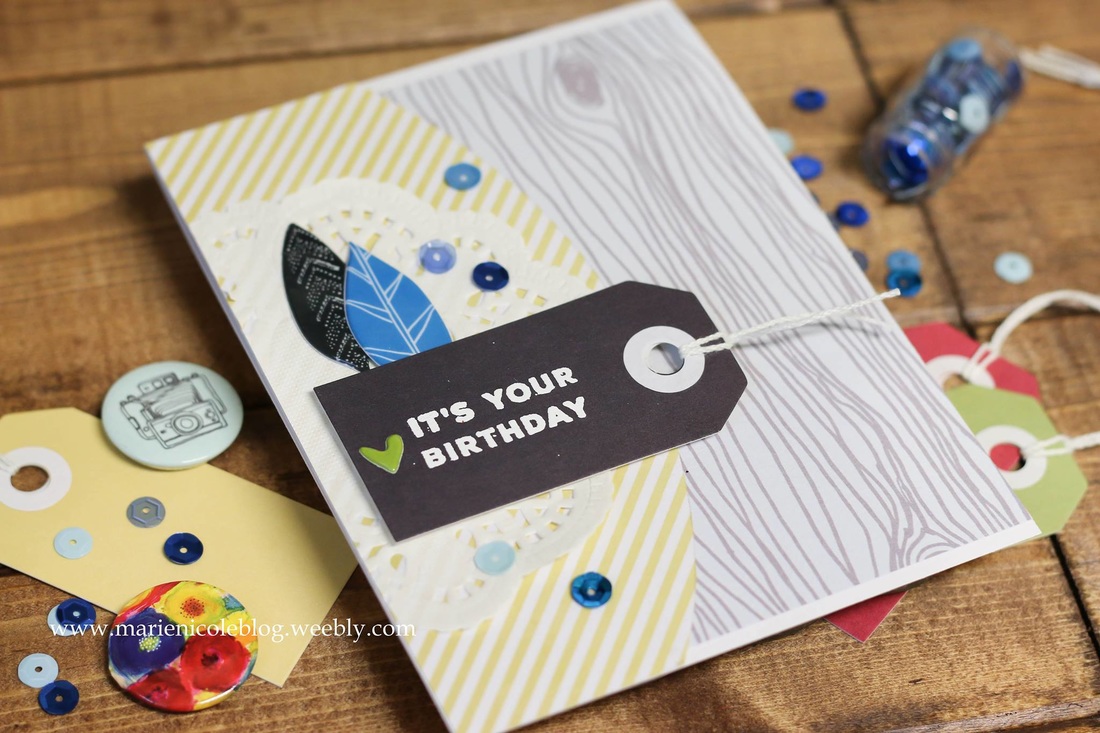
For today's card I used the Attwell collection by Fancy Pants Designs. I absolutely love this collection. It's so colorful and fun!
I used their woodgrain paper as the background, and then layered their yellow stripes on top along with a paper doily. Then, I took one of their black tags and embossed the birthday sentiment with a stamp set from Simon Says Stamp. 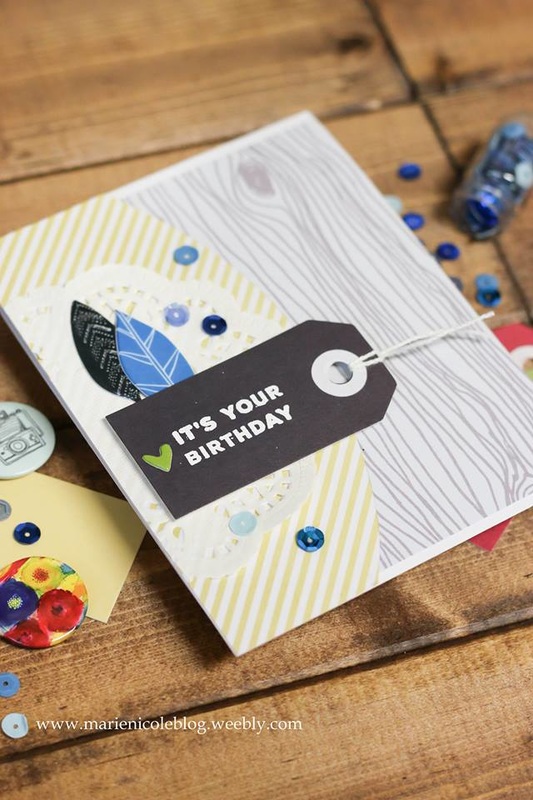
I used a few of the Attwell puffy stickers and some blue sequins by Doodlebug Designs to finish embellishing this card.
Thanks so much for stopping by!
Check out a few of the products I used!

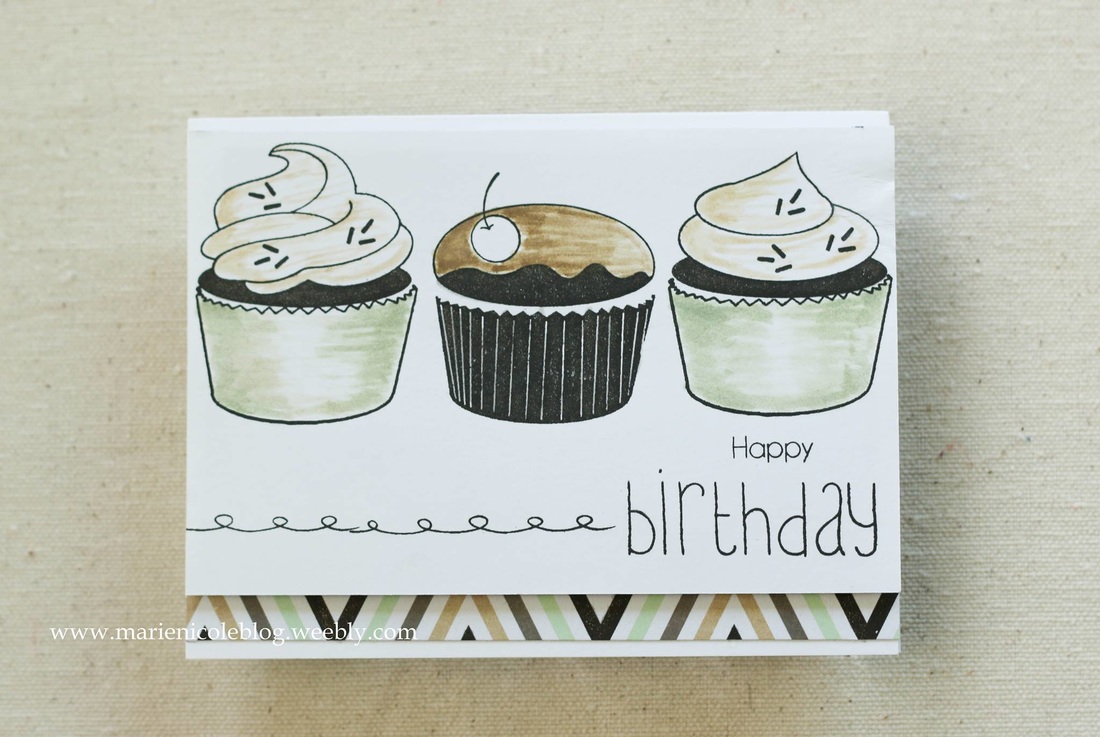
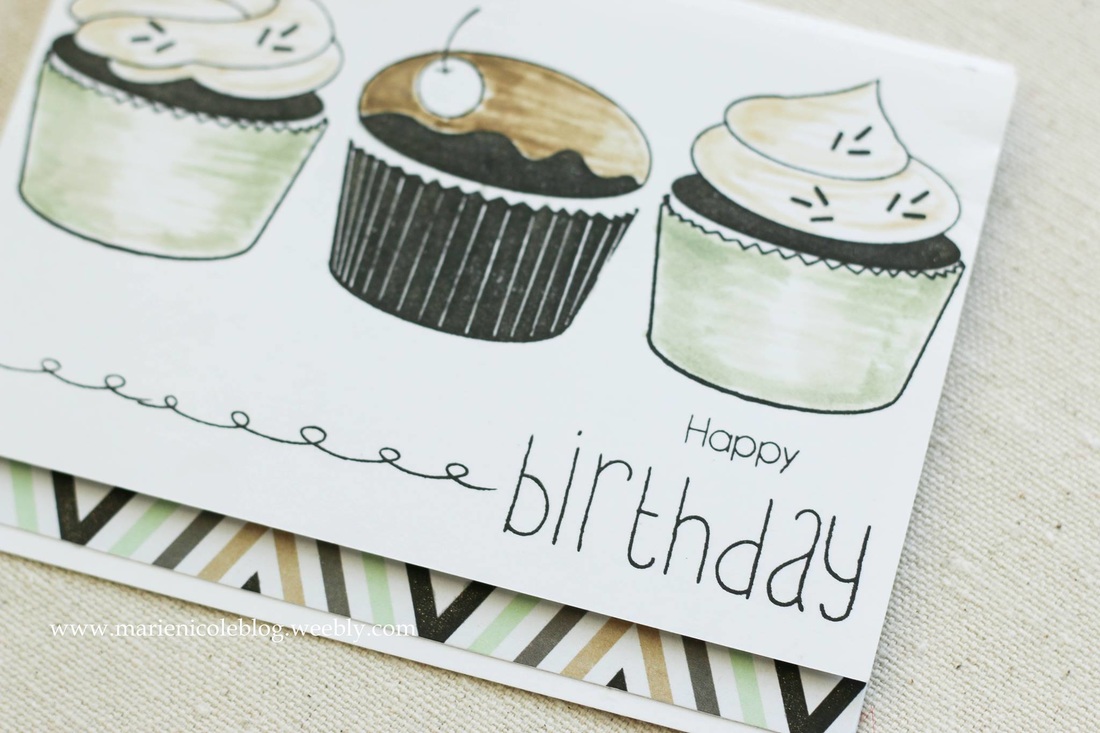
This is a quick easy card I created a while ago. I just used Avery Elle's Cupcake stamp set and stamped three cupcakes using Versafine Black Onyx Ink.
I colored them in with Distress Inks. I picked the colors to coordinate with the strip of patterned paper along the bottom. I used Gathered Twigs, Peeled Paint, and Antique Linen. I used a different stamp set to stamp out the "happy birthday" along the bottom. The cardstock layer that the cupcakes are stamped on is popped up on some craft foam. Lastly, I added some Wink of Stella to the cupcakes for some extra shimmer. 
Thanks for stopping by and Happy Crafting!
Im linking this project up with: Simon Says Stamp's Wednesday Challenge Check out a few products I used!
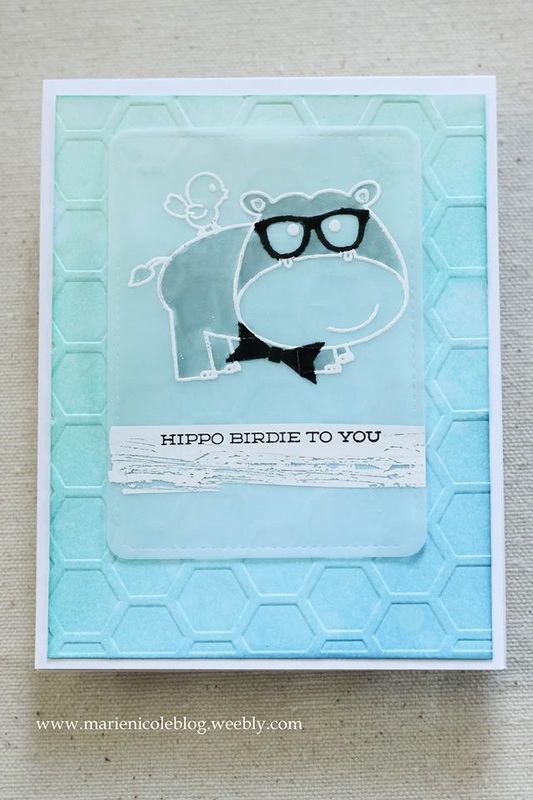
I recently got some vellum, and I just love the look it brings to my cards. For this card, I started by blending some Distress Inks together for the background. I used Cracked Pistachio, Peacock Feathers, and Mermaid Lagoon. Then, I spritzed some Pearl Glimmer Mist over the inks to get them moving together and also for some shine.
The next step was to run my background through my Sizzix with an embossing folder. I first sprayed in some Chalkboard Glimmer Mist, which is similar to the regular Glimmer Mist but a little more opaque. Then, I embossed the background and dried it. I then moved on to the vellum portion of the card. I die cut a piece of vellum with Lawn Fawn's Stitched Journaling Card die. I used some VersaMark ink to stamp the hippo and bird with, and then embossed them in white. Then, I ran some Tombow correction tape down and stamped my sentiment over that. I then took a scissors and scratched a little of the correction tape off to give it a distressed look. I then stamped the cute glasses and bowtie on the hippo with VersaFine Black Onyx ink. I used my Tombow Monotwin permanent marker to fill in areas that did not stamp very crisp. After all that I adhered the vellum to the background using my Tombow Stamp Runner adhesive. 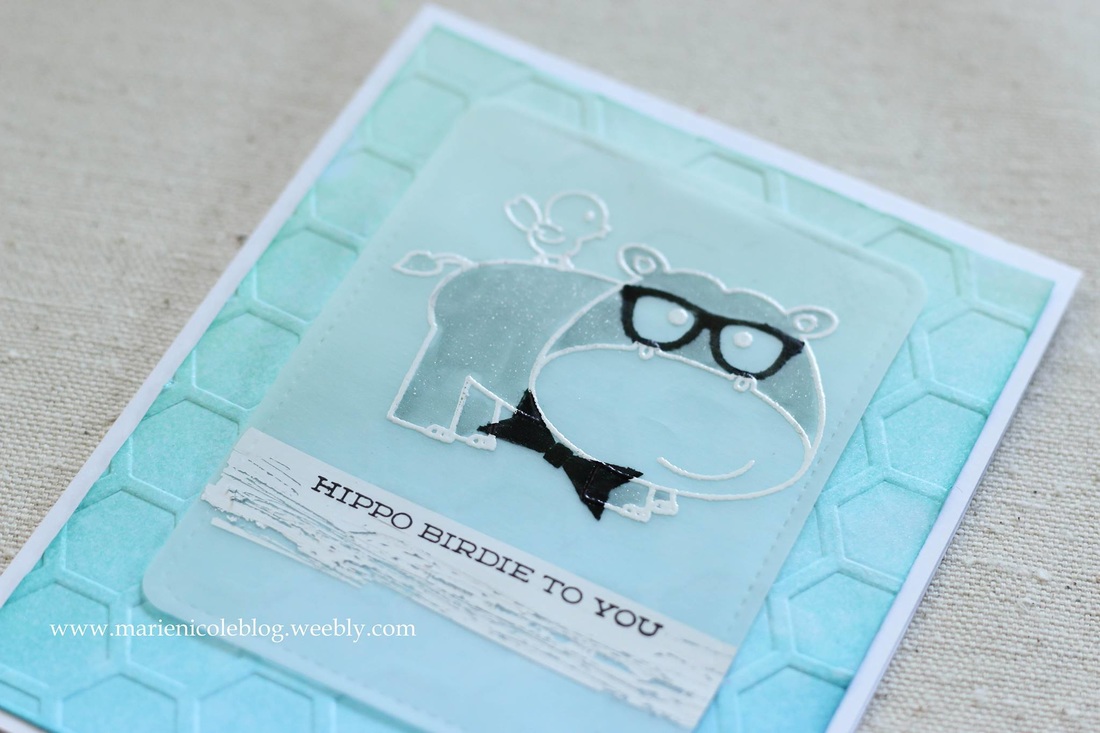
Thanks so much for checking out the card for today! If you are interested in some of the items I used I have included links below. Happy crafting!
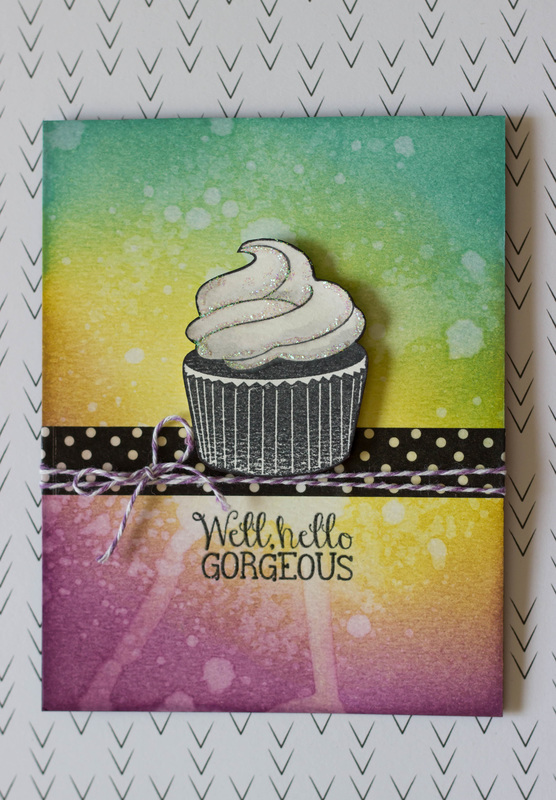 I'm sure I've said it before, but I'll say it again... I love my Distress Inks!! I used them for the background of this card. Started with the darker colors at the ends and then blended them together with a lighter color in the middle. Then, to add some texture and interest, I splattered some water on it.
I stamped the cupcake in black, and kept the colors very bland. I figured since the background was so bright and colorful, the contrast with a more muted cupcake would be nice. The rest of the card is very simple, as well. Just some polka dot washi tape and a little purple baker's twine. I stamped and embossed the sentiment and added a little bit of stickled to finish it off. Im linking this card up with: Simon Says Stamp's Monday Challenge! 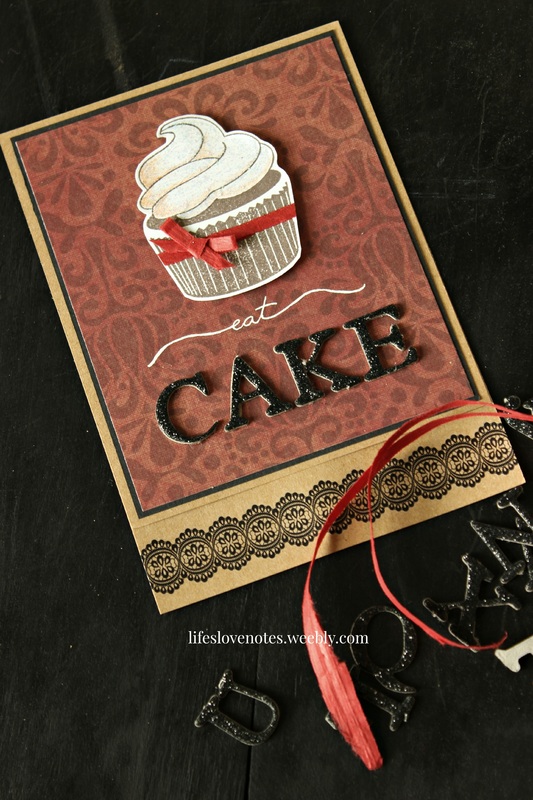
We are having some very unusual weather here this week (I think, from what I've been told, anyway. I guess I haven't been here long enough to compare it to anything). It's late morning and it has not even hit 70 yet today. I'm loving it. I have the windows open, even though we have some on-and-off showers.
So, I'm sort of stuck indoors due to the rain and the fact that our only car is in the shop today. I figured what a better time to dust off the craft supplies! I sat down at my laundry/craft room with my mug of hot chocolate. I usually have a stash of cards on hand so I can just pick one and send them out when the occasion arises. However, my birthday stash is getting disturbingly low (Yes, not having enough birthday cards disturbs me). Since I'm still getting organized, I kept this card simple by using pre-cut and glittered chipboard letters. The "eat" part of the sentiment I wrote with a white gel pen. Usually, writing on a card free-hand is a big no-no for me, since it never turns out well. This time it was tolerable... The background is just some fun patterned paper that I have had forever. The cupcake I stamped and added some stickles to on the icing. Oh, and of course every cupcake needs a bow, right? This one I added with some red raffia. You can kinda see that this card is not folded equally in half. The inside part is longer than the front. I was going to trim the bottom off, but instead I used a black lace rub-on for the bottom portion. Now, when you open the card to write your message you will still see the border along the bottom. And, I just love the combo of black on craft. |

Pin it!

AuthorSo glad you found me! This blog is my little space where I can share bits about my life and my latest crafting projects (mostly handmade cards). My goal is to share, inspire, and to be a positive presence in the creative community. 

Find me on Instagram!Archives
January 2018
Categories
All
Link Love
 

|


 RSS Feed
