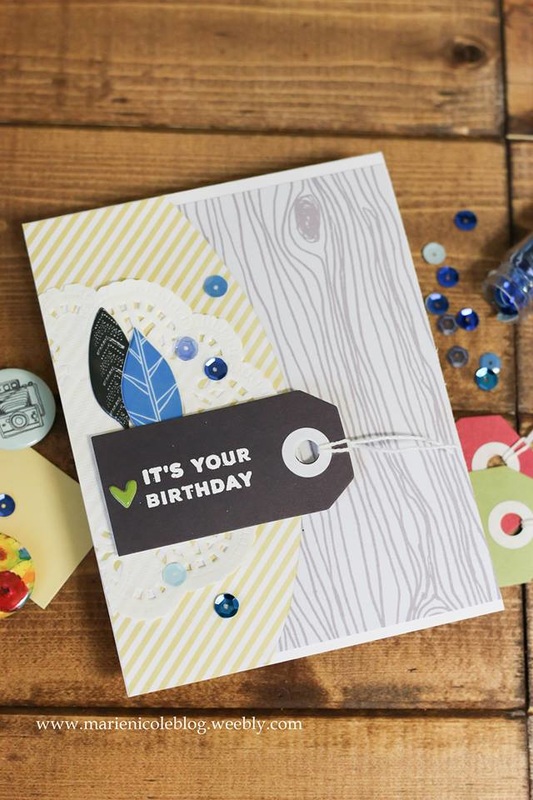
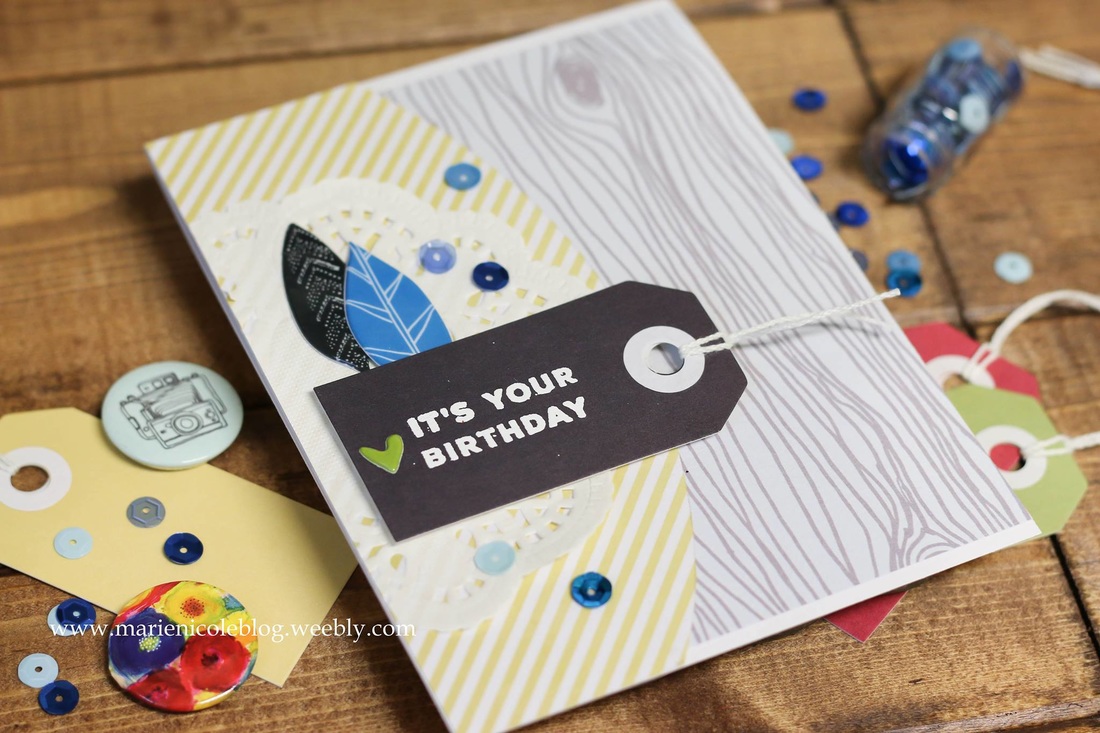
For today's card I used the Attwell collection by Fancy Pants Designs. I absolutely love this collection. It's so colorful and fun!
I used their woodgrain paper as the background, and then layered their yellow stripes on top along with a paper doily. Then, I took one of their black tags and embossed the birthday sentiment with a stamp set from Simon Says Stamp. 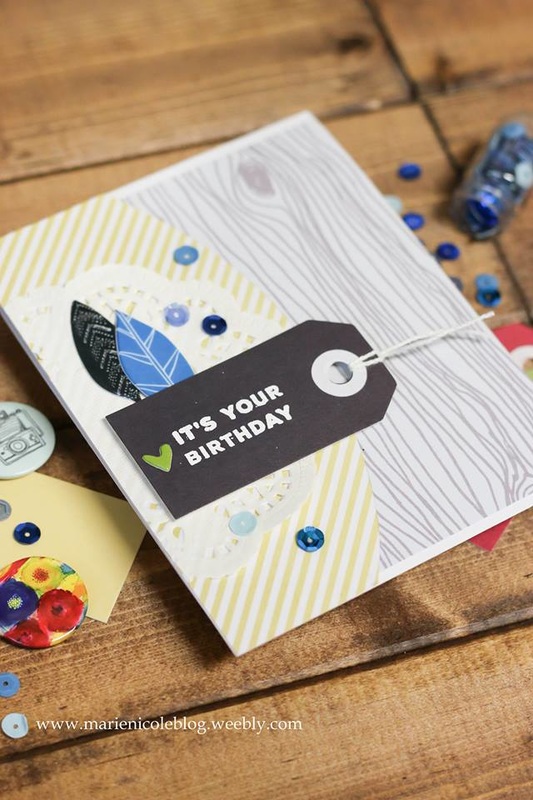
I used a few of the Attwell puffy stickers and some blue sequins by Doodlebug Designs to finish embellishing this card.
Thanks so much for stopping by!
Check out a few of the products I used!

3 Comments
May 7th is National Scrapbook Day! Tombow teamed up with some amazing friends at Graphic 45, May Arts Ribbons, Stampendous!, Fancy Pants Designs, Art Impressions, and Simple Stories to celebrate this day. They sent me a scrapbooking care package full of goodies that I get to play with and share with you! I'll be featuring their brands this week on my blog, so keep watching my social media for new posts!
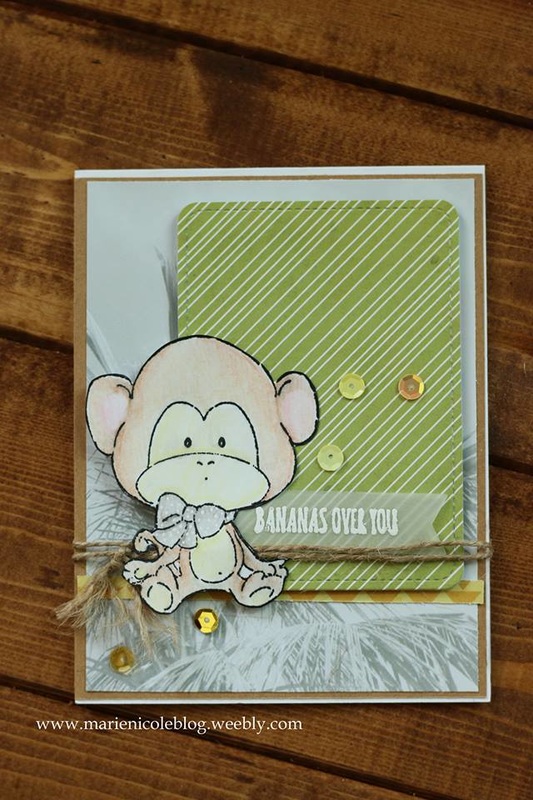
I knew immediately that I wanted to get my hands on this adorable little monkey stamp. You can find this stamp at Art Impressions' online store here. I stamped him and then colored him in using Tombow's Irojiten Coloring Set in Tranquil. I then fussy cut him out and set him aside to work on the background of my card. I used the You Are Here papers from Simple Stories. These papers are so bright and cheery, they just make me want to go on vacation! I layered all the papers together and added some CCB Twine and sequins as embellishments. 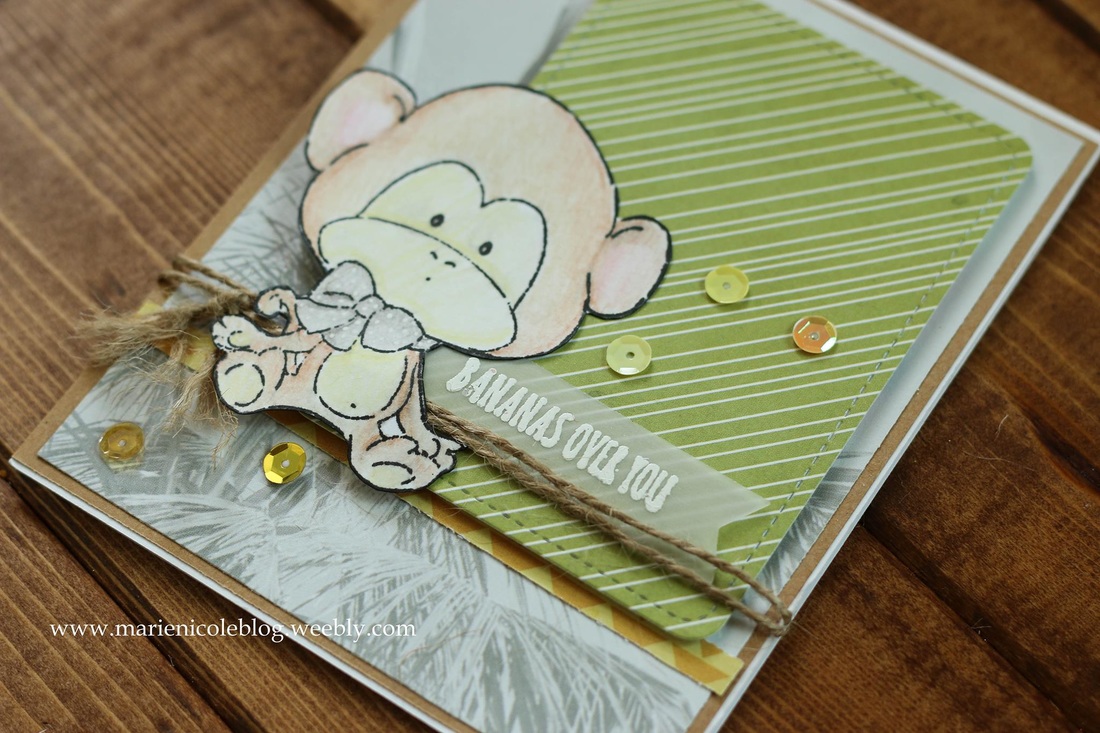
Thanks so much for stopping by! I did manage to put together a process video, so check that out if you want more detail into how I put this together.
Dont forget! Ill be posting more fun projects this week from some amazing brands! Happy Crafting! Some of the fun products I used:
Tombow has teamed up with some amazing companies to bring you some fun inspiration in honor of National Scrapbook Day! This whole week I'll be sharing projects and fun products from some amazing craft and scrapping companies that include:
Tombow USA Graphic 45 Stampendous! Fancy Pants Designs Art Impressions Simple Stories Canvas Corp Brands For this card I used Stampendous! Fiesta Stamp set and added color using Tombow's Irojiten Tranquil Coloring Set. First I used the stamps to create a fun border around the bottom of this card. Then, I took Tombow's Crimson colored pencil, and their Straw Yellow colors to color around the outside of the stamped images. Then all that was left was to stamp the sentiment and add some black sequins! I did also brush on some silver Wink of Stella to add some shimmer. Thanks so much for stopping by!! I managed to put together a process video, so please watch and enjoy. Happy Crafting!!
Check out some fun products I used!
There's nothing more fun than shaker cards! However, the amount of foam adhesive that traditional shaker cards use makes it a little tricky to pull one off. This is a simple way to make a shaker card without messing with the adhesive!
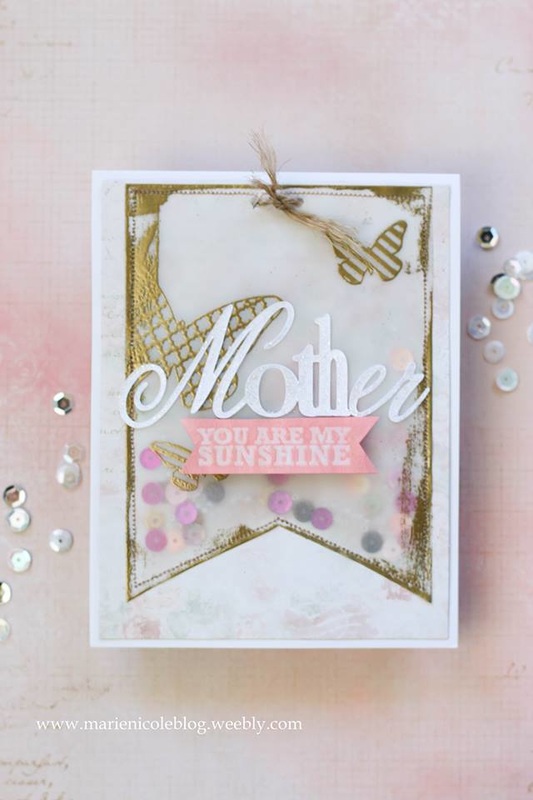
First, I cut a piece of patterned paper down to slightly smaller than my card base and adhered it down. Next, I took a piece of vellum and cut it into a flag shape. I stamped and embossed some butterflies in gold embossing powder, and then also embossed around the edges. I used a little tape adhesive to adhere the flag down on top of the background paper. BUT I DID NOT PUT ADHESIVE ON THE TOP OF THE VELLUM FLAG. This is important, because you need to leave the top open in order to fill the pocket with your shaker goodies. I then ran the card through my sewing machine to sew down the sides of the flag pocket, again leaving the top open. Then I filled the pocket with several colors of sequins and some tiny clear beads. After your pocket is filled, go ahead and sew the top shut. 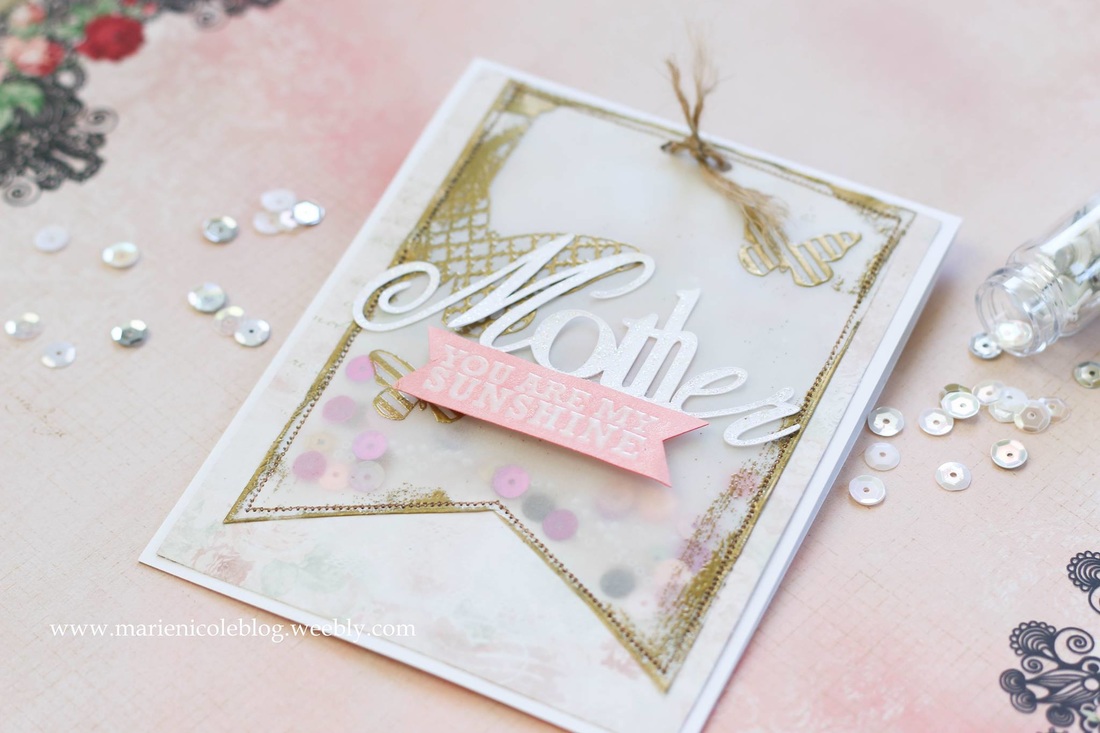
You;ve just made a fun shaker pocket card! I added a die cut "mother" to the front, and stamped and embossed the rest of the sentiment and adhered it below.
I hope you take a look at the process video to see how I did this in more detail! Thanks for stopping by and Happy Crafting!
I am also linking this card up with
Simon Says Stamps Monday Challenge Simon Says Stamps Wednesday Challenge
Thanks for stopping by today!
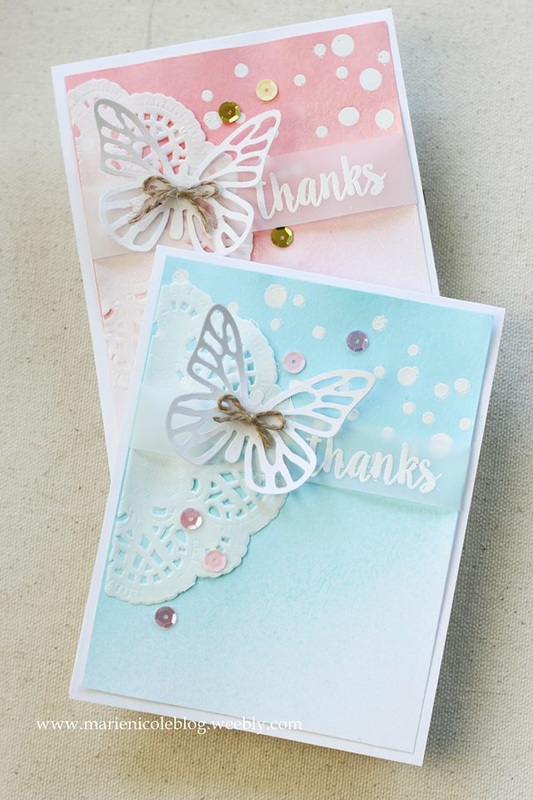
I made a few cards recently using Tattered Angels' Glimmer Mists. These mists are so fun to play with and you can get so many different styles and looks out of them! I made a few cards that are more on the Clean and Simple side. First, I took my Heidi Swapp Confetti stencil and stenciled in some circles at the top of the card using Ranger's Perfect Medium Pen. It puts down a clear, sticky ink similar to VersaMark that you can use to so some embossing with. Then I sprinkled some white embossing powder over the circles and heat embossed them. Next I took my mists and misted the top of the cardstock. I wanted a heavier concentration of the color at the top and have it gradually lighten towards the bottom. The colors I used were Wedding Pink and Patina. Since I embossed first, it created a resist. I just wiped off the mist on top of the embossed circles. Next, I cut a paper doily in half and adhered it to the side. For the sentiment I stamped the word "thanks" on a piece of vellum and wrapped it around the cardstock and adhered it in the back. I cut two butterflies with my Sizzix and placed them next to my "thanks" sentiment. Lastly, I took some coordinating sequins and added them around the butterfly and doily. 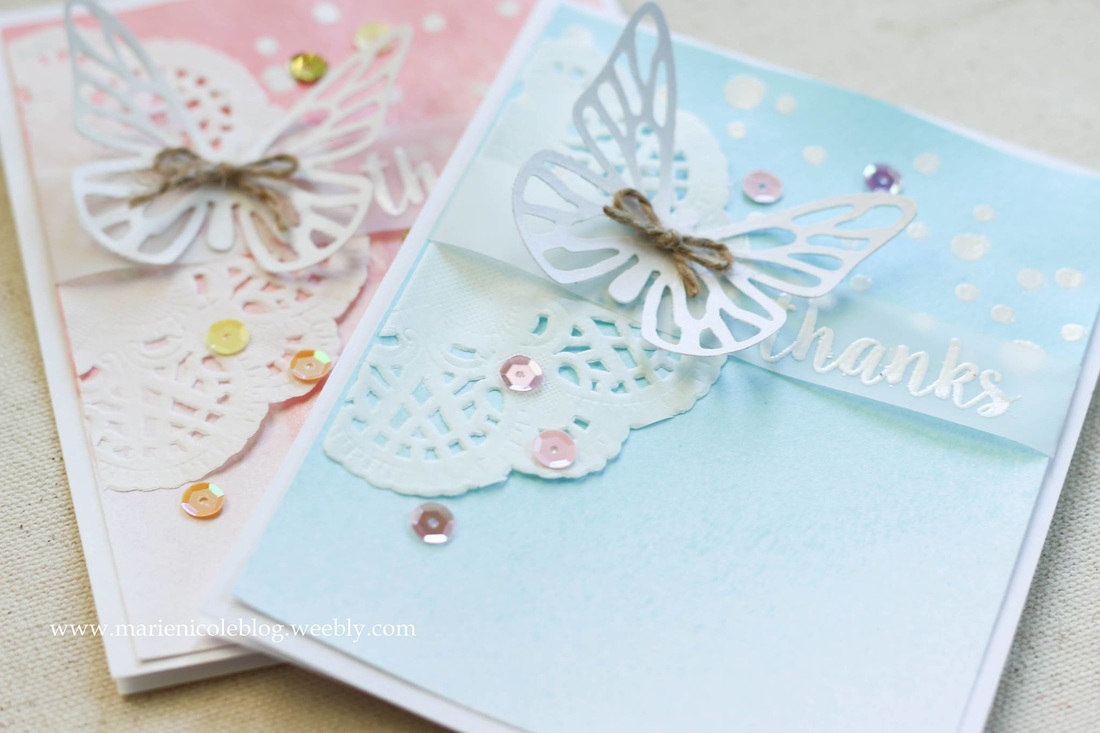
Hope you enjoy today's cards!
Happy Crafting! Here's a few of the products I used:
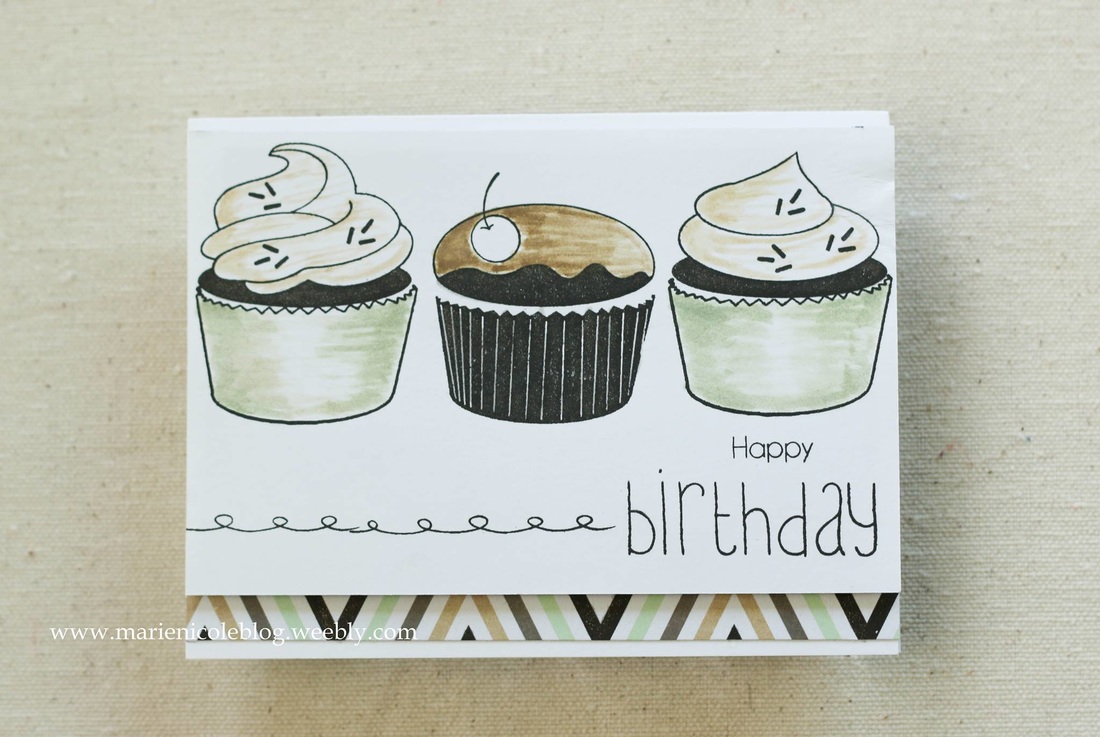
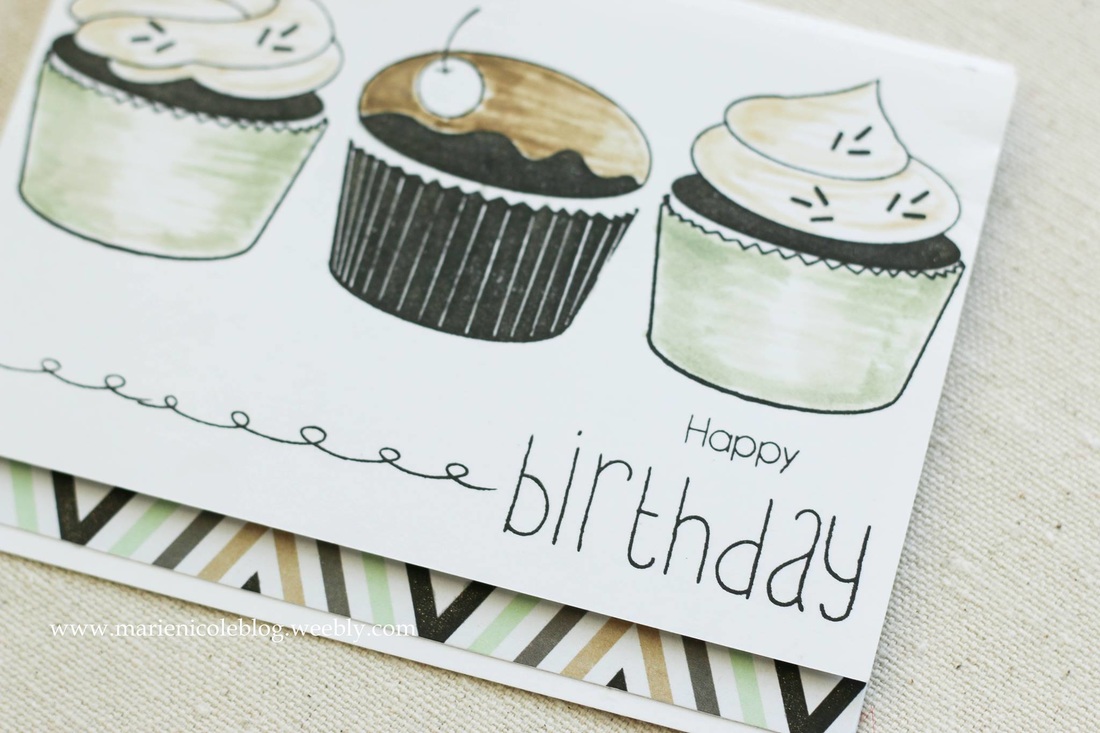
This is a quick easy card I created a while ago. I just used Avery Elle's Cupcake stamp set and stamped three cupcakes using Versafine Black Onyx Ink.
I colored them in with Distress Inks. I picked the colors to coordinate with the strip of patterned paper along the bottom. I used Gathered Twigs, Peeled Paint, and Antique Linen. I used a different stamp set to stamp out the "happy birthday" along the bottom. The cardstock layer that the cupcakes are stamped on is popped up on some craft foam. Lastly, I added some Wink of Stella to the cupcakes for some extra shimmer. 
Thanks for stopping by and Happy Crafting!
Im linking this project up with: Simon Says Stamp's Wednesday Challenge Check out a few products I used!
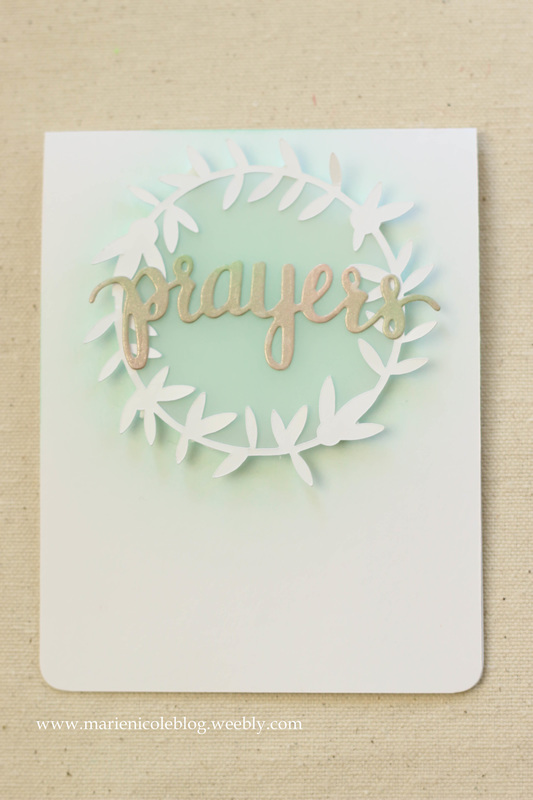
Hello! I have a simple card to share with you today. I have this "Prayers" stamp set from Simon Says Stamp, and I have been absolutely loving it. It is perfect for sympathy and encouragement type cards.
With sympathy cards I feel like you want them simple, classy, and definitely not depressing. I feel this card fits the bill. I started by taking some Cracked Pistachio Distress Ink and lightly applying it to my white cardstock base. I only wanted the color in one spot near the top. Then, I took this beautiful vine frame die cut that I cut using my Cricut and I cut a piece of vellum to fit. I glued the vellum to the back of the frame using Aleene's Tack It glue. For the "Prayers" die, I first took a strip of white cardstock and sprayed it with Tattered Angels' glimmer mists, The colors I used were Mint Julip, Wedding Pink, and I also added a few splatters of their Chalkboard paint in Chalk White. When that was dry, I die cut the word "prayers" and adhered it over the vellum using Aleene's again. Then I took the whole vellum piece and put some tiny foam adhesive pieces on the back to adhere it to the base. That completed the card! It was so simple so I ended up making two. I may even make a few more to complete a set of them. 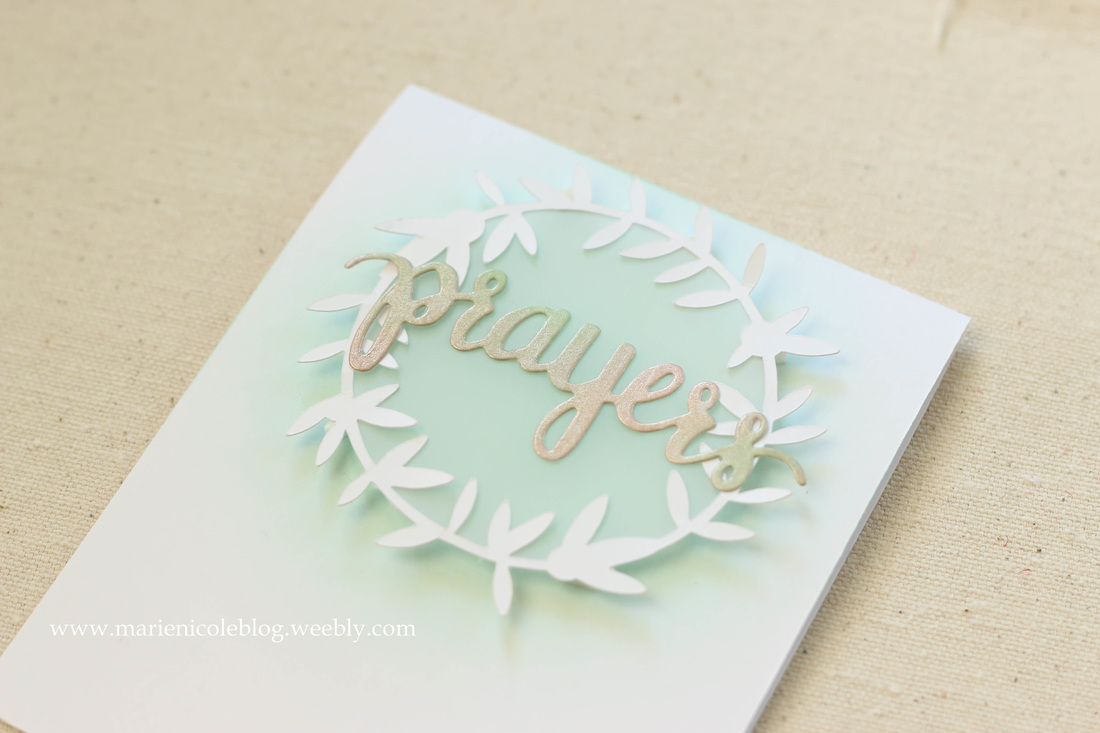
Thank you so much for taking the time to stop by!
If you are interested in the products I used, I have put together some links to them below!
I'm also linking this up with Simon Says Stamp's Monday challenge!
The challenge is to Leap Into the Unknown, and since this is my first time working with vellum, I'd say it fits! 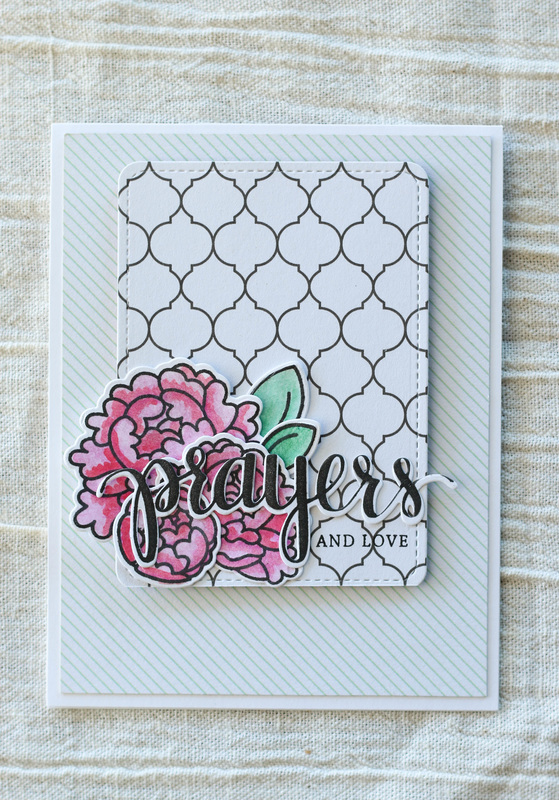
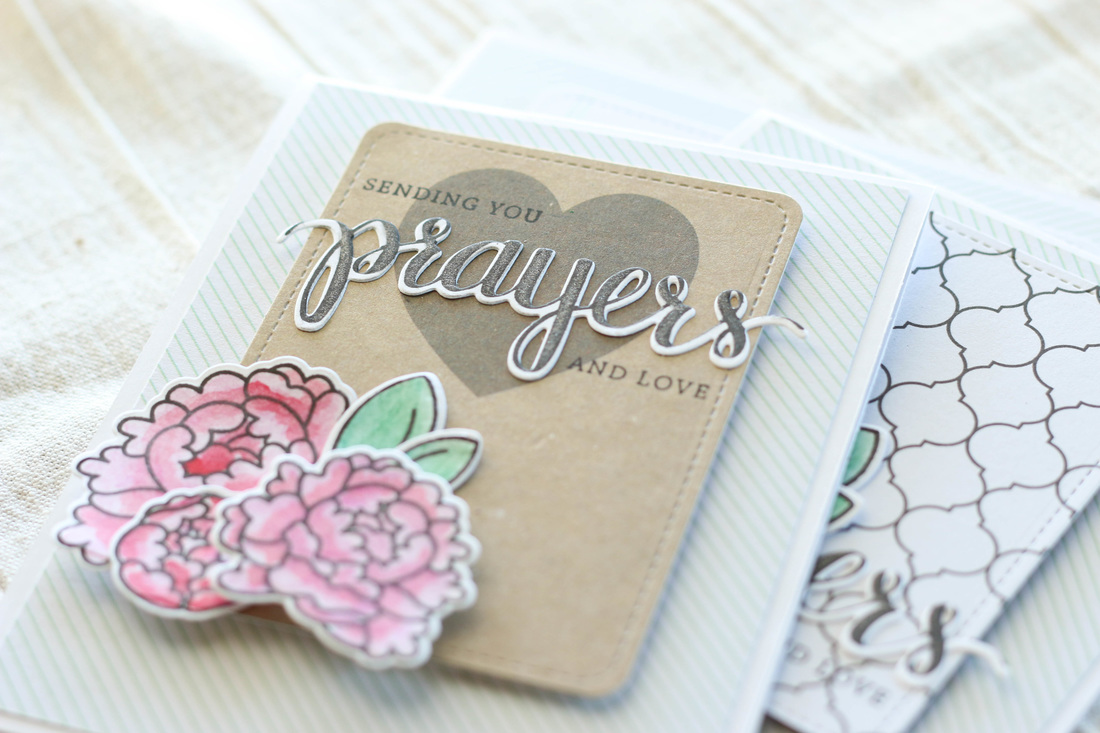
I've been busy working on some cards to send out to the Lasting Hearts Card Drive. I just got them in the mail this morning, and this is the last set that I managed to put together.

I started with stamping out all the peonies and leaves. These flowers are from Avery Elle's stamp set, Peonies. Its an absolutely gorgeous set. After they were all stamped out, I colored them with my watercolor pencils, and then blended the colors using my waterbrush. I then used the coordinating dies and ran them through my Sizzix to die cut all the little pieces.
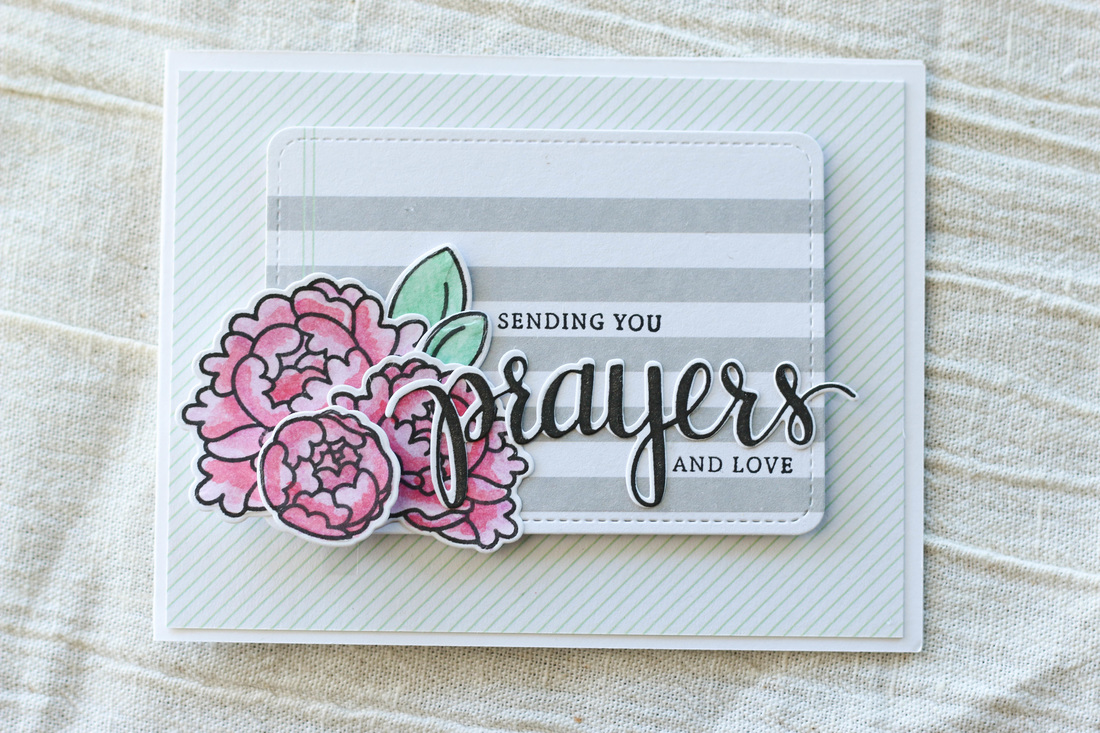
My next step was to stamp and die cut the word "Prayers" with my Prayers stamp set from Simon Says Stamp. After they were cut, I added some Wink of Stella to give it a little shimmer.
Then, I cut out three note cards using my Lawn Fawn Stitched Journaling Card die set. I adhered the cards down on some green striped background paper using some craft foam to help give some dimension. Then I glued on the peonies, leaves, and "Prayers" dies. Lastly, I used some of the mix and match sentiments from the "Prayers" stamp set to add a few more words around the die. 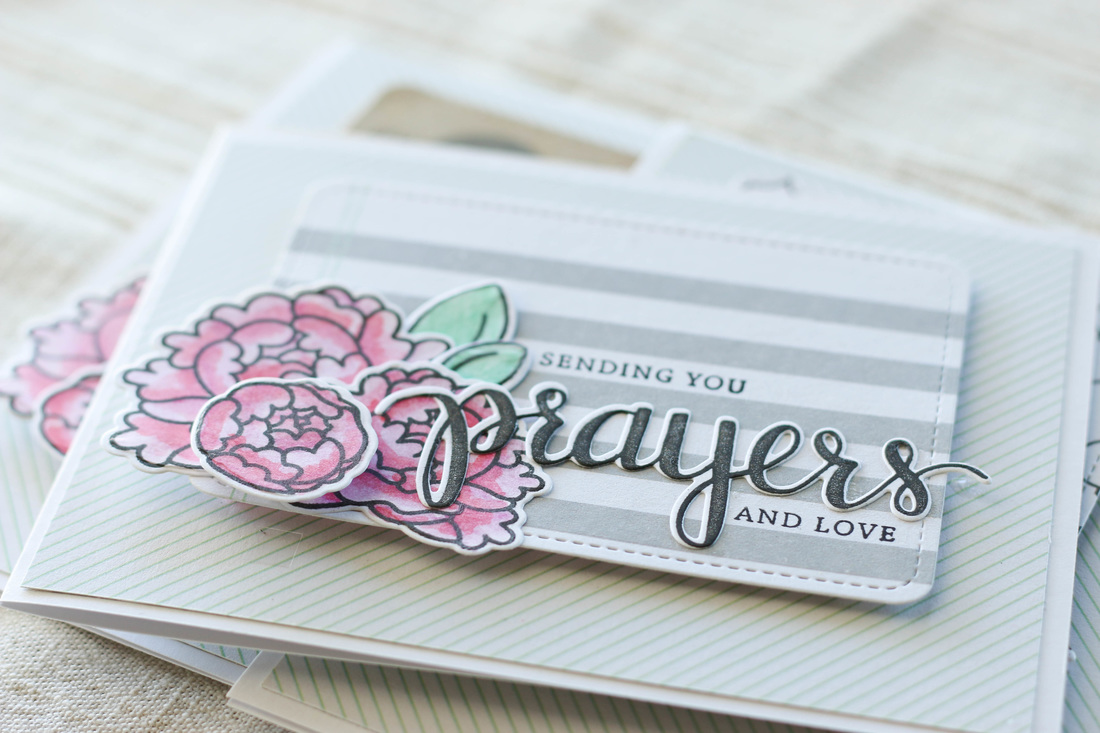
I find sometimes that keeping my cards simple really brings the focus to the sentiment, which is what I was going for here. These cards are going to such a sweet cause and I really want them to be an encouragement to the recipients.
Check out some fun products I used!
I am also linking this project up to:
Simon Says Stamp's Wednesday Challenge! Simon Says Stamps Monday Challenge! 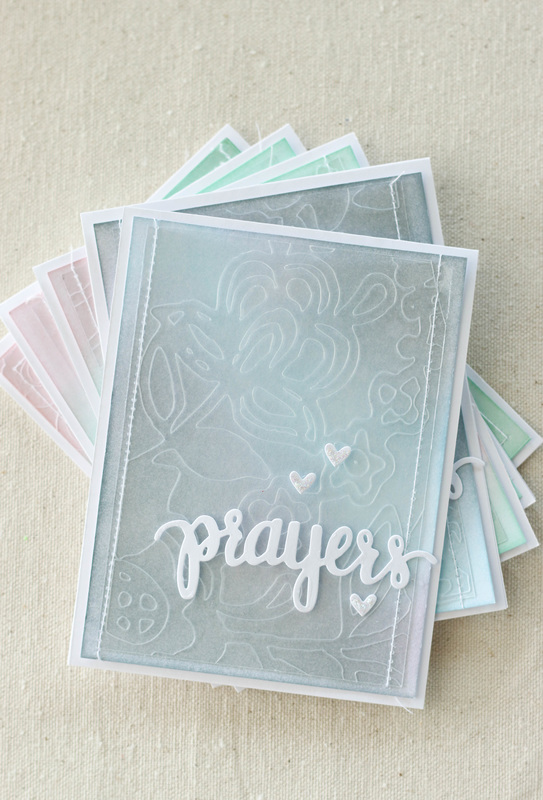
I haven't worked with acetate a whole lot, but I picked up a pack of it on sale a while ago. I decided I wanted to try to run it through my Cricut with a beautiful floral design and see if I could create my own stencil.
It would have worked, but I didn't know until later after I researched it a little that I need a deep cut blade to cut all the way through my acetate. So I was left with a sheet of acetate that was partially cut. The design on it was beautiful, but it definitely would not work for a stencil. I decided instead to try to make a set of cards out of it. The etched effect that the acetate had looked amazing over a Distress Inked background. 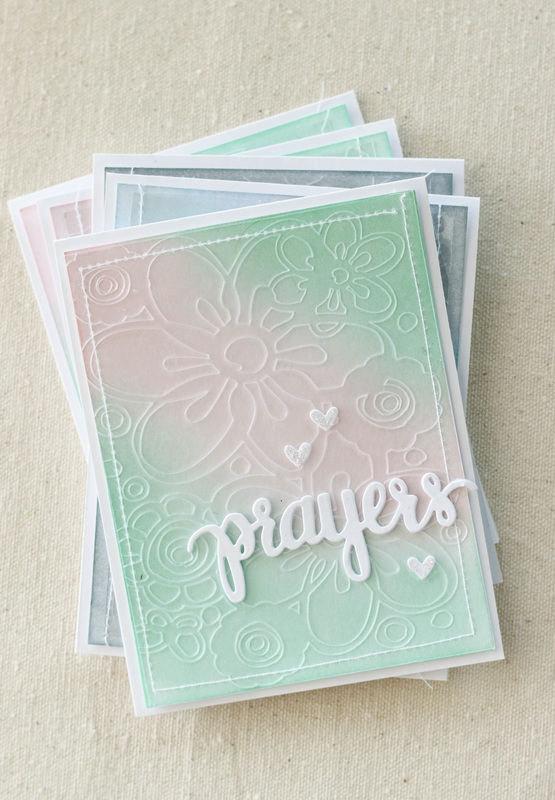
For the first card you see above, I used a combination of Story Sky, Tumbled Glass, and Milled Lavender. For the second, I used Cracked Pistachio (a new favorite, this color is GORGEOUS!) and Spun Sugar. After I had the background colors applied, I took some Tattered Angels' Glimmer Mist in Pearl and just spritzed on some shimmer.
To attach the acetate, I ran it through my sewing machine. I didn't want any adhesive showing through, and I love the look of stitching on cards. For the sentiment, I used Simon Says Stamp's "Prayers" stamp set and die cut the word prayers. I also die cut a few tiny hearts as well. 
I usually leave the inside of my cards blank, but I wanted to add a special something to these cards. I used some of the mix and match sentiments from the Prayers stamp set to create the inside message.
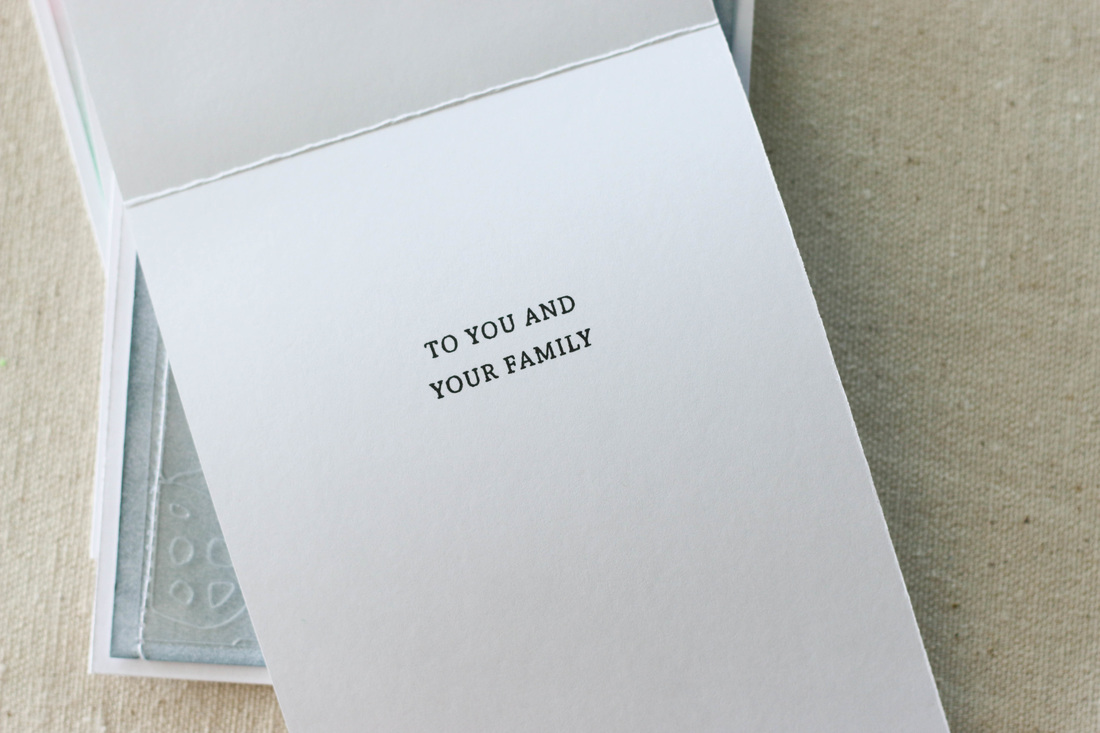
These cards I will be sending out to theLasting Hearts Card Drive. It's an amazingly sweet organization that is seeking to offer healing support to families that have suffered miscarriage and infant loss. I encourage you to follow the link and learn more about it!
Check out some fun products I used!
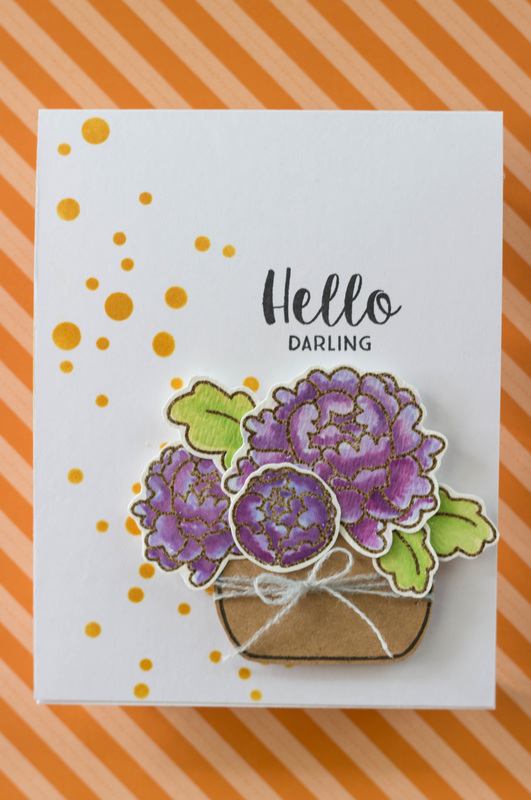 I am currently loving on this stamp set by Avery Elle. The peonies are so much fun to watercolor! I started by stamping and embossing the peonies onto watercolor paper, and then used Distress Ink to color them in. I then cut the vase from kraft cardstock. I did have a patterned paper for the vase, but decided it looked a bit too busy, and I really wanted the flowers to stand out. I then used Heidi Swapp's Confetti stencil to add some orange dots to the background. Stamped the sentiment in black, adhered the flowers with foam adhesive, and called it a day! I love when I can make pretty cards quickly, since my little guy doesn't take long naps these days! 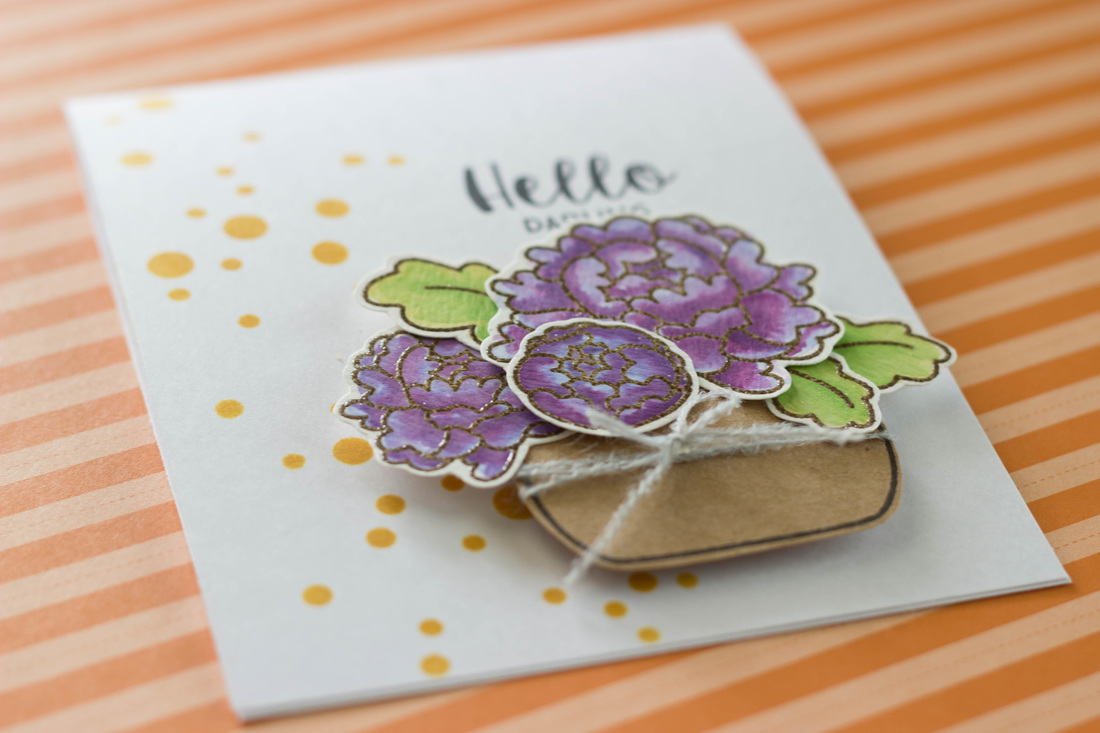 |

Pin it!

AuthorSo glad you found me! This blog is my little space where I can share bits about my life and my latest crafting projects (mostly handmade cards). My goal is to share, inspire, and to be a positive presence in the creative community. 

Find me on Instagram!Archives
January 2018
Categories
All
Link Love
 

|


 RSS Feed
